


Typhoeus is a Nature Striker whose damage looks straightforward on a build sheet but becomes much more demanding once you actually use her. Most of her important damage comes from repeated Nature Bursts during Hovering, while her ability to keep doing that depends on two resources of her own—Signs and Hunting Arrows—and one resource the rest of the team needs to help provide: Nature Infliction.



This is why Typhoeus can feel dramatically different depending on the team and the encounter. Her numbers are strong when everything lines up, but mobile enemies, interrupted Hovering strings, or Nature Infliction disappearing at the wrong time can leave her with an awkward gap before the next set of Hunting Arrows is ready. Building her correctly is only half of the job; understanding what keeps that resource loop moving matters just as much.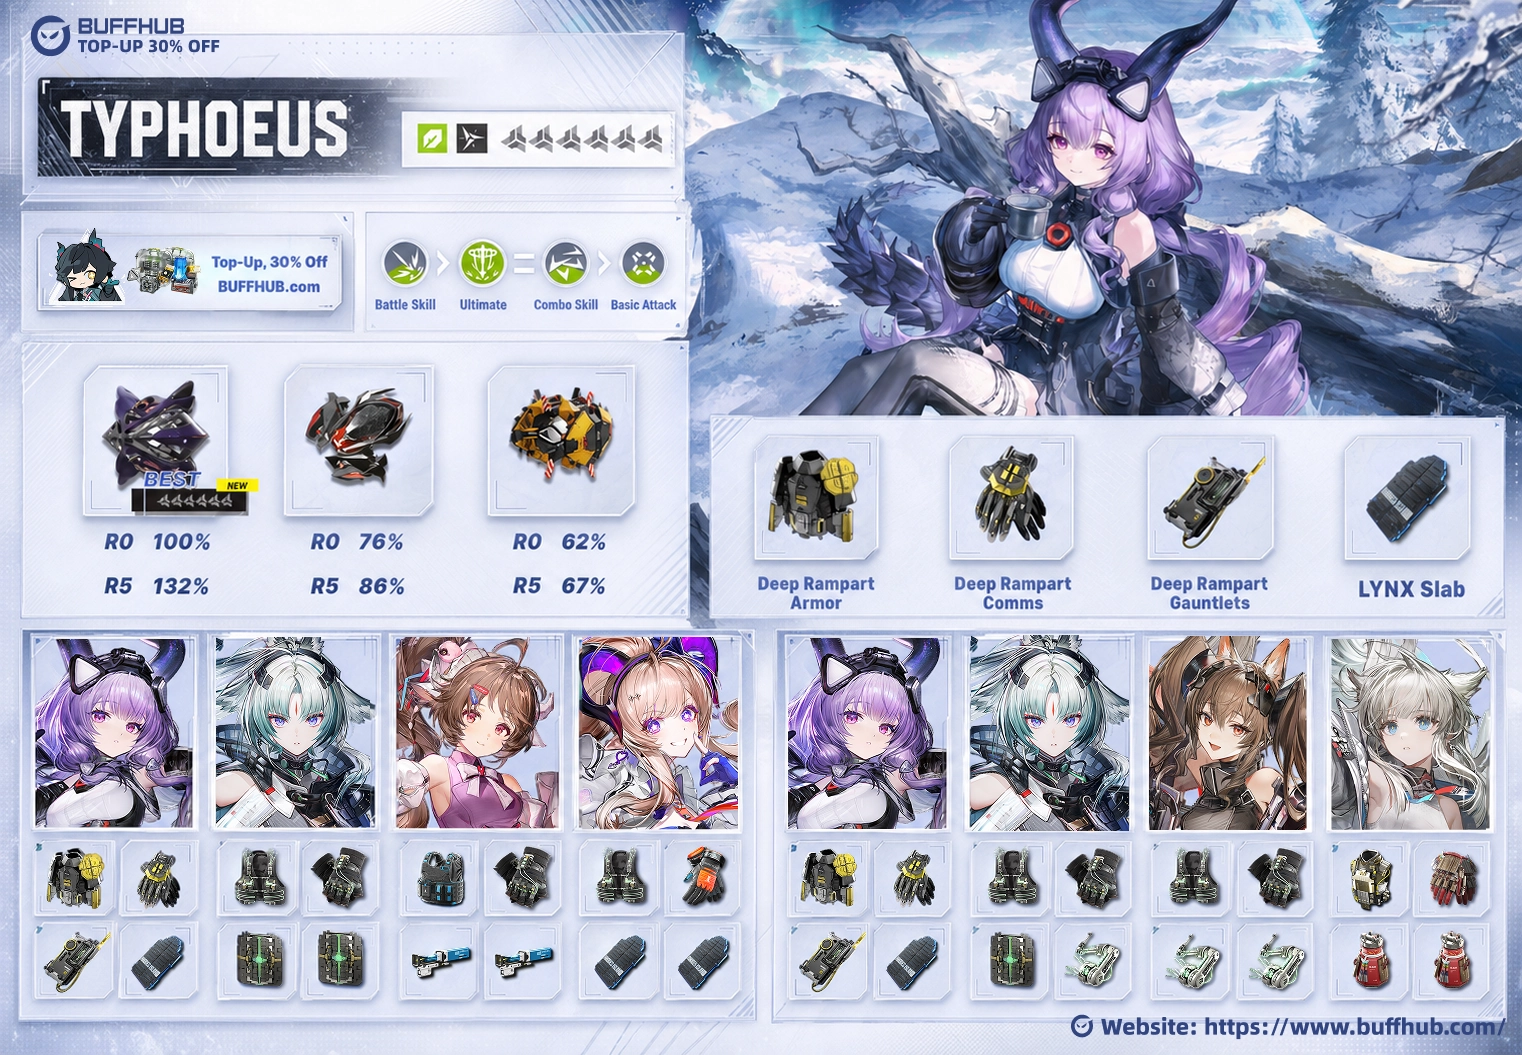








Typhoeus Is Built Around Nature Burst
Piercing Arrows of the Woods puts Typhoeus into Hovering and gives her five Aerial Basic Attacks. When one of those attacks hits an enemy with Nature Infliction, Typhoeus consumes one stack, gains a Sign, and restores additional Ultimate Energy.
If Typhoeus has a Hunting Arrow, the aerial attack consumes one and becomes a Power Shot. Power Shot forcibly applies Nature Burst, and if it consumes Nature Infliction at the same time, the resulting Nature Burst deals additional damage. When Typhoeus is the controlled operator, the fifth aerial attack also counts as a Power Shot without consuming a Hunting Arrow.
This is the important part of her damage structure. The raw Aerial Basic Attack itself is not what makes the kit work. Typhoeus wants the attack to carry a Hunting Arrow, consume Nature Infliction when possible, and trigger Nature Burst.
Nature Burst then feeds back into her own resource system through Prey Checklist. Whenever Nature Burst is triggered on an enemy, Typhoeus gains another Sign. Once her Signs are full, Rampant Thorns converts them into Hunting Arrows at a rate of two Signs per Arrow and resets her available aerial attacks.
The loop is easier to understand as:
Nature Infliction → Signs → Hunting Arrows → Power Shots → Nature Burst → more Signs
This also explains why simply stacking damage buffs around Typhoeus is not enough. If the team cannot keep Nature Infliction available when she needs it, the next cycle becomes slower no matter how good the buffs are.
Hovering Is Strong, but It Is Not a Free Damage Window
Hovering gives Typhoeus access to the part of her kit that matters most, but it also creates some practical problems that are easy to miss if you only read the skill description.
She does not move through the air like a fully mobile ranged character. Much of her positioning comes from the movement attached to her shots, and there are attacks from large enemies that can still hit her while she is airborne. Her defensive talent helps her survive the first hit and makes her harder to interrupt, but the barrier is not something you can rely on to absorb an entire enemy combo.
Target movement can be an even bigger issue. Missing a normal attack is annoying; missing a Power Shot means losing one of the Nature Burst triggers that the rest of the rotation was built around. The fifth shot is particularly important because it becomes a Power Shot without consuming a Hunting Arrow, so losing that attack to enemy movement hurts more than the animation makes it look.
This is one reason Typhoeus should not be played from a memorized sequence alone. A clean theoretical rotation assumes the target stays alive, stays in range, and keeps the required Infliction long enough for Typhoeus to consume it. Real fights do not always cooperate.
Suffering's End
Suffering's End is the primary weapon for this Typhoeus build.
At Rank 1, it has 490 Base ATK and provides Agility +20, Nature DMG Dealt +5.56%, and Arts Intensity +15. Whenever the wielder applies an Arts Burst, Nature DMG Dealt increases by another 2% for 25 seconds. The effect can stack four times, with each stack tracking its own duration.
Reaching four stacks adds another 6% Nature DMG Dealt, bringing the Rank 1 Nature DMG bonuses to a total of 19.56% when fully active.
More important than the number itself is how easy the passive is for Typhoeus to use. Her Power Shots already apply Nature Burst, so Suffering's End builds its stacks during the same sequence that produces the damage you are trying to improve. There is no separate setup skill that needs to be inserted purely to activate the weapon.
Higher weapon ranks increase the same Agility, Nature DMG, and Arts Intensity package. They make the weapon stronger, but Typhoeus does not need additional ranks for her basic resource loop to function.
Umbra of Frigid Eventide
Umbra of Frigid Eventide is the main alternative if you are not using Suffering's End. It is important not to label it as a free-to-play option; it is another 6-star Arts Unit.
At Rank 1, Umbra has 505 Base ATK and gives Agility +20, ATK +5%, and Arts DMG Dealt +16%. After the wielder casts a Battle Skill, it grants Arts Intensity +35 and four Windform stacks for 15 seconds. Applying an Arts Burst consumes one Windform stack and grants another 4% Arts DMG Dealt for 30 seconds, stacking up to four times.
The activation pattern still fits Typhoeus well. Piercing Arrows of the Woods activates the Battle Skill portion, while the Power Shots that follow can consume Windform through their Nature Burst triggers.
What is not useful is attaching an artificial percentage gap between the two weapons without a controlled damage test. Their actual difference changes with weapon rank, gear, team buffs, and how cleanly Typhoeus completes her Hovering strings. For this build, Suffering's End remains the primary recommendation and Umbra of Frigid Eventide is the alternative.
Deep Rampart and LYNX Slab
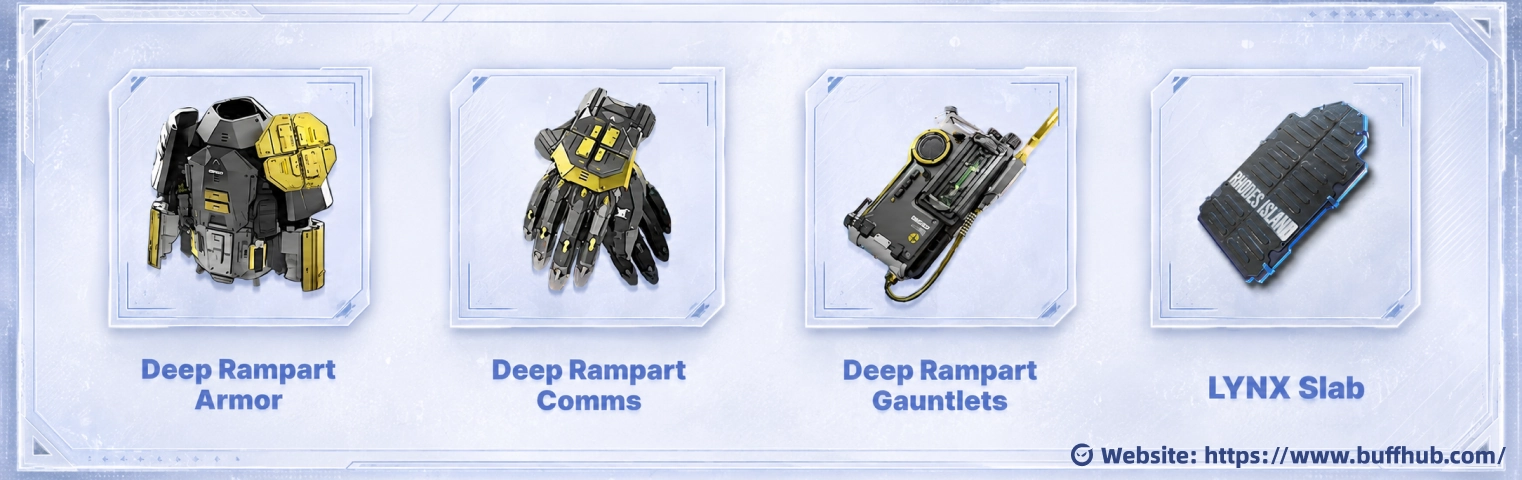
The recommended gear setup uses three Deep Rampart pieces with LYNX Slab:
- Deep Rampart Armor
- Deep Rampart Comms
- Deep Rampart Gauntlets
- LYNX Slab
Deep Rampart gives 16% Arts DMG Dealt from its three-piece effect. Whenever the wearer applies Nature Burst or Cryo Burst, it also grants Arts Intensity +16 for 20 seconds, stacking up to three times.
At three stacks, that is another 48 Arts Intensity.
There is very little friction between this set and Typhoeus. Power Shots already force Nature Burst, which means the Deep Rampart stacks come online while she is spending Hunting Arrows rather than requiring a separate activation sequence.
The three pieces are also useful before the set effect is considered. At maximum Artifice, Deep Rampart Armor, Comms, and Gauntlets together provide 238 Agility and 125.6 Arts Intensity. Typhoeus uses Agility as her Main Attribute, so the base stat profile is already pointed toward her damage.
LYNX Slab fills the remaining slot. This is a 3+1 setup rather than an attempt to activate two different three-piece bonuses. The LYNX set effect is not active here; the reason to use the piece is its own stat line, including the Main Attribute bonus.
It is possible to trade the fourth slot for more Ultimate recharge if a specific setup needs it, but that should be a deliberate choice rather than the default. Typhoeus's real rotations are inconsistent enough that chasing one exact Energy breakpoint can cost offensive stats without guaranteeing that every fight follows the same timing.
Typhoeus Teams Need to Solve Nature Infliction First
Typhoeus teams look more complicated when every character is judged individually. They become much simpler when you look at what the team is actually doing between her Hovering strings.
When Typhoeus has Hunting Arrows available, she wants to be in the air spending them. When those resources are gone, the rest of the team needs to rebuild the conditions that generate Signs and Nature Burst for the next cycle.
That makes Nature Infliction one of the most important things to solve before chasing another generic damage buff.
Typhoeus + Arcane (WILL) + Liino + Ardelia
This is the first lineup to consider:
Typhoeus / Arcane (WILL) / Liino / Ardelia
Arcane connects directly to Typhoeus's resource loop. Jadecrushing Grid applies Nature Infliction, giving Typhoeus something she can consume during Piercing Arrows of the Woods for Signs and additional Ultimate Energy.
For this team, Arcane should use her WILL setup rather than being built around maximizing her own INT damage.
When Arcane's normalized Will is higher than her Intellect, Array Arcana: WILL becomes active. Yinglung Stance IV can then apply Nature Susceptibility and Cryo Susceptibility, while additional Will further increases those effects.
That is the real reason for using WILL Arcane with Typhoeus. Arcane is not here to compete for damage; she is here to prepare Nature Infliction and make the target more vulnerable before Typhoeus spends Hunting Arrows.
Liino handles a different part of the rotation. Her kit provides ATK Boost, Nature Amp, and continuous HP Treatment. She can also refund SP to Nature or Electric operators through her talent after her Combo interaction.
That SP recovery is useful because Piercing Arrows of the Woods is not just another damaging skill. It is one of the places where Typhoeus restarts the part of her resource cycle that matters most.
Liino also fits the way Typhoeus actually deals damage. Typhoeus may look like a single-window burst carry when you focus on the Nature Burst multipliers, but in practice her damage tends to be spread across a series of shorter Hovering cycles. A support that remains useful across those repeated windows is easier to use than one that only looks ideal in a perfectly scripted opener.
Ardelia adds healing and another way to increase Arts damage taken, but her Arts Susceptibility has a condition. Dolly Rush needs the enemy to have Corrosion first; Ardelia then consumes that Corrosion and applies Physical Susceptibility and Arts Susceptibility.
That condition should not be ignored when planning the rotation. Ardelia does not simply give Typhoeus permanent Arts Susceptibility for existing in the team.
The lineup works because each slot solves a different part of the problem: Arcane handles Nature Infliction and Nature Susceptibility, Liino provides Nature Amp, ATK, healing, and SP support, while Ardelia adds more sustain and conditional Arts Susceptibility.
Typhoeus + Arcane (WILL) + Gilberta + Perlica
The second recommended lineup is:
Typhoeus / Arcane (WILL) / Gilberta / Perlica
Arcane's role stays the same. She remains the Nature-oriented setup character and should still use the WILL configuration.
Perlica adds Electric Infliction through Protocol ω: Strike, while her Combo Skill can forcibly apply temporary Electrification. This matters because Arcane's Yinglung Stance IV is triggered when an Arts Infliction is applied.
Perlica therefore gives the team another way to create the state Arcane wants to react to. She is not replacing a Nature applicator by turning Electric damage into Nature damage; she is helping the team's Infliction and Combo flow work more consistently.
Gilberta and Perlica should be viewed as a functional pair rather than two individually strong characters placed next to Typhoeus. The point of the lineup is to keep the team's Arts Infliction and Combo triggers moving while Arcane continues to provide the Nature-specific setup Typhoeus needs.
Do Not Memorize One Perfect Typhoeus Rotation
Typhoeus is much easier to understand as a collection of small rules than as one long button sequence.
A fixed rotation assumes the enemy stays in range, the correct targets remain alive, Nature Infliction is still available when Typhoeus enters Hovering, and nothing interrupts the aerial sequence. Any one of those assumptions can fail.
Before Hovering
When possible, put Nature Infliction on the target first.
Piercing Arrows of the Woods gains more value when Typhoeus has something to consume for Signs and additional Ultimate Energy. This does not mean casting the skill without Nature Infliction is always wrong. It means a prepared target gives her a cleaner start to the next resource cycle.
While Typhoeus Is in the Air
Watch Hunting Arrows and target movement rather than treating every aerial shot as equal.
The important shots are the ones that become Power Shots and trigger Nature Burst. Against mobile enemies, losing one of those attacks can change the resource state you expected to have when Typhoeus lands.
Do not hold the sequence for too long waiting for a perfect target either. Hovering is not designed for indefinite stalling, and trying to over-optimize a single shot can cost the rest of the string.
When Signs Are Full
Rampant Thorns is part of the resource loop, not just another damage skill.
It converts Signs into Hunting Arrows and resets Typhoeus's aerial attack attempts. The Barrage Array also increases Nature Burst DMG Taken, which gives the Hunting Arrows created by the skill a natural window to be spent.
Once the team is producing enough Nature Infliction consistently, Sign generation may stop being the main limitation. At that point, the cooldown of Rampant Thorns itself can become one of the things holding back the next cycle.
This is why the quality of a Typhoeus rotation is less about repeating the same opener and more about checking what resource is actually missing before the next Hovering sequence begins.
Typhoeus Skill Priority
Typhoeus has a more defensible skill priority than many characters because her damage is not distributed evenly across all four skills.
Piercing Arrows of the Woods > Rampant Thorns > Call of Ice Mountain / Basic Attack
Piercing Arrows of the Woods
The Battle Skill should be the first priority.
This is where Typhoeus enters Hovering, consumes Nature Infliction, generates Signs, spends Hunting Arrows, and triggers the Power Shots that produce Nature Burst. Improving the skill directly strengthens the part of her kit responsible for the bulk of her practical damage.
Rampant Thorns
Rampant Thorns comes next because it affects both damage and circulation.
It converts Signs back into Hunting Arrows, and the Barrage Array increases Nature Burst DMG Taken. Its cooldown also matters more once the team becomes good enough at generating Signs that Typhoeus can reach full resources before the Combo Skill is ready again.
If upgrade resources are limited, this is still a skill worth investing in rather than leaving it far behind the Battle Skill.
Call of Ice Mountain and Basic Attack
The Ultimate is useful, but much of its practical value comes from what it gives Typhoeus after activation rather than the direct hit alone. Call of Ice Mountain puts her back into Hovering, resets the aerial sequence, and immediately gives her Hunting Arrows.
Basic Attack and Ultimate upgrades improve their direct multipliers, but those increases are less closely tied to the repeated Nature Burst engine than the Battle Skill and Combo Skill upgrades.
They should therefore come after the two skills that control Typhoeus's core resource cycle.
Typhoeus Potentials
Typhoeus works at P0. Her Potentials mostly strengthen the same Hovering and Nature Burst loop instead of unlocking a completely different playstyle.
Potential 1: Samifjod Fletching
Potential 1 gives Typhoeus 18% ATK while Hovering and increases her Aerial Basic Attack damage to 1.2 times the original. It also shortens the reactivation time of the Protective Barrier from Huntress's Focus.
This is a straightforward early damage upgrade and one of the more noticeable Potentials if you are already planning to go beyond P0.
Potential 2: Huntress's Stride
Potential 2 adds Agility +20 and Arts Intensity +16.
There is nothing complicated about this node. It adds useful offensive stats without changing how the rotation works.
Potential 3: Thorny Trap
Potential 3 is more interesting from a gameplay perspective. Rampant Thorns receives a two-second cooldown reduction, and enemies inside the Barrage Array take an additional 6% Nature Burst damage.
The damage increase is useful, but the cooldown reduction becomes increasingly relevant in teams that already generate Signs quickly. If Typhoeus is reaching maximum Signs before Rampant Thorns is available again, reducing that cooldown makes the resource loop smoother rather than simply adding another number to her damage sheet.
Potential 4: No Escape
Potential 4 reduces the Ultimate Energy cost of Call of Ice Mountain by 15%.
This makes the Ultimate easier to cycle, although it still does not change the basic way Typhoeus builds and spends Hunting Arrows.
Potential 5: Fatal Shot
Potential 5 gives Call of Ice Mountain one additional Hunting Arrow, increases the Ultimate's damage, and improves the Nature Burst multiplier of Power Shot.
This is another meaningful offensive endpoint for players investing heavily into Typhoeus because it directly improves the resource she spends on her most important aerial attacks.
Typhoeus Promotion Materials
| Promotion | Materials |
|---|---|
| Elite 1 | Protodisk ×8, Pink Bolete ×3, T-Creds ×1,600 |
| Elite 2 | Protodisk ×25, Red Bolete ×5, T-Creds ×6,500 |
| Elite 3 | Protoset ×24, Ruby Bolete ×5, T-Creds ×18,000 |
| Elite 4 | Protoset ×36, Tachyon Screening Lattice ×20, Talos Cap ×8, T-Creds ×100,000 |
Total Promotion Materials
| Material | Total |
|---|---|
| Protodisk | 33 |
| Protoset | 60 |
| Pink Bolete | 3 |
| Red Bolete | 5 |
| Ruby Bolete | 5 |
| Tachyon Screening Lattice | 20 |
| Talos Cap | 8 |
| T-Creds | 126,100 |
These totals cover promotion only. Skill and Talent upgrades use additional materials and should be planned separately if you intend to fully invest in Typhoeus.
What Typhoeus Feels Like at Full Build
Typhoeus is not the kind of carry where finishing the correct gear set solves most of the character for you.
The build itself is fairly clear. Suffering's End supports the same Nature Burst pattern she already wants to play. Deep Rampart gives useful Agility and Arts Intensity while rewarding repeated Nature Burst triggers. WILL Arcane solves both Nature Infliction and Nature Susceptibility, and the remaining team slots can provide Amp, SP, healing, Arts Susceptibility, or additional Infliction triggers.
The harder part is deciding what to do when one part of that plan fails.
If the target loses Nature Infliction before the next shot, the sequence changes. If Typhoeus is already sitting at maximum Signs, more Infliction may not be the thing she needs at that moment. If Rampant Thorns is still on cooldown, generating Signs even faster does not immediately solve the problem. If the boss moves during the Power Shot you were relying on, the resources you have after landing may be different from the theoretical rotation.
That is why Typhoeus rewards players who actually watch the fight instead of only watching the cooldown bar.
Her ceiling comes from Nature Burst, but her consistency comes from resource management. Once you start treating Nature Infliction, Signs, Hunting Arrows, and Combo cooldown as separate things that can each become the current bottleneck, the character becomes much easier to understand—and much harder to reduce to a single fixed rotation.