


Chisa is a 5-star Havoc Broadblade Resonator who first debuted in Wuthering Waves Version 2.8. She brings more than healing to a team: Havoc Bane application, enemy DEF reduction, increased Negative Status stack limits, and a Chainsaw Mode that lets her contribute Resonance Liberation DMG while keeping teammates protected.



Her biggest advantage is how much she can do for a damage dealer without demanding the main DPS slot. With the right teammates, Chisa can help build Negative Status stacks, improve damage against marked enemies, and provide both healing and shields. The key is knowing when to use her for personal damage and when to prioritize team buffs instead. Her signature weapon, Kumokiri, and the Thread of Severed Fate Echo set support her offensive side, while characters such as Yangyang: Xuanling, Suisui, Aemeath, and Denia give her abilities a clear purpose in combat.








Chisa Build Overview
Chisa works best as a support and sub-DPS in teams built around Negative Status effects. Although her Chainsaw Mode can deal substantial damage, her main contribution is enabling stronger damage windows for the rest of the team. She is particularly useful when the main damage dealer can apply or consume Negative Status stacks and take advantage of her Outro Skill.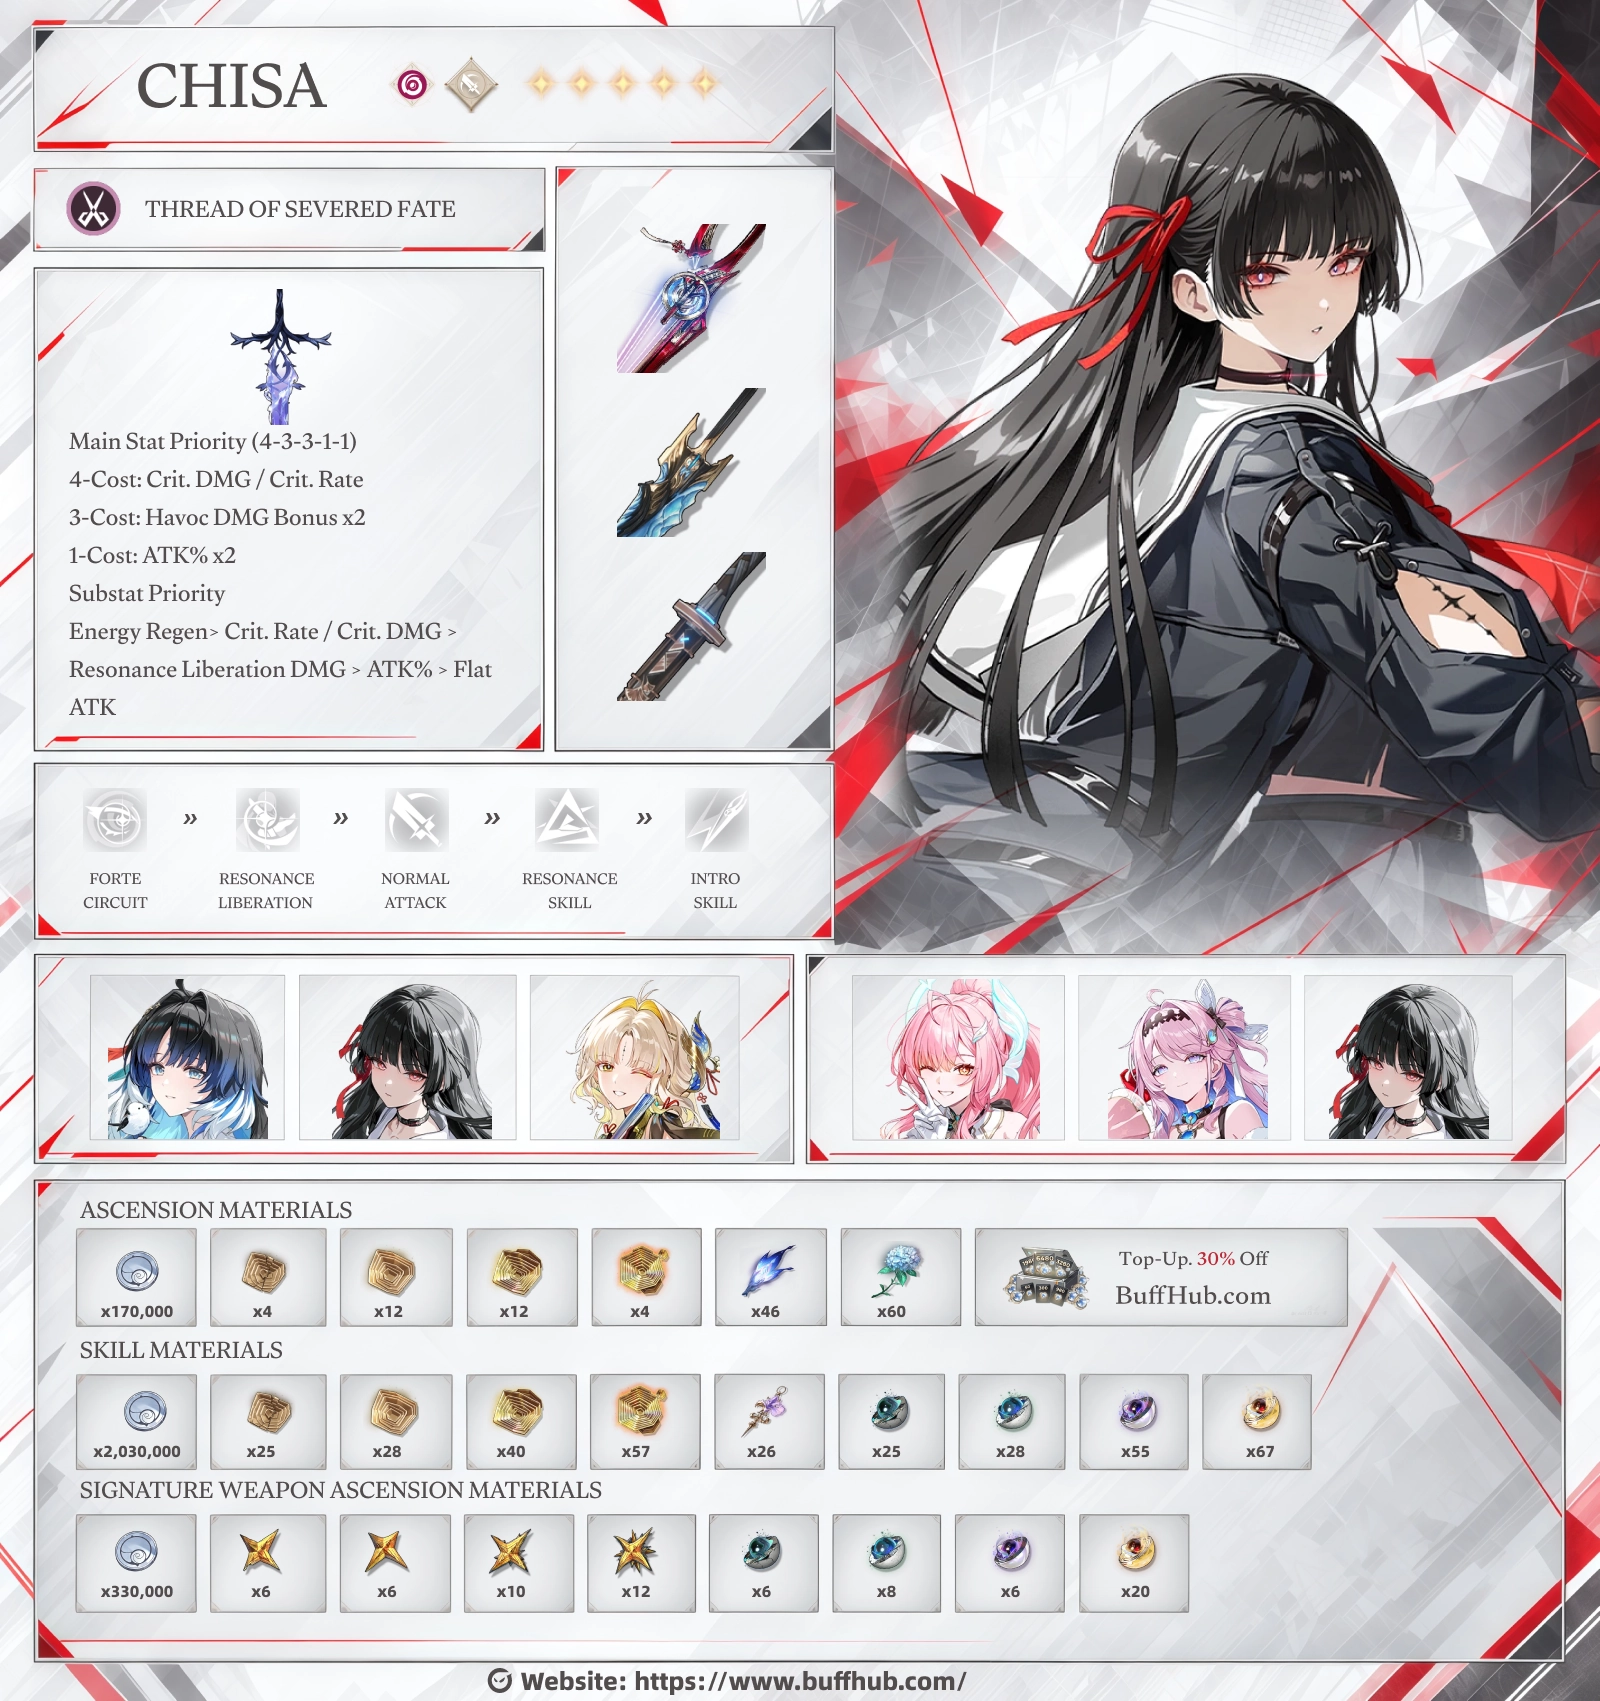
- Rarity: 5-Star
- Element: Havoc
- Weapon Type: Broadblade
- Combat Role: Support, Healer, and Sub-DPS
- Best Weapon: Kumokiri
- Recommended Damage Echo Set: 3-Pc Thread of Severed Fate + 2-Pc Havoc Eclipse
- Main Echo: Reminiscence: Threnodian - Leviathan
- Main Damage Type: Resonance Liberation DMG
- Key Mechanic: Havoc Bane and Negative Status support
Chisa's effectiveness depends heavily on her teammates. A character who can reliably inflict Negative Statuses can activate more of her support effects, while a conventional DPS without those mechanics receives fewer benefits. Before investing heavily in her weapon or Resonance Chains, decide which team will use her. That choice matters more than simply maximizing her own damage.
Best Weapons for Chisa
Kumokiri is Chisa's preferred weapon because it improves both her personal damage and the offensive potential of teammates who apply Negative Statuses. Lustrous Razor is a practical alternative if you already own the standard 5-star Broadblade, while Autumntrace offers a Crit. Rate option at lower rarity. Their passives are not equally suited to Chisa's combat loop, so the weapon's actual effects matter more than rarity alone.
| Weapon | Level 90 Stats | Effects and Build Value |
|---|---|---|
| 1. Kumokiri (5-Star) | 500 ATK 36% Crit. Rate |
Increases ATK by 12%. Intro Skills or inflicting Negative Statuses grant 8% Resonance Liberation DMG Bonus, up to 3 stacks. At maximum stacks, teammates who inflict Negative Statuses receive 24% All-Attribute DMG Bonus for 15s. |
| 2. Lustrous Razor (5-Star) | 588 ATK 36.5% ATK |
Provides 12.8% Energy Regen and grants 7% Resonance Liberation DMG Bonus when casting Resonance Skill, stacking up to 3 times for 12s. |
| 3. Autumntrace (4-Star) | 413 ATK 20.25% Crit. Rate |
Dealing Basic Attack or Heavy Attack DMG grants 4% ATK, up to 5 stacks for 7s, with a 1s trigger interval. |
Kumokiri: Personal Damage and Team Buffs
Kumokiri fits Chisa's kit particularly well because applying Negative Statuses is already part of her normal rotation. The weapon's Crit. Rate helps with offensive Echo building, while its ATK and Resonance Liberation bonuses strengthen her Chainsaw attacks. Once its three stacks are active, teammates who inflict Negative Statuses can also gain a 24% All-Attribute DMG Bonus. The effect lasts 15 seconds and cannot stack with another effect of the same name.
That team buff is the main reason to consider Kumokiri over weapons that only increase Chisa's damage. Yangyang: Xuanling can apply Havoc Bane, while Aemeath and Denia can apply Fusion Burst in their corresponding combat modes. All three can therefore interact with the weapon's Negative Status requirement. On teams where the main DPS cannot meet that requirement, Kumokiri's supportive advantage is smaller, even though its offensive stats remain useful for Chisa.
Lustrous Razor and Autumntrace
Lustrous Razor is an easier choice for accounts that already have a standard 5-star Broadblade. Its high base ATK benefits Chisa's ATK-scaling healing and shielding, while Energy Regen helps her use Moment of Nihility more consistently. The Resonance Liberation DMG passive also fits her damage profile, although a normal Chisa rotation may not build all three stacks. It lacks Kumokiri's teamwide damage bonus, making it a more personal and resource-friendly alternative.
Autumntrace gives Crit. Rate, but its passive has a limitation. Chisa's Sawring attacks are treated as Resonance Liberation DMG, not ordinary Basic Attack DMG, so the enhanced Chainsaw sequence cannot reliably build Autumntrace's ATK stacks by itself. She can trigger the passive with eligible attacks before entering Chainsaw Mode, but the lower base ATK and lack of a team buff reduce its appeal. Use it if you need the Crit. Rate and do not have a suitable 5-star option; there is little reason to replace an already upgraded Lustrous Razor with it.
Best Echo Sets and Main Stats for Chisa
For a Chisa build that keeps her personal damage relevant, combine 3-Pc Thread of Severed Fate with 2-Pc Havoc Eclipse. Thread of Severed Fate increases ATK by 20% and grants 30% Resonance Liberation DMG Bonus for 5 seconds after Chisa inflicts Havoc Bane. Because applying Havoc Bane is built into her Forte Circuit, she can activate the bonus naturally during combat rather than changing her rotation for an equipment effect.
The remaining two Echo slots can use Havoc Eclipse for additional Havoc DMG. Midnight Veil is another usable Havoc-focused two-piece choice if you have better Echo stats on that set. Prioritize the quality of your Crit, ATK, and Energy Regen rolls rather than replacing several well-built Echoes just to change between comparable two-piece bonuses.
Best Main Echo: Reminiscence: Threnodian - Leviathan
Reminiscence: Threnodian - Leviathan complements both parts of Chisa's offensive kit. When equipped in the main slot, it provides 12% Havoc DMG Bonus and 12% Resonance Liberation DMG Bonus. Its additional damage also benefits from attacking enemies affected by Havoc Bane, which fits the target-marking and status application Chisa already performs.
Use the Echo around Chisa's damage setup, ideally before Moment of Nihility when its animation can be incorporated into the Liberation transition. This keeps her enhanced Chainsaw window focused on consuming Ring of Chainsaw and reaching Sawring - Eradication instead of spending unnecessary time on another action.
Recommended Echo Main Stats
Use a 4-3-3-1-1 Echo cost distribution. Chisa wants enough Energy Regen to keep her Liberation available, then a balance of offensive stats that improves her Sawring damage without sacrificing the ATK that also supports her healing and shielding.
| Echo Cost | Recommended Main Stat |
|---|---|
| 4-Cost | Crit. Rate or Crit. DMG |
| 3-Cost | Havoc DMG Bonus |
| 3-Cost | Havoc DMG Bonus or ATK% |
| 1-Cost | ATK% |
| 1-Cost | ATK% |
For substats, prioritize Energy Regen until the rotation is consistent, followed by Crit. Rate, Crit. DMG, ATK%, Resonance Liberation DMG Bonus, and flat ATK. Around 125% Energy Regen is a useful starting reference, not a strict requirement for every team. Chisa receives Resonance Energy through different actions and teammates, so the amount she needs changes with the rotation.
As a developed offensive build, roughly 2,000-2,500 ATK, 65-80% Crit. Rate, and 210-255% Crit. DMG are reasonable long-term stat goals. These are build targets rather than minimum requirements. If Moment of Nihility is regularly unavailable when Chisa returns to the field, fix her Energy Regen before chasing more Crit. DMG. With Kumokiri providing 36% Crit. Rate at Level 90, balancing Crit stats is generally easier than with Lustrous Razor.
Alternative: Rejuvenating Glow for Team Support
Thread of Severed Fate is the preferred option for Chisa's personal damage, but it is not automatically the highest team-damage choice in every composition. If she mainly serves as the healer and support for an ATK-scaling main DPS, 5-Pc Rejuvenating Glow can be more valuable. Healing allies activates its teamwide 15% ATK bonus, and Fallacy of No Return can provide additional Energy Regen and another team ATK buff.
This alternative is worth considering for the Yangyang: Xuanling team, where Chisa's job is often to support the main damage dealer rather than maximize her own Chainsaw numbers. Moonlit Clouds can also be considered when you specifically want Chisa to pass an ATK bonus to the next Resonator through her Outro. Keep Thread of Severed Fate if you prefer stronger personal damage or already have a well-built set; changing to a support set should be a deliberate team optimization, not an automatic upgrade.
How Chisa's Havoc Bane and Chainsaw Mode Work
Chisa's kit revolves around two connected mechanics: marking enemies so the team can benefit from Havoc Bane, and building Ring of Chainsaw to access her enhanced attacks. The first provides much of her supportive value, while the second determines how she deals damage, generates her shield, and finishes her field time.
Unseen Snare, Havoc Bane, and Thread of Bane
Chisa's Forte Circuit applies Unseen Snare, a mark that lasts 30 seconds. She can apply it through Resonance Skill, certain follow-up attacks after Serrated Loop, or her enhanced Dodge Counter. When a marked enemy receives direct damage from a Resonator, Chisa applies one stack of Havoc Bane, with a trigger interval of up to once every 2 seconds. This allows the team to keep building Havoc Bane through its normal attacks instead of relying only on Chisa staying on the field.
Havoc Bane contributes enemy DEF reduction, while Thread of Bane provides another form of DEF interaction. Chisa's Outro Skill, Unraveling - Law Zero, grants Resonant Thread of Closure to the team for 20 seconds. Attacks made during this effect can increase the target's maximum Negative Status or Electro Rage stacks by 3 for 15 seconds. Characters who inflict Negative Statuses or deal Negative Status DMG can also obtain Thread of Bane for 15 seconds, allowing their damage against Unseen Snare targets to ignore 18% of the enemy's DEF.
The distinction matters: Chisa does not simply give every teammate unconditional 18% DEF Ignore. The character needs Thread of Bane, and the target needs to be affected by Unseen Snare. This is why her support kit is much more effective in dedicated Negative Status teams than in lineups that only need generic healing.
Ring of Chainsaw and the Enhanced Damage Window
Ring of Chainsaw has a maximum of 100 points. Chisa builds it through eligible Normal Attacks and Eye of Unraveling hits, while Reverberance - Return grants 20 points and Moment of Nihility grants 40 points. Once the gauge is full, she can use Serrated Loop on the ground to gather nearby enemies and enter Chainsaw Mode.
Chainsaw Mode replaces her normal attack pattern with Sawring - Blitz and eventually Sawring - Eradication. Sawring - Blitz consumes Ring of Chainsaw on hit, and the amount consumed strengthens the damage multiplier of the next Eradication, counting up to 100 points. Eradication consumes the remaining gauge, ends Chainsaw Mode, and grants nearby teammates a shield lasting 30 seconds. Its damage, along with Sawring - Blitz and Chainsaw Mode Dodge Counters, counts as Resonance Liberation DMG.
Moment of Nihility should normally be used before the main Chainsaw damage sequence. It deals Havoc DMG, heals the team, and activates Woven Myriad - Convergence for 15 seconds, increasing the damage multipliers of Chisa's enhanced Chainsaw attacks by 120%. The effect also strengthens the Ring of Chainsaw contribution to Eradication and ends when Eradication is cast. Using the Liberation after the Chainsaw finisher misses the intended enhanced damage window.
Chisa Rotation: From Scissors Mode to Sawring - Eradication
Chisa's standard rotation should build enough Ring of Chainsaw to enter Chainsaw Mode, use Moment of Nihility before her enhanced damage, then finish with Eradication and pass her Outro effects to the team. You do not need to hold every Chainsaw attack for its maximum possible duration. Extending her field time can delay the main DPS and reduce the practical benefit of her support slot.
Opening Rotation
The opening sequence needs more setup because Chisa may not enter with an Intro Skill. Use her regular attacks and Eye of Unraveling to build the missing Forte, then use her Liberation to complete the setup before starting the Chainsaw sequence.
- Begin with Basic Attack Stage 1 and Stage 2, then use Eye of Unraveling to mark the enemy and continue into Rending Lunge.
- Follow with Death Snip and Thread Withdrawn to build additional Ring of Chainsaw. Use the Main Echo during the setup when appropriate.
- Cast Moment of Nihility once available. The Liberation grants 40 Ring of Chainsaw and activates the enhanced damage state.
- When Ring of Chainsaw is full, cast Serrated Loop to enter Chainsaw Mode. Continue with Sawring - Blitz Stage 2 and Stage 3, consuming the gauge.
- Finish with Sawring - Eradication, grant the team shield, and use Chisa's Outro when her Concerto Energy is ready.
Repeat Rotation After an Intro Skill
Later rotations are shorter because Reverberance - Return grants Ring of Chainsaw immediately and lets Chisa continue from Basic Attack Stage 2. Follow with Rending Lunge and Death Snip, then use Moment of Nihility to enter the damage window. When the gauge is ready, cast Serrated Loop, proceed through Sawring - Blitz, and finish with Eradication before switching to the next teammate.
Watch the target rather than following the input sequence blindly. Missing attacks delays Ring of Chainsaw generation, and an interrupted damage window can prevent you from getting the intended Eradication multiplier. In longer fights, make sure the enemy is marked before the main DPS begins attacking so Havoc Bane application and the relevant DEF effects do not start late.
Best Chisa Teams
Chisa can fit into several Negative Status compositions, but these two teams use her abilities for different reasons. The first builds around Yangyang: Xuanling's Havoc Bane and Heavy Attack damage, while the second uses Aemeath and Denia to turn Fusion Burst application into larger damage windows. Both benefit from Chisa's status support, healing, and shielding, but their main DPS mechanics and swap priorities are different.
Team 1: Yangyang: Xuanling + Chisa + Suisui
Team Roles: Yangyang: Xuanling (Main DPS) | Chisa (Support/Sub-DPS) | Suisui (Support/Healer)
This composition brings together three characters who interact with Havoc Bane in complementary ways. Yangyang: Xuanling is a Havoc Sword damage dealer focused on powerful Heavy Attacks and stance switching. She applies Havoc Bane through her attacks and gains additional damage advantages from enemies affected by the status. Chisa helps maintain Havoc Bane application, provides DEF-related support, and raises the available Negative Status stack limit through her Outro. Suisui contributes healing, All DMG Amplification, and further support when Havoc Bane stacks are consumed.
Xuanling's Forte Circuit converts Melody and Sword Stance changes into Azure Plume. With two Azure Plume points, she can unleash an enhanced Heavy Attack in her current stance. Her Unbroken Vow passive increases damage against targets with Havoc Bane, while Feathered Oath further increases the Crit. DMG of designated Heavy Attack moves when teammates inflict Havoc Bane. This makes maintaining the status before Xuanling's damage window especially useful.
Suisui adds another layer through Song of Thoroughfare. While Ceaseless Landscape is active, consuming Havoc Bane after landing a skill allows the Resonator's Havoc DMG to ignore 6% of the target's DEF and 12% of its Havoc RES for 30 seconds. Her Outro grants 25% All DMG Amplification to the team, with further benefits depending on how much Floral Epistle she consumes. Chisa and Suisui therefore do not simply duplicate one another's support effects; each contributes a different part of Xuanling's offensive setup.
Recommended Team Rotation:
- Suisui: Build Cloud Breath through her available attacks, enter Drizzle Stance with Awakening Spring, and generate Floral Epistle. Use Song of Thoroughfare to establish Ceaseless Landscape, then trigger her Outro after completing the available setup.
- Chisa: Apply Unseen Snare, build Ring of Chainsaw, and use Moment of Nihility before entering Chainsaw Mode. Finish the enhanced sequence with Sawring - Eradication to provide a shield, then activate Unraveling - Law Zero through her Outro.
- Yangyang: Xuanling: Enter with her Intro Skill, apply Havoc Bane through her attacks, and consume Melody through her Sword Stance combos. Use Sword Stance Flow to restore Melody and build Azure Plume, then release the appropriate enhanced Heavy Attacks. Use Hush of a Thousand Voices and continue stance transitions as resources allow.
- Reset: Return to the supports as their skills and buffs become available, rebuilding the status setup before the next major Xuanling damage window.
For this team, Chisa's main responsibility is to make Xuanling's field time more productive. Avoid keeping Chisa active longer than needed just to squeeze out another minor attack. If you have built Chisa with Rejuvenating Glow or Moonlit Clouds instead of Thread of Severed Fate, focus even more on passing the relevant support buffs to Xuanling. The exact order of small animation cancels can change with available Energy and Concerto, but the main goal stays the same: establish Suisui's support effects, complete Chisa's setup, and let Xuanling deal her enhanced Heavy Attack damage.
Team 2: Aemeath + Chisa + Denia
Team Roles: Aemeath (Main DPS) | Chisa (Support/Healer) | Denia (Fusion Burst Support/Sub-DPS)
Aemeath and Denia form a Fusion Burst core, with Chisa occupying the support slot. Aemeath is a Fusion Sword DPS who can use either Tune Rupture or Fusion Burst through her Resonance Mode, while Denia has separate Fusion Burst and Tune Strain modes. For this team, set both Aemeath and Denia to their Fusion Burst modes before combat. Their Fusion Burst application and detonation mechanics are what make Chisa's Negative Status support useful here.
Denia handles much of the Fusion Burst setup. Her Fusion Burst mode lets several attacks apply the status, while Erosion Field continues dealing Fusion DMG and pulling enemies together after Final Act - Breakdown Form. During Entropy Shift, her Etched Colors passive also grants the team 30% Fusion DMG Bonus. Her Fusion Burst Outro further amplifies Fusion Burst DMG against nearby targets by 60% for 30 seconds, providing a direct damage benefit for the team's main offensive window.
Aemeath turns that setup into damage. In Fusion Burst mode, she gains Fusion Trail as teammates apply Fusion Burst, and Seraphic Duet can consume Fusion Trail to trigger additional Fusion Burst damage based on the target's maximum stack limit. Chisa contributes by increasing the maximum Fusion Burst stacks enemies can receive by 3 through her Outro, while supplying the team with healing, shields, and DEF-related support. Unlike the Xuanling composition, this team focuses less on Havoc Heavy Attacks and more on building and triggering Fusion Burst efficiently.
Recommended Team Rotation:
- Chisa: Begin by applying Unseen Snare and preparing Ring of Chainsaw. Cast Moment of Nihility when ready, complete Serrated Loop and the enhanced Chainsaw sequence, then finish with Eradication and her Outro.
- Denia: Enter in Fusion Burst mode and apply Fusion Burst through her attacks and skills. Use Final Act - Stagecraft Form to enter Breakdown Form, build Conformal Charge with her enhanced actions, and cast Final Act - Breakdown Form when ready to establish Erosion Field. Complete her Outro to activate Fusion Burst amplification.
- Aemeath: Enter through her Intro and build Synchronization Rate using Basic Attacks and Sync Strike transitions between her normal and Mech forms. Cast Heavenfall Edict - Overdrive to enter Stardust Resonance, then use Seraphic Duet to capitalize on the available Fusion Trail and Fusion Burst setup.
- Damage Finish: Continue building Synchronization Rate and Resonance Rate. When both are full during Heavenfall Edict: Unbound, cast Heavenfall Edict: Finale to finish Aemeath's major damage sequence.
Denia's two Liberation forms and Aemeath's resource requirements make this a more involved rotation than a simple three-character swap order. Not every resource will be ready during the opening cycle, so use the sequence as a framework rather than forcing skills before their conditions are met. Preserve the status setup for Aemeath's Seraphic Duet and Finale, and avoid switching Denia into Tune Strain mode by mistake. That would change her status application and Outro effects, weakening the intended Fusion Burst synergy.
Chisa Skill Priority: Where to Spend Resources First
Chisa has multiple attack forms, but you do not need to level every skill equally. Her Forte Circuit controls much of her enhanced Chainsaw damage, while Resonance Liberation contributes a large damage hit, team healing, and the Woven Myriad - Convergence buff. These two abilities should receive the most attention when materials are limited.
Recommended Skill Upgrade Order:
- Forte Circuit — Sight of Unraveling - Oblivion: First priority for Sawring - Blitz, Sawring - Eradication, and the enhanced Chainsaw damage sequence.
- Resonance Liberation — Moment of Nihility: Important for direct damage, healing, and enabling the stronger Chainsaw window.
- Normal Attack — Reign of Silence: Improves the attacks used during her setup, including Death Snip and its healing.
- Resonance Skill — Fractured Composition: Useful for Eye of Unraveling and Serrated Loop damage, but lower priority than her main sources of output.
- Intro Skill — Reverberance - Return: Valuable for the rotation, though its level contributes less to the overall build than the higher-priority abilities.
Unlock both Inherent Skills as part of Chisa's development. All Ends Here grants 20% Havoc DMG Bonus and 20% Healing Bonus for 12 seconds after using her Intro Skill or Resonance Liberation, making it relevant to both damage and sustain. Inescapable Fate provides a separate utility effect when marked enemies are defeated. Her Crit. Rate and ATK stat bonus nodes are also worth unlocking as resources allow.
If Chisa is mainly supporting Xuanling or Aemeath, getting her Forte Circuit and Liberation upgraded is a better initial investment than evenly distributing materials across all five skills. You can return to the remaining levels later if you want more personal damage or additional healing. The order does not change simply because you switch between the two recommended teams.
Are Chisa's Resonance Chains Worth Investing In?
Chisa is already functional at S0. Her base kit contains Unseen Snare, Havoc Bane application, healing, shielding, and the Outro effect that raises Negative Status stack limits. Additional Resonance Chains improve her damage, reliability, and buffs, but they do not need to be unlocked just to make her usable in either recommended team.
S1 and S2: Utility and Team Buff Upgrades
S1 — Wandering Through the Desolate Corridors provides interruption immunity during Sawring - Blitz, Sawring - Eradication, and Chainsaw Mode Dodge Counters. Applying Unseen Snare also grants Chisa a 30% ATK increase for 15 seconds and triggers a fixed instance of Havoc DMG with a target HP restriction. The interruption resistance can help protect the Chainsaw sequence, while the extra offensive effects mainly benefit Chisa herself.
S2 — Into the Web of Endless Bonds is the more significant team-oriented upgrade. Chisa ignores an additional 10% Havoc RES when dealing damage, while nearby teammates with Thread of Bane gain 50% All-Attribute DMG Bonus. Because Yangyang: Xuanling, Aemeath, and Denia can interact with the relevant Negative Status requirements, this node has a clear purpose in the two recommended compositions. S2 is a reasonable stopping point for players specifically investing in Chisa's support ceiling, although S0 still provides the mechanics these teams need.
S3 to S6: Higher Damage and Specialized Improvements
S3 increases the damage multipliers of Chisa's enhanced Chainsaw attacks by another 120%, including the Ring of Chainsaw contribution to Eradication. This stacks with the corresponding bonus from Woven Myriad - Convergence, making S3 more relevant when personal damage is the goal. S4 improves Havoc Bane application frequency on marked targets from once every 2 seconds to once every second, while S5 adds a 100% DMG Bonus to Moment of Nihility and reduces the Lifethread - Glide resource cost.
S6 changes Unseen Snare into Unseen Snare - Finality. Affected targets take 30% Amplified DMG from Negative Statuses and 40% increased damage from Chisa. It also lets Chisa survive an otherwise fatal hit while performing designated Chainsaw attacks. These are substantial enhancements, especially for a fully invested Negative Status team, but their cost is much higher than building the S0 version with good Echoes and a suitable weapon.
Chisa Ascension and Skill Materials
Chisa's character ascension requires Polygon Cores, Abyssal Husk, Summer Flower, and Shell Credits. Her skill upgrades use additional Polygon Cores, Waveworn Residue materials, and When Irises Bloom. If you plan to level her to 90 and fully upgrade her skills, the following amounts provide the material requirements for both categories.
| Material | Character Ascension | Skill Upgrades |
|---|---|---|
| Shell Credits | 170,000 | 2,030,000 |
| LF Polygon Core | 4 | 25 |
| MF Polygon Core | 12 | 28 |
| HF Polygon Core | 12 | 40 |
| FF Polygon Core | 4 | 57 |
| Abyssal Husk | 46 | — |
| Summer Flower | 60 | — |
| When Irises Bloom | — | 26 |
| Waveworn Residue 210 | — | 25 |
| Waveworn Residue 226 | — | 28 |
| Waveworn Residue 235 | — | 55 |
| Waveworn Residue 239 | — | 67 |
Combined, character ascension and full skill upgrades require 2,200,000 Shell Credits, excluding separate character EXP leveling, weapon upgrades, and Echo development costs. You will also need 29 LF Polygon Cores, 40 MF Polygon Cores, 52 HF Polygon Cores, and 61 FF Polygon Cores across both categories. Keeping these combined totals in mind makes it easier to avoid spending the same materials on another character before Chisa is finished.
If you are also leveling Kumokiri to 90, the weapon has its own material requirements: 330,000 Shell Credits, 6 LF Whisperin Cores, 6 MF Whisperin Cores, 10 HF Whisperin Cores, 12 FF Whisperin Cores, and Waveworn Residue materials in amounts of 6, 8, 6, and 20 for tiers 210, 226, 235, and 239 respectively. These costs are separate from Chisa's character development.
For an account with limited resources, complete the necessary ascensions and unlock her important Inherent Skills before spending everything on minor skill levels. Build Forte Circuit and Resonance Liberation first, then improve the rest according to how often Chisa takes the field. Farming an entire perfect Echo set can wait until her main mechanics and rotation are already functioning.
Chisa FAQ
Can Chisa Apply Unseen Snare Without Hitting an Enemy?
Yes. Locking on to a target is one of the ways Chisa can apply Unseen Snare, alongside Resonance Skill hits and certain follow-up attacks. This can help establish her mark before committing to a longer attack sequence.
Does Defeating a Marked Enemy Reset Chisa's Resonance Skill Cooldown?
Yes, after unlocking Inescapable Fate. When a teammate defeats a target affected by Unseen Snare, the cooldown of Eye of Unraveling resets. This effect can trigger at most once every 3 seconds, making it useful when moving between multiple enemies.
Can Chisa Use Lifethread - Glide During Chainsaw Mode?
No. Lifethread - Glide is available outside Chainsaw Mode and consumes Lifethread - Jetstream. After entering Chainsaw Mode, that resource is replaced by Chainsaw Fever. If Chisa stops dealing damage for too long, Chainsaw Fever depletes and can force her out of the mode into the Burnout State.
Does Chisa's S1 Fixed Damage Instantly Remove 61,803 HP From Every Boss?
Not necessarily. S1 can deal a fixed 61,803 Havoc DMG when applying Unseen Snare, but this effect cannot reduce a target below 61.80% of its maximum HP and can affect each target only once. The damage is not increased by ordinary damage bonuses, so it should not be treated as a repeatable burst attack.
Should Chisa Use Healing Bonus Instead of ATK for Stronger Shields?
No. Her Sawring - Eradication shield scales with ATK, while Healing Bonus improves healing rather than directly increasing shield strength. If you want stronger shields and better healing together, ATK remains relevant to both. Healing Bonus is a more specialized choice when you are prioritizing recovery over her personal damage.