

Escoffier can reduce enemy Cryo and Hydro RES by 55%, deal sustained off-field Cryo damage, and heal the entire party. That's a lot of utility from one character, but there's a catch: her maximum resistance reduction only works when all four party members are Cryo or Hydro. Replace one teammate with another Element, and her own RES Shred drops to 15%.



That restriction makes Escoffier especially valuable for Skirk, Ayaka, and other Cryo carries. Her best build, however, depends on who deals most of the team's damage. Golden Troupe improves her personal output, while Scroll of the Hero of Cinder City, Noblesse Oblige, and Tenacity of the Millelith can offer better overall results when your main DPS does the heavy lifting.








This Escoffier build guide covers her best weapons, artifacts, Energy Recharge requirements, teams, and rotations. We'll also look at how Vodyanitsa changes her Burst usage, what to equip without premium weapons, and whether C1 or Symphonist of Scents deserves your Primogems.
Escoffier Best Build Overview
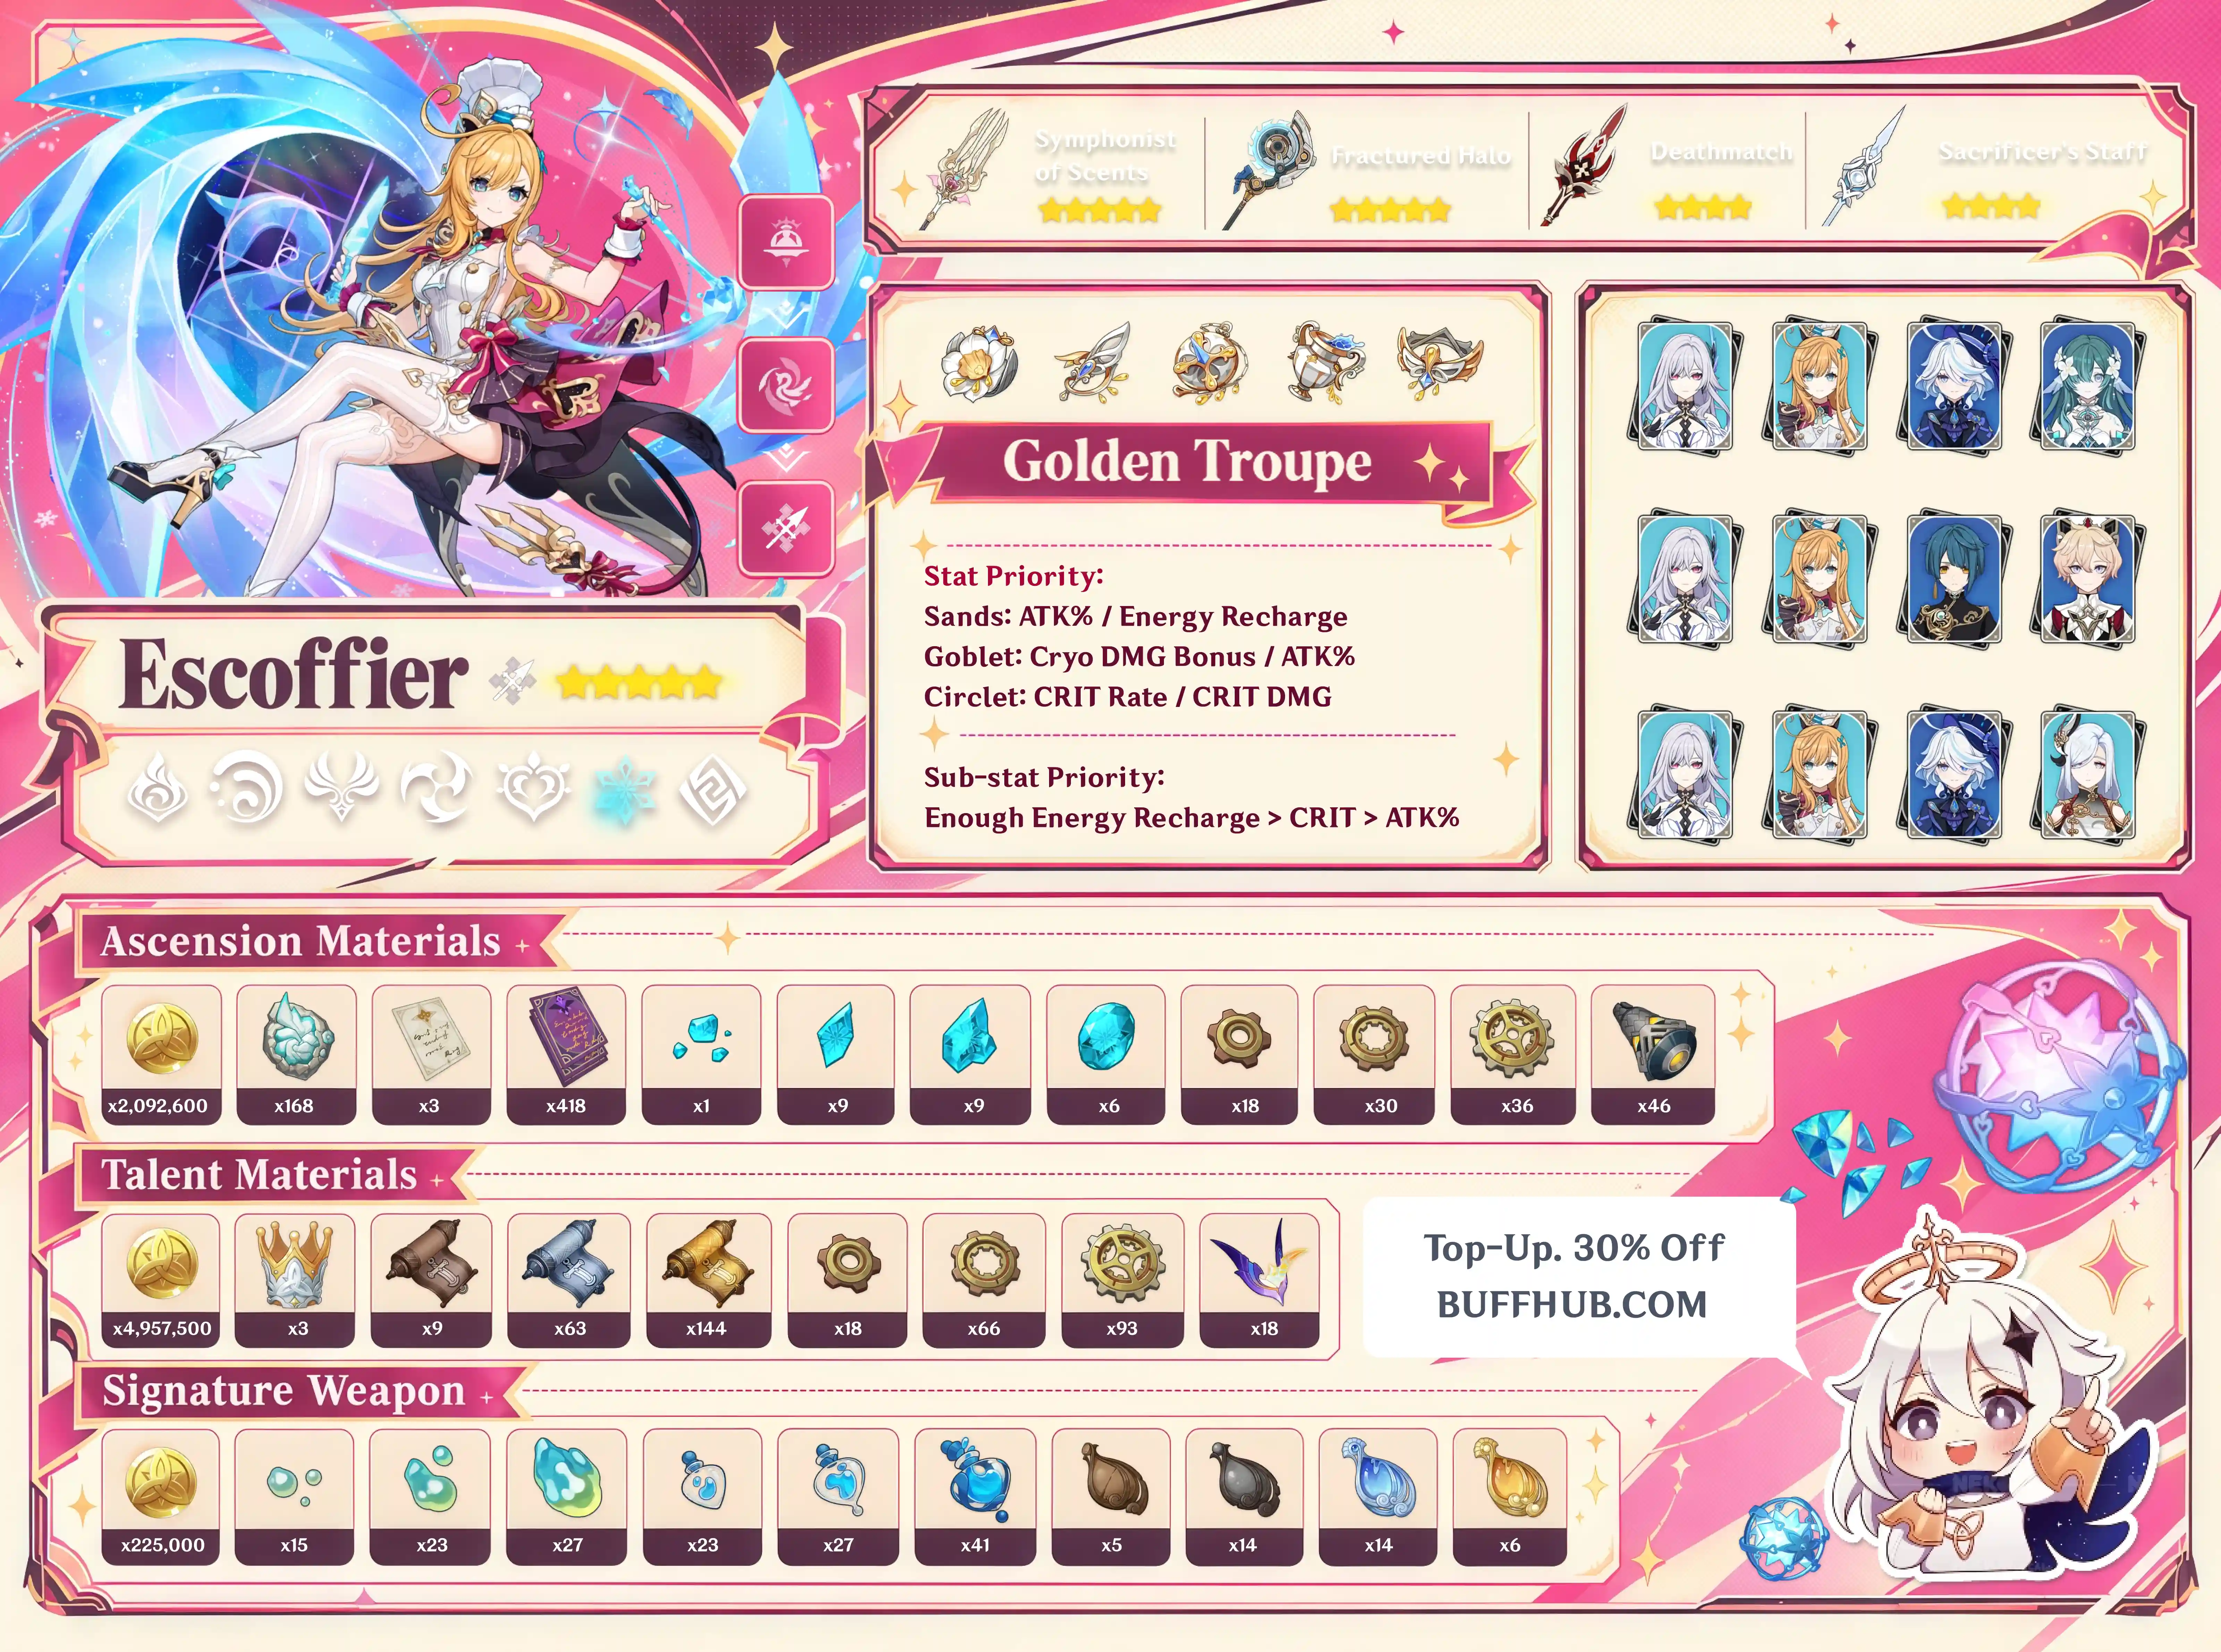
If you're building Escoffier specifically for Skirk, don't automatically farm Golden Troupe. Although it is her strongest general set for personal Elemental Skill damage, support sets can improve total team DPS more when Skirk contributes most of the damage. Your artifact choice should follow the team's damage distribution, existing buffs, and Escoffier's Energy needs.
How Escoffier Works: Skill, RES Shred, and Healing
Elemental Skill: Low-Temperature Cooking
Escoffier's Elemental Skill has two modes. Tapping it activates her All-Spectrum Multi-Use Cooking Mek in Cold Storage Mode, dealing an initial AoE Cryo hit and summoning a device that follows the active character for 20 seconds. The Cooking Mek repeatedly fires Frosty Parfaits at nearby enemies, dealing off-field Cryo damage and refreshing her resistance reduction when its attacks connect.
At Talent Level 10, the initial Skill hit deals 90.7% damage, while each Frosty Parfait deals 216%. The Tap Skill has a 15-second cooldown, allowing Escoffier to maintain good uptime throughout a normal rotation. Its initial hit also generates Cryo particles, which help reduce her Energy Recharge requirements.
Holding the Skill instead activates Off-the-Cuff Cookery Mode, which is intended for cooking rather than combat. Always use the Tap Skill when setting up your team's damage window. Accidentally activating the cooking mode leaves you without the off-field damage and repeated debuff application.
The Cooking Mek is particularly effective against single targets, although the initial Skill hit has an AoE component. In multi-wave encounters, its repeated attacks can also help apply Escoffier's RES Shred to newly appearing enemies without requiring an immediate switch back to her.
Inspiration-Immersed Seasoning: The 55% RES Shred
Escoffier's Ascension 4 Passive, Inspiration-Immersed Seasoning, reduces enemy Cryo and Hydro RES for 12 seconds after her Elemental Skill or Burst hits them. The amount depends on how many party members are Cryo or Hydro, including Escoffier herself.
With one qualifying character, the reduction is 5%. With two, it becomes 10%; with three, 15%. A full party of four Cryo or Hydro characters increases the reduction to 55% Cryo and Hydro RES.
That final jump defines her strongest teams. Replacing a Cryo or Hydro teammate with Kazuha, Xilonen, or another Element reduces Escoffier's personal RES Shred by 40 percentage points. Those characters can compensate through their own buffs and resistance reduction, so mixed-element compositions aren't automatically bad. They simply need to provide enough additional value to justify losing part of Escoffier's passive.
The debuff also works against enemies that cannot be Frozen. Escoffier only needs her Skill or Burst to hit them, making her useful against Freeze-immune bosses. Other Freeze-dependent mechanics in the team may still lose value against those enemies.
Elemental Burst: Scoring Cuts
Scoring Cuts deals AoE Cryo damage and immediately heals nearby party members based on Escoffier's ATK. At Talent Level 10, its damage multiplier is 1067%, and its initial healing is 309.7% ATK plus 2,373 HP. The Burst costs 60 Energy and has a 15-second cooldown.
Her Ascension 1 Passive, Better to Salivate Than Medicate, adds Rehab Diet after casting the Burst. For nine seconds, the active character receives healing once per second based on 138.24% of Escoffier's ATK.
This makes Escoffier especially useful alongside Furina. The initial teamwide heal helps recover HP drained by Furina's abilities, while the follow-up healing supports additional Fanfare generation. Escoffier can cover the team's healing role while also contributing Cryo damage and RES Shred.
However, her Burst isn't mandatory in every rotation. If another character already provides sufficient healing, Escoffier can sometimes skip it and invest more artifact stats into personal damage. The exact choice depends on Furina's Fanfare generation and whether Escoffier's weapon or artifact set requires her to use the Burst.
Best Escoffier Weapons
Symphonist of Scents — Best Signature Weapon
Symphonist of Scents is Escoffier's strongest dedicated weapon. At Level 90, it provides 608 Base ATK and 66.2% CRIT DMG. Its passive increases her ATK, including an additional bonus while she is off-field, and provides an ATK buff when its wielder heals party members.
At Refinement 1, its healing-triggered Sweet Echoes effect grants 32% ATK for three seconds. Escoffier's initial Burst healing can activate the effect, while her repeated healing from Rehab Diet can refresh it throughout the active character's damage window.
This makes the weapon more than a personal damage upgrade. It also benefits ATK-scaling teammates, especially characters such as Ayaka and Ganyu whose important attacks can snapshot applicable buffs.
The limitation is straightforward: Escoffier must heal to activate the weapon's support effect. If Vodyanitsa or another healer makes Escoffier's Burst unnecessary, skipping her Burst also sacrifices that healing-triggered ATK buff.
For teams where Escoffier already uses her Burst consistently, Symphonist of Scents is an excellent premium upgrade. In rotations that regularly skip her Burst, its offensive stats remain valuable, but its full support potential isn't being used.
Deathmatch — Best 4-Star Personal Damage Weapon
Deathmatch is Escoffier's strongest general 4-star weapon for personal damage. Its CRIT Rate secondary stat and ATK passive work well with her repeated Skill hits. At high refinements, Deathmatch can even outperform some 5-star Polearms in favorable single-target conditions.
The main drawback is stat balancing. Escoffier gains CRIT Rate from Ascension, while Cryo Resonance adds another 15% against enemies affected by Cryo or Frozen. Deathmatch provides substantial CRIT Rate on top of that, making it easy to overinvest in the stat.
Escoffier has 19.2% CRIT Rate at Level 90 before weapon and artifact bonuses. If you're using Deathmatch, check her effective CRIT Rate against Cryo-affected enemies before adding more. A CRIT DMG circlet may be preferable when her other equipment already provides enough CRIT Rate.
Deathmatch is a Battle Pass weapon, not a free-to-play option. It's particularly attractive if you already own it or have invested in refinements, but buying it solely for Escoffier isn't necessary to make her a functional support.
Sacrificer's Staff — Balanced Damage and Energy Recharge
Sacrificer's Staff is another strong 4-star alternative. It provides useful offensive stats alongside Energy Recharge from its passive, allowing Escoffier to maintain respectable personal damage while easing her Burst requirements.
Her repeated Skill hits help maintain the weapon's passive stacks, so it fits her standard rotation without requiring unusual field time.
If you already own Sacrificer's Staff, replacing it with an expensive weapon upgrade should be a relatively low priority. It offers a useful balance between damage, Energy, and artifact flexibility.
Favonius Lance — Best When Energy Is the Problem
Favonius Lance sacrifices personal damage to improve team Energy generation. Its Energy Recharge secondary stat helps Escoffier use her Burst consistently, while its passive generates neutral particles after a qualifying CRIT hit.
This is useful when Furina needs Escoffier's Burst healing to build Fanfare or when another teammate struggles to recharge an important Burst.
Favonius requires an on-field CRIT hit to activate its particle-generation passive. Escoffier can trigger it with her initial Skill hit, Burst hit, or a short Normal Attack before switching out. Make sure her CRIT Rate is high enough for reasonably consistent activation.
Choose Favonius when missing a Burst costs more team damage than the offensive stats lost by changing weapons. If Energy is already comfortable and Escoffier rarely needs her Burst, an offensive Polearm becomes more attractive.
Prospector's Shovel — Accessible Craftable Weapon
Prospector's Shovel is a practical craftable option for accounts without premium Polearms. Its ATK stats contribute to Escoffier's Skill damage and healing, although its passive does little for her normal build.
Because the passive provides little value, one copy is generally enough. Refining it specifically for Escoffier isn't an efficient use of additional billets.
If you already own Blackcliff Pole or another usable offensive Polearm, don't spend resources crafting a replacement unless it solves a specific stat problem.
Other 5-Star and Alternative Weapons
- Fractured Halo: A strong 5-star alternative with useful offensive stats. Its relative value depends on Escoffier's CRIT balance and external buffs.
- Calamity Queller: Particularly effective when Escoffier lacks external ATK buffs. Its high ATK and off-field benefits fit her Skill-focused damage.
- Staff of Homa: A reliable CRIT DMG option, although Escoffier doesn't naturally build around its HP-related mechanics.
- Lumidouce Elegy: Another competitive premium option, depending on how effectively its passive fits the team.
- Engulfing Lightning: More attractive with high Energy Recharge requirements, but less competitive when Escoffier rarely Bursts.
- Skyward Spine: A usable option for Energy-hungry teams, although stronger offensive Polearms are preferable when ER is already sufficient.
- Tamayuratei no Ohanashi: A reasonable event weapon if you already own it. Its Energy Recharge is useful, but its offensive buff doesn't cover Escoffier's entire Skill duration.
Before investing in a weapon, determine whether Escoffier needs her Burst every rotation. If she does, solve Energy problems first. If she doesn't, offensive weapons become more valuable. Her signature remains the strongest dedicated option, but none of her essential support functions require it.
Best Escoffier Artifacts: Golden Troupe vs Support Sets
4-Piece Golden Troupe — Best Personal Damage Set
Golden Troupe is Escoffier's default artifact set for maximizing Elemental Skill damage. Since the Cooking Mek provides most of her personal damage while she remains off-field, she naturally benefits from the set's Skill DMG bonuses.
It makes the most sense when Escoffier contributes a meaningful portion of the team's damage, uses a strong offensive weapon, or already owns well-rolled Golden Troupe pieces.
However, maximizing Escoffier's individual damage isn't the same as maximizing team DPS. In a heavily invested Skirk lineup, a support set that amplifies Skirk can provide a larger overall improvement.
4-Piece Scroll of the Hero of Cinder City — Skirk Hypercarry Support
Scroll of the Hero of Cinder City grants an Elemental DMG Bonus after its wearer triggers the relevant Elemental Reaction. Escoffier cannot access the enhanced Nightsoul version, so she provides the standard 12% Elemental DMG Bonus to the relevant Elements rather than the larger bonus available to qualifying Natlan characters.
That bonus can still be worthwhile when the main DPS contributes most of the team's damage. If Skirk has a strong weapon, Constellations, and well-optimized artifacts, buffing her can outweigh increasing Escoffier's personal Frosty Parfait damage.
Escoffier must trigger the relevant reaction herself. In a Freeze team, a reliable starting method is to apply Hydro first, then use Escoffier's Cryo Skill to trigger Freeze. Simply having another teammate trigger Freeze does not activate the Scroll effect from Escoffier's artifact set.
Also check whether another teammate already provides the relevant Scroll buff. For example, Citlali can activate the larger Nightsoul-enhanced bonus, so equipping another support set on Escoffier may provide better value.
4-Piece Noblesse Oblige — Reliable Burst-Based ATK Support
Noblesse Oblige grants a 20% partywide ATK buff for 12 seconds after the wearer uses an Elemental Burst. It works especially well when other teammates already cover Scroll or Tenacity of the Millelith.
Its limitation is Burst frequency. If Escoffier already needs to Burst every rotation for Furina's Fanfare, Noblesse adds useful offensive support without requiring another action. If she regularly skips her Burst because Vodyanitsa handles the team's healing, Noblesse becomes less reliable.
4-Piece Tenacity of the Millelith — Off-Field ATK Support
Tenacity of the Millelith grants an ATK buff when the wearer's Elemental Skill hits an enemy, and the buff can be refreshed from off-field. Escoffier's repeated Cooking Mek attacks give the set good uptime.
The two-piece HP bonus contributes little to her ATK-scaling damage and healing, but the team buff can justify the personal damage loss.
In teams with Vodyanitsa, Tenacity is often better assigned to Vodyanitsa, allowing Escoffier to use Scroll, Noblesse, or Golden Troupe. The strongest assignment depends on the main DPS and the existing support buffs.
4-Piece Blizzard Strayer — Situational Freeze Option
Blizzard Strayer is another option worth considering in Freeze teams. Its Cryo DMG Bonus and additional CRIT Rate against enemies affected by Cryo or Frozen can make it competitive with Golden Troupe when enemies can be Frozen consistently.
The problem is reliability. Against bosses that cannot be Frozen, Blizzard Strayer loses part of its CRIT Rate bonus and performs significantly worse than it does in ideal Freeze conditions. Escoffier also gains CRIT Rate from Ascension and often benefits from Cryo Resonance, making it easy to overcap when using a CRIT Rate weapon.
Blizzard Strayer is best treated as a situational alternative rather than a universal recommendation. If your Escoffier needs to perform across different bosses and encounters, Golden Troupe offers more consistent personal damage.
Which Artifact Set Should You Actually Farm?
For general off-field damage: Golden Troupe is the simplest personal damage option, especially if you already have strong pieces.
For a heavily invested Skirk: Scroll or another support set often becomes more attractive because Skirk contributes a larger portion of the team's total damage.
For a high-ER Favonius Escoffier: Support sets deserve more consideration because a significant portion of her stat budget already goes toward Energy rather than personal damage.
For teams that Burst every rotation: Noblesse is convenient when other support artifact bonuses are already covered.
For teams that rarely use Escoffier's Burst: Avoid relying on Noblesse uptime. Golden Troupe, Scroll, or Tenacity may perform more consistently.
For consistently Freezable enemies: Blizzard Strayer can be competitive for personal damage, but it becomes less reliable against Freeze-immune bosses.
Community build comparisons often reach different conclusions because the characters being compared have different investment levels. A player with C2R1 Skirk and Favonius Escoffier may benefit more from Scroll, while someone using C0 Skirk and a heavily invested Escoffier may find Golden Troupe more competitive.
The useful comparison is the entire team's performance under the same rotation. Don't replace a strong existing artifact set with poorly rolled support pieces until the teamwide benefit justifies the cost.
Escoffier Best Stats and Energy Recharge
Artifact Main Stats and Substats
- Sands: ATK% for personal damage and healing; Energy Recharge if her Burst isn't consistently available when needed.
- Goblet: Cryo DMG Bonus generally performs slightly better for personal damage. ATK% can be competitive with strong substats or substantial external DMG Bonus buffs.
- Circlet: CRIT Rate or CRIT DMG depending on the rest of your build.
- Substats: Enough Energy Recharge first, followed by CRIT Rate, CRIT DMG, and ATK%.
Escoffier gains CRIT Rate from Ascension, and Cryo Resonance grants another 15% against enemies affected by Cryo or Frozen. Check her effective CRIT Rate before equipping a CRIT Rate circlet, especially when using Deathmatch or Blizzard Strayer.
An ATK% Goblet can be reasonable in Furina teams because Furina already supplies considerable DMG Bonus. It also increases Escoffier's healing. With Shenhe, however, Cryo DMG Bonus tends to become more attractive for personal damage.
How Much Energy Recharge Does Escoffier Need?
Escoffier's Energy needs depend on her Burst frequency, the number of Cryo teammates, particle generation, Favonius activations, and rotation length. The following are approximate C0 reference ranges for teams that use her Burst regularly.
| Team Setup | Approximate C0 ER |
|---|---|
| Triple Cryo | 120–150% |
| Double Cryo | 130–165% |
| Skirk Triple Cryo | 155–175% |
| Skirk Double Cryo | 185–200% |
| Solo Cryo | 160–195% |
These estimates assume reasonable team particle generation and Favonius support where applicable. Different equipment and rotations can change the numbers. For detailed Energy calculations and additional equipment comparisons, the KQM Escoffier Quick Guide is a useful theorycrafting reference.
In a Skirk team with Furina and Shenhe, Escoffier often benefits from using her Burst consistently to support Fanfare generation. This can justify an ER Sands or Favonius Lance. With Vodyanitsa, who provides another source of healing, Escoffier may be able to Burst every other rotation or skip it when sufficient healing and buffs are already available.
Before lowering her ER, check Furina's Fanfare and the party's HP at the beginning of the main DPS's damage window. If major buffs are still building when Skirk starts attacking, Escoffier may need to use her Burst more frequently.
Escoffier Talent Priority
Low-Temperature Cooking (Elemental Skill) > Scoring Cuts (Elemental Burst) > Kitchen Skills (Normal Attack)
Level the Elemental Skill first because the Cooking Mek contributes most of Escoffier's personal damage. Higher Skill levels improve that damage, although her resistance reduction remains fixed by her Ascension Passive and team composition rather than Talent Level.
The Burst is the second priority. It improves the initial damage and teamwide healing, making it valuable in Furina teams and other compositions that depend on Escoffier for sustain.
Normal Attacks are a low priority for standard support and sub-DPS builds. Escoffier spends little time attacking on-field, so upgrading them offers limited value.
A practical investment target is Skill Level 8–9 and Burst Level 8 before considering Crowns. Crown the Skill first if you want additional personal damage, and consider the Burst afterward if you specifically value its increased healing.
Best Escoffier Teams
Skirk + Escoffier + Furina + Vodyanitsa
This is one of Escoffier's strongest premium teams. All four characters are Cryo or Hydro, maintaining the full 55% resistance reduction. Skirk acts as the main DPS, Furina supplies off-field Hydro damage and Fanfare buffs, Escoffier provides Cryo damage and resistance reduction, while Vodyanitsa contributes additional offensive support, healing, and defensive utility.
Vodyanitsa's biggest practical advantage is that she changes the team's healing and Energy economy. Escoffier may not need to Burst every rotation, giving her more freedom to invest in damage instead of Energy Recharge. The exact benefit depends on Furina's Fanfare generation and whether Escoffier's weapon or artifacts require Burst usage.
A useful artifact starting point is Golden Troupe on Furina, Tenacity of the Millelith on Vodyanitsa, and Scroll or Noblesse on Escoffier. Other arrangements can be competitive when Escoffier contributes substantial personal damage.
Vodyanitsa can also use Thrilling Tales of Dragon Slayers. If you're using that weapon to buff Skirk, arrange the rotation so Vodyanitsa switches directly into Skirk and doesn't accidentally pass the ATK bonus to another support.
For a closer look at Vodyanitsa's HP requirements, weapon choices, and buff timing, see the Vodyanitsa Build Guide.
What Does Vodyanitsa Change for Skirk?
Vodyanitsa's value has generated discussion among Skirk players, especially when compared with Mona, Yelan, and Shenhe in the fourth slot.
In one Chinese-language Skirk and Escoffier banner analysis, the creator reported approximately 120,000 DPS with a Mona setup and around 180,000 DPS after switching to Vodyanitsa. The creator specifically described this as a result for a Normal Attack-oriented Skirk playstyle, not a universal improvement for every rotation.
These figures are a single creator's test, with equipment and character investment affecting the comparison. They should not be interpreted as a fixed 50% improvement from Vodyanitsa alone.
The more reliable takeaway comes from her mechanics: Vodyanitsa supplies additional buffs and healing while preserving Escoffier's full Cryo/Hydro team condition. Her value can vary between Normal Attack-focused, Burst-focused, and hybrid Skirk rotations because those playstyles distribute damage differently.
Skirk + Escoffier + Furina + Shenhe
Shenhe is another strong fourth-slot choice. Her Icy Quill and other buffs amplify Cryo damage, benefiting both Skirk and Escoffier. She also provides Cryo particles that can help reduce the team's Energy requirements.
The main difference is sustain. Shenhe does not replace Escoffier's healing, so Escoffier generally needs to use her Burst more consistently to support Furina's Fanfare. This makes Energy Recharge and Favonius Lance more important than in some Vodyanitsa compositions.
Shenhe teams can support standard Skirk rotations as well as more advanced split rotations, but the latter require tighter cooldown and buff timing. If you're still learning Skirk's damage sequences, start with the standard rotation before attempting more demanding setups.
For Skirk's own weapons, artifacts, and damage combos, refer to the Skirk Build Guide.
Budget Skirk Team: Skirk + Escoffier + Xingqiu + Dahlia / Layla / Charlotte
You don't need Furina and Vodyanitsa to build a functional Skirk team with Escoffier. Xingqiu provides off-field Hydro application, while Dahlia, Layla, or Charlotte fills the final support slot. All of these characters are Cryo or Hydro, preserving Escoffier's full resistance reduction.
Dahlia: Provides a shield and an Attack SPD buff. His shield can also enable Calamity of Eshu, a strong event Sword option for Skirk when available. Xingqiu remains valuable because Dahlia alone does not provide sufficient off-field Hydro application.
Layla: Provides a durable Cryo shield, extra Cryo application, and access to Tenacity of the Millelith. She can also enable Calamity of Eshu, making her useful for players who already own that weapon.
Charlotte: Offers additional healing, Cryo particles, and access to Thrilling Tales of Dragon Slayers. Her healing may allow Escoffier to use her Burst less frequently.
These are lower-cost alternatives for players who already own Skirk and Escoffier, not teams that require zero limited 5-star characters. Their main advantage is avoiding additional premium supports while keeping Escoffier's full passive active.
Xingqiu's Rain Swords require Normal Attacks to trigger, so include suitable Normal Attacks during Skirk's field time rather than using a rotation that ignores his Burst mechanics.
Ayaka + Escoffier + Furina + Shenhe / Rosaria
Ayaka benefits from Escoffier's Cryo RES Shred, sustained Cryo damage, and healing. Furina provides Hydro application and teamwide damage buffs, while Shenhe amplifies Cryo damage. Rosaria is a more accessible option who contributes particles, CRIT Rate support, and personal damage.
Escoffier's Burst helps generate Furina's Fanfare before Ayaka's main damage window. Meanwhile, the Cooking Mek can continue attacking and refreshing the resistance reduction while Ayaka uses her Burst and follow-up attacks.
Against enemies that can be Frozen, the team also benefits from Freeze control. Against bosses that cannot be Frozen, Escoffier still provides resistance reduction, but Ayaka's Burst positioning becomes more important.
Lower-Cost Freeze Team: Escoffier + Furina + Rosaria + Xingqiu
This composition is an alternative for players who already own Escoffier and Furina but lack Skirk or another premium Cryo carry. It reduces the need for additional limited 5-star characters, although it is not a fully F2P team because both Escoffier and Furina are limited 5-stars.
Rosaria contributes Cryo damage, particles, and CRIT Rate support, while Xingqiu supplies Hydro damage and defensive utility. The team has flexible field times rather than relying on one expensive hypercarry.
A practical starting sequence is Furina Skill and Burst, Escoffier Skill and Burst, Rosaria Skill and Burst, then Xingqiu Skill and Burst. Return to Rosaria for Normal and Charged Attacks, refreshing her Skill as it becomes available and using Normal Attacks to trigger Xingqiu's Rain Swords.
This composition won't match the concentrated damage of a highly invested Skirk team, but it makes good use of Escoffier's resistance reduction and offers a workable Freeze setup without requiring multiple additional premium teammates.
Lohen + Escoffier + Furina / Vodyanitsa + Mona
Lohen can use Escoffier's Cryo support in a Freeze-oriented composition. Furina contributes teamwide damage amplification, while Mona adds her Omen debuff and other offensive support. Vodyanitsa can replace Furina in a different version of the team, providing healing and additional buffs.
In these lineups, Escoffier generally benefits from a support set such as Noblesse or Scroll. Furina or Vodyanitsa can carry Tenacity when the resulting team buff provides more value than additional personal damage.
For more information on Lohen's personal equipment and rotation, see the Lohen Build Guide.
Stellar-Conduct Teams: Sandrone and Wriothesley
Escoffier can also support some Stellar-Conduct teams, even when they cannot satisfy her four-Cryo/Hydro party requirement. Her resistance reduction becomes smaller, but she still provides off-field Cryo application, damage, and healing.
For Sandrone, Escoffier can help maintain Cryo application and contribute particles while holding Tenacity or Noblesse to strengthen ATK-scaling teammates. Favonius Lance is worth considering when the team needs additional Energy.
Sandrone's team-building requirements differ from traditional Freeze teams, so Escoffier should be evaluated as one part of the full composition rather than assuming she always provides her maximum RES Shred. The Sandrone Build Guide covers that character's own equipment and team options.
Wriothesley needs more careful healing management. His enhanced Charged Attack mechanics benefit from maintaining the appropriate HP conditions, and excessive healing can interfere with those interactions. In some Wriothesley Stellar-Conduct rotations, Escoffier should use her Skill without casting her Burst unless healing is specifically required.
Escoffier Rotation Guide
Standard Support Rotation
- Activate any Hydro application or support effects that should come before Escoffier.
- Tap Escoffier's Elemental Skill to summon the Cooking Mek and apply Cryo RES Shred.
- Use her Burst if healing, Fanfare generation, or Burst-triggered equipment effects are needed.
- Activate the remaining support buffs, keeping short-duration effects close to the main DPS's field time.
- Switch to the main DPS and perform the planned damage combo while the Cooking Mek continues attacking.
- Refresh support abilities once the next rotation begins.
Escoffier's standard personal sequence is Skill followed by Burst. This lets her Burst benefit from the resistance reduction already applied by her Skill and helps her receive the Skill's Cryo particles.
Burst followed by Skill is also possible when you want another teammate to receive particles or need a different setup, but the change should be intentional rather than automatic.
Skirk + Furina + Escoffier + Vodyanitsa Rotation
A practical starting sequence is:
Furina Skill and Burst → Escoffier Skill (Burst if needed) → Vodyanitsa Skill (Burst if needed) → Skirk damage combo.
Escoffier and Vodyanitsa can alternate Burst usage when their combined healing is sufficient. The key is to maintain appropriate HP and Fanfare buffs before Skirk begins her main damage window.
If Vodyanitsa holds Thrilling Tales of Dragon Slayers, arrange the final support actions so she switches directly into Skirk. The weapon buffs the next character who takes the field, so switching into another support wastes the intended ATK bonus.
Also check Skirk's cooldowns before using Vodyanitsa's final support action. Activating a short-duration buff while Skirk is still waiting for an important ability reduces the effective duration of that buff during actual damage.
Skirk + Furina + Escoffier + Shenhe Rotation
A standard starting sequence is:
Furina Skill and Burst → Escoffier Skill and Burst → Shenhe Hold Skill and Burst → Skirk Tap Skill damage combo.
Shenhe's buffs should overlap Skirk's main damage window. Since Escoffier provides the primary healing, her Burst is generally needed regularly to support Furina's Fanfare generation.
Advanced Skirk players can use more complex split or Burst-focused rotations, but those require additional cooldown management. Start with the standard sequence before moving to a rotation that demands more precise execution.
Common Rotation Mistakes
- Holding Escoffier's Skill: This activates the cooking utility instead of the combat-focused Cooking Mek.
- Failing to trigger Scroll: If Escoffier holds Scroll, she must trigger the relevant Elemental Reaction herself.
- Skipping necessary healing: Missing Escoffier's Burst can delay Furina's Fanfare and reduce effective team damage.
- Using Noblesse without Bursting: The team ATK buff only activates after Escoffier casts her Burst.
- Wasting Thrilling Tales: Switching from Vodyanitsa into the wrong character can give the ATK buff to another support instead of Skirk.
- Overbuilding Energy Recharge: If Escoffier rarely needs her Burst, excessive ER reduces the offensive stats available for her Skill damage.
- Using the wrong Skirk rotation: A Normal Attack-oriented setup and a Burst-focused setup don't necessarily benefit equally from the same buffs or timing.
Escoffier Constellations: C0, C1, and C2 Value
C0 — Complete Support Kit
Escoffier is fully functional at C0. Her maximum Cryo/Hydro RES Shred, off-field Skill damage, and healing are already available without Constellations.
For F2P accounts, this is a sensible stopping point. Her core utility doesn't require premium weapons or additional copies, and completing the rest of the team often provides a better return than pursuing vertical investment immediately.
C1 — 60% Cryo CRIT DMG
Pre-Dinner Dance for Your Taste Buds grants nearby party members 60% Cryo DMG CRIT DMG for 15 seconds after Escoffier uses her Elemental Skill or Burst, provided all four party members are Cryo or Hydro and her required Ascension Passive is unlocked.
This is a strong upgrade for Cryo-centered teams because it improves damage from characters such as Skirk and Ayaka, as well as Escoffier's own Cryo damage.
The bonus is less valuable in Hydro-centered teams where Cryo damage makes up a smaller part of the team's output. It also cannot activate in mixed-element teams that fail to meet the four-character requirement.
C2 — Cold Dish Damage Bonus
C2 grants five Cold Dish stacks after Escoffier activates Cold Storage Mode. When another nearby active character deals eligible Cryo damage, those stacks are consumed to provide an Additive DMG Bonus equal to 240% of Escoffier's ATK per stack.
The stacks are limited and may be consumed quickly in multi-target situations because consumption depends on the number of opponents hit. Escoffier herself does not receive the C2 bonus, so it is primarily intended to strengthen an active Cryo damage dealer.
C2 can be valuable for concentrated Cryo damage windows, but it is a luxury investment. For most accounts, completing important teammates and addressing equipment weaknesses should come first.
C4 and C6 — Higher Investment
C4 extends Rehab Diet and can provide additional healing and Energy. The extra Energy lowers Escoffier's ER requirements, particularly in teams that use her Burst every rotation.
C6 adds Special-Grade Frosty Parfait attacks when the active character hits enemies with Normal, Charged, or Plunging Attacks. These attacks deal AoE Cryo damage equal to 500% of Escoffier's ATK, count as Elemental Skill damage, and can trigger up to six times during one Cold Storage Mode duration.
C6 substantially improves her personal damage, but it isn't required for her support role. Unless Escoffier is a favorite character you specifically want to maximize, C0 or C1 is generally the more efficient stopping point.
Escoffier C1 vs Signature Weapon: Which Should You Pull?
If you already own C0 Escoffier and have enough Primogems for one major upgrade, compare C1 against Symphonist of Scents based on your team's damage distribution and Burst usage.
Choose C1 when: You mainly use full Cryo/Hydro teams, your main carry deals substantial Cryo damage, and you want a teamwide CRIT DMG bonus without relying on a healing-triggered weapon effect.
Choose Symphonist of Scents when: Escoffier contributes meaningful personal damage, your teammates benefit from its ATK buff, and her Burst is used frequently enough to activate and maintain that support effect.
Consider neither when: Your team still lacks essential characters, Escoffier has unresolved Energy problems, or another investment would improve your roster more.
For a dedicated Cryo hypercarry lineup, C1 is an attractive upgrade because it benefits the main DPS directly. Symphonist is especially appealing when Escoffier contributes substantial personal damage and its healing-triggered buff can be used effectively.
Neither option should take priority over building a functional team. A well-equipped C0 Escoffier already provides her most important resistance reduction and healing.
Escoffier Ascension and Talent Materials
Level 1–90 Ascension and EXP Requirements
To fully ascend Escoffier and raise her from Level 1 to 90, prepare the following character materials:
- 168 Beryl Conch
- 46 Secret Source Airflow Accumulator
- 1 Shivada Jade Sliver
- 9 Shivada Jade Fragments
- 9 Shivada Jade Chunks
- 6 Shivada Jade Gemstones
- 18 Meshing Gear
- 30 Mechanical Spur Gear
- 36 Artificed Dynamic Gear
Character Ascension stages cost 420,000 Mora in total, while leveling the character requires additional EXP materials and Mora. For the supplied Level 1–90 calculator plan, the combined Mora requirement is 2,092,600, with 418 Hero's Wit and 3 Wanderer's Advice listed as the chosen EXP material combination.
Different combinations of EXP books can cover the same leveling requirement, so the exact number of books may vary. The important distinction is that the 420,000 Mora Ascension cost is only part of the full leveling budget.
Talent Materials for All Three Talents at Level 10
- 9 Teachings of Justice
- 63 Guide to Justice
- 114 Philosophies of Justice
- 18 Meshing Gear
- 66 Mechanical Spur Gear
- 93 Artificed Dynamic Gear
- 18 Eroded Horn
- 3 Crown of Insight
- 4,957,500 Mora
These totals assume upgrading Normal Attack, Elemental Skill, and Elemental Burst all the way to Level 10. Standard support builds don't require that much investment.
Leave Normal Attack at Level 1 initially, prioritize Skill Level 8–9, and raise Burst to Level 8 or higher if you rely on its healing. This saves Talent books, weekly boss materials, Mora, and Crowns.
For accounts with limited Resin, prioritize unlocking her Ascension Passives and improving her Skill before spending heavily on artifact optimization. Her 55% RES Shred doesn't require Level 90 or Crowned Talents.
Should You Pull Escoffier?
If You Already Have Skirk
Escoffier is one of Skirk's strongest supports. Her Cryo/Hydro RES Shred, sustained off-field damage, and healing cover several important team requirements in one slot.
When choosing between Escoffier and Vodyanitsa with enough Primogems for only one character, Escoffier is often the more foundational addition if your Skirk team lacks her resistance reduction and healing package. Vodyanitsa provides valuable buffs and flexibility, but the two characters aren't direct replacements.
Skirk remains playable without Escoffier, but alternative teams usually give up some combination of damage, resistance reduction, and sustain. If you're prioritizing Skirk's team performance rather than simply collecting characters, Escoffier deserves serious consideration.
If You Own Neither Skirk Nor Escoffier
Consider the cost of completing the team before committing to either character. Skirk and Escoffier have strong synergy, but owning only one doesn't automatically give you a complete premium Freeze lineup.
If you already have Furina, Ayaka, or another suitable Cryo/Hydro core, Escoffier may provide immediate value independently. If your roster lacks those characters, using her full passive becomes more restrictive.
For F2P players with limited Primogems, skipping an unfinished premium team can be reasonable when those resources could strengthen an existing roster.
If You Need Another Team for Endgame Content
Escoffier can be a valuable investment when she completes an existing Cryo/Hydro lineup. Combining healing, RES Shred, and off-field damage in one slot allows the remaining characters to focus more heavily on offense.
However, she doesn't solve every team-building problem by herself. Missing main DPS investment, insufficient Hydro application, and encounter-specific mechanics still matter. Even strong Skirk teams may need to adjust their fourth slot in certain high-difficulty fights.
If you're deciding whether to invest in the Skirk and Escoffier rerun, the Genshin Impact 7.1 Banner Guide provides the wider banner lineup and additional context for planning your wishes.
Escoffier Build FAQ
Can Escoffier Work Without Furina?
Yes. Escoffier can support Skirk alongside Xingqiu and a Cryo/Hydro flex character such as Dahlia, Layla, or Charlotte. These compositions preserve her full resistance reduction but generally offer fewer offensive buffs than premium Furina teams.
Can Vodyanitsa Replace Escoffier?
Not directly. Escoffier provides substantial Cryo/Hydro RES Shred, off-field damage, and healing, while Vodyanitsa offers additional damage buffs, healing, and utility. They work particularly well together, but neither reproduces every function of the other.
Does Escoffier Need Her Burst Every Rotation?
No. Furina teams often benefit from regular Escoffier Bursts for Fanfare generation, but another healer can reduce that need. If Escoffier holds Noblesse or Symphonist of Scents, skipping her Burst also affects those equipment bonuses.
Does Escoffier's RES Shred Work Against Bosses That Cannot Be Frozen?
Yes. The resistance reduction activates when Escoffier's Elemental Skill or Burst hits an opponent, regardless of whether that enemy can be Frozen. However, other Freeze-dependent effects in the team may still lose effectiveness against Freeze-immune enemies.
Is Escoffier C1 Worth It Without Her Signature Weapon?
Yes, particularly in full Cryo/Hydro teams centered on a Cryo DPS. C1 provides 60% Cryo CRIT DMG without requiring Symphonist of Scents. However, C0 already provides Escoffier's main support functions, so C1 should be an optional upgrade after the rest of your team is properly built.
What to Upgrade Next
For an unbuilt C0 Escoffier, start by raising her to at least Level 80/90, unlocking her Ascension Passives, and improving Low-Temperature Cooking. Equip a functional artifact set and enough Energy Recharge to use her Burst whenever the team needs healing.
For a Skirk-focused build, decide whether Escoffier should contribute significant personal damage or primarily buff Skirk. Use Golden Troupe when her Skill damage matters, or consider Scroll and other support sets when Skirk dominates the team's output. Check reaction timing, existing buffs, and Burst frequency before farming a replacement set.
Once your rotation works consistently, further investment becomes optional. C1 is a strong stopping point for dedicated Cryo teams, while Symphonist of Scents is valuable when its healing-triggered buff can be maintained. If your C0 Escoffier already supports the team comfortably, prioritize unresolved roster or equipment weaknesses before chasing either upgrade.