

A good Skirk build needs more than a high CRIT DMG number. If she runs out of Serpent’s Subtlety, receives the wrong support buff, or spends half a damage window chasing an enemy, another artifact upgrade may barely change the result. Start with a Normal Attack build, three Hydro or Cryo teammates, and a rotation you can repeat.



For most accounts, that means Finale of the Deep Galleries, an ATK% sands, a Cryo DMG or ATK% goblet, and a balanced CRIT circlet. Keep a strong Marechaussee Hunter set if you use Furina and focus on Normal Attacks. The Version 7.1 banner guide covers the banner context; this build guide focuses on equipment, three team options, and the mistakes that make a good setup feel weak.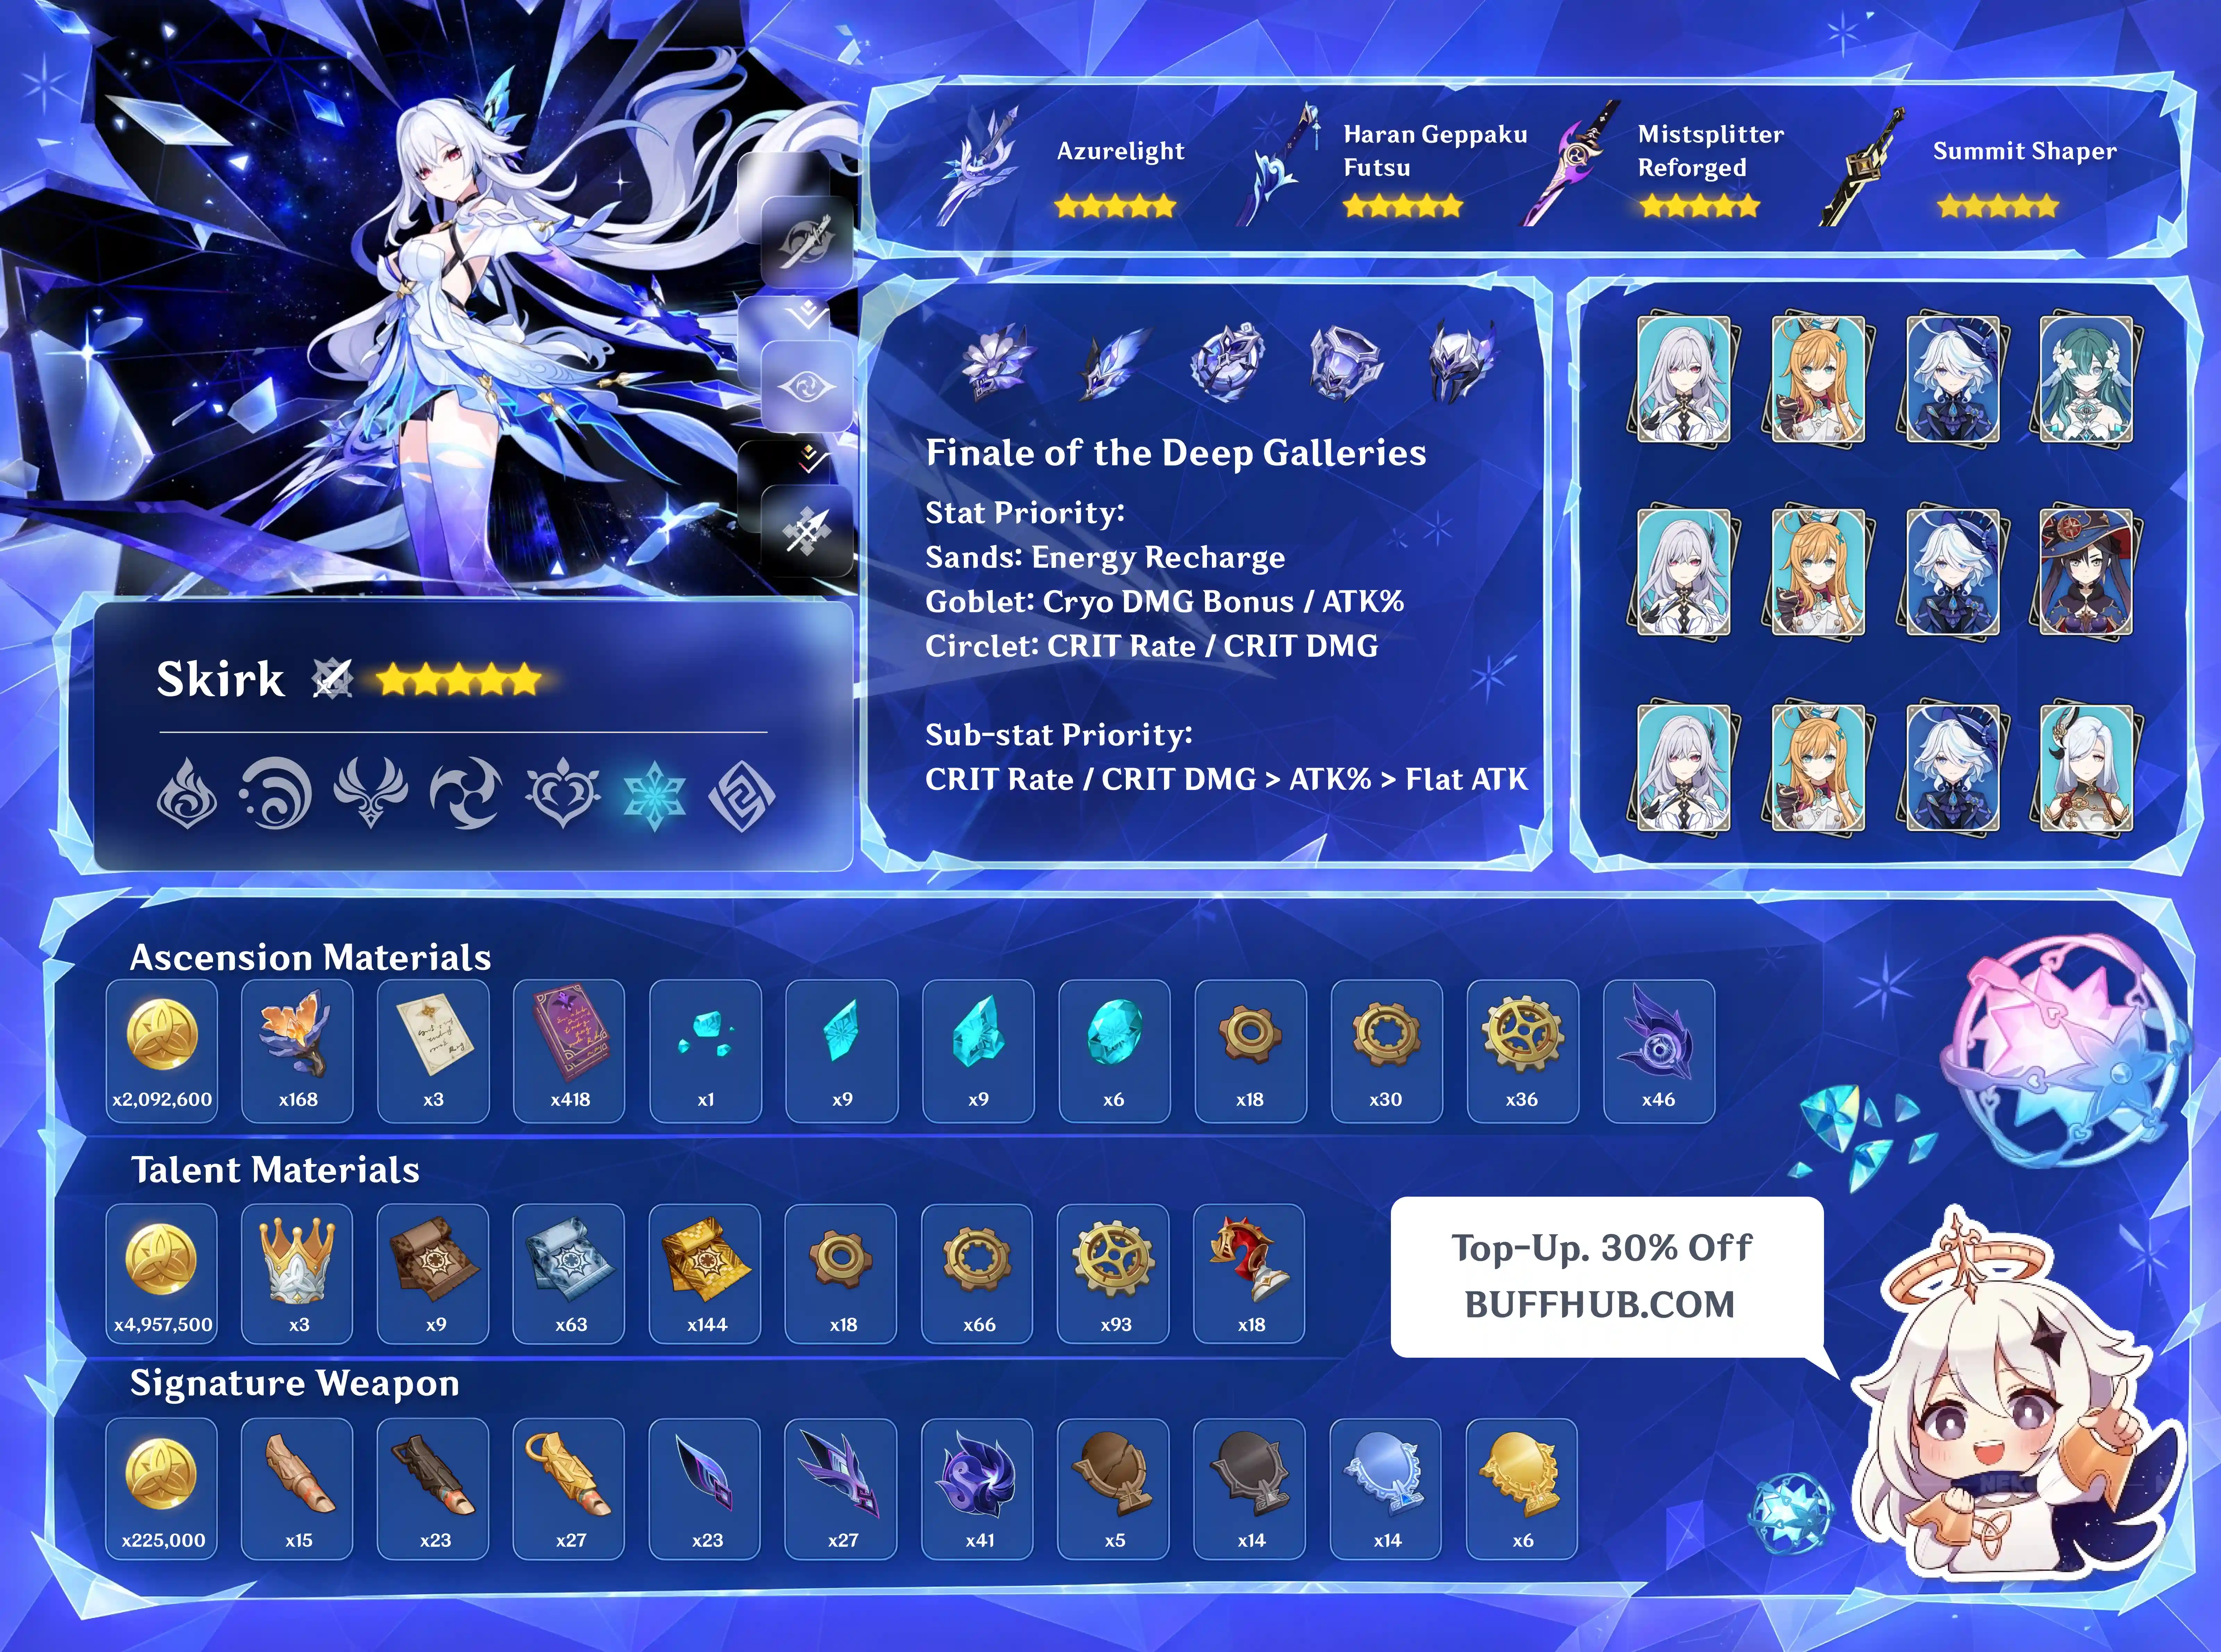









Skirk Build: Main Stats and Substat Priority
| Build choice | Recommendation | What to check |
|---|---|---|
| Artifact set | 4-piece Finale of the Deep Galleries | Marechaussee Hunter remains competitive for Normal Attack play with Furina and reliable stacks. |
| Sands | ATK% | Energy Recharge does not replenish Skirk’s special resource. |
| Goblet | Cryo DMG Bonus / ATK% | Start with Cryo at comparable substats, then compare both with your actual team buffs. |
| Circlet | CRIT Rate / CRIT DMG | Include conditional bonuses before choosing. |
| Substat priority | CRIT Rate / CRIT DMG → ATK% → Flat ATK | Stop adding CRIT Rate once effective CRIT Rate reaches 100%; balance ATK and CRIT rather than maximizing one number. |
| Talent priority | Elemental Skill → Elemental Burst | Reverse the priority for dedicated Burst play. The ordinary Normal Attack talent can stay at level 1. |
How Skirk’s Skills and Void Rifts Work
Skirk’s enhanced Normal Attacks scale with her Elemental Skill talent. Normal Attack damage bonuses still apply, but leveling her ordinary Normal Attack talent does not improve these stance attacks. Her Burst talent affects both the regular damaging Burst and the Normal Attack bonus from her special Burst, so it remains useful in an on-field build.
Tap Skill enters Seven-Phase Flash, her attacking stance. Hold Skill enters a movement state that can absorb nearby Void Rifts without starting that stance. At C0, either input grants 45 Serpent’s Subtlety, and each absorbed Rift adds eight. The regular Burst requires at least 50, so Hold Skill from zero needs at least one Rift before you can use it.
Inside the attacking stance, Q becomes Havoc: Extinction: it collects nearby Rifts and strengthens the next ten qualifying Normal Attack hits instead of dealing a nuke. Its bonus depends on how many Rifts that cast absorbs. Outside the stance, Havoc: Ruin consumes Subtlety to deal the regular Burst’s damage.
In Hydro-Cryo teams, Frozen reactions supply the Rifts. Generation is limited to once every 2.5 seconds, with at most three present at once. A stance Charged Attack must hit an opponent to collect nearby Rifts; swinging at empty space is not enough. Melt does not produce them, so enemies with persistent Pyro auras can disrupt your resource supply.
Best Artifacts: Galleries or Marechaussee Hunter?
Galleries supports both playstyles, but watch the six-second restriction
Finale of the Deep Galleries is the flexible choice for Normal Attack and Burst builds. At zero Elemental Energy, its four-piece effect supplies 60% Normal Attack DMG and 60% Elemental Burst DMG. Normal Attack damage disables the Burst bonus for six seconds, while Burst damage disables the Normal Attack bonus for six seconds.
Skirk’s special Burst deals no damage, so it does not disable the Normal Attack bonus. Her regular Burst does. If you nuke and immediately start attacking, the early Normal Attacks lose that bonus; put useful support actions between the windows, or accept the loss when an enemy’s brief vulnerability makes immediate damage more valuable.
Keep Hunter when your Furina build already works
Marechaussee Hunter is a strong alternative when Furina supplies reliable HP changes and Skirk mainly uses Normal Attacks. Its two-piece bonus does not enhance the regular Burst, and its CRIT stacks need time on-field to build. A Burst opening cannot automatically use the same effective CRIT Rate as an established attacking window.
Do not replace a well-balanced Hunter set solely because Galleries is the dedicated set. Farming becomes more appealing when you want to change teammates, introduce regular Burst openings, or cannot balance Hunter around your weapon’s CRIT Rate. Otherwise, fixing support uptime or an underleveled talent may improve the team sooner.
Use realistic stat targets
Hunter provides 36% CRIT Rate at full stacks. Cryo Resonance adds 15% against enemies affected by Cryo or Frozen, so 49% displayed CRIT Rate reaches 100% only when both conditions apply. Without the resonance condition, that build reaches 85%. On Galleries, 75–85% displayed CRIT Rate is a useful starting range when resonance is dependable, not a guarantee against every enemy.
Use an ATK% sands and begin with a Cryo goblet at comparable substats. If your ATK% goblet has substantially better rolls, use it instead of forcing a weak Cryo piece. Furina’s damage bonus can also make ATK% more competitive, while stronger ATK buffs can favor Cryo DMG; compare with the actual team enabled.
For a developed level-90 Galleries build with a Cryo goblet and Azurelight, roughly 2,100–2,200 ATK and 210–220% or more CRIT DMG are useful reference points alongside balanced CRIT Rate. These are build targets, not entry requirements. Change them with your weapon and buffs rather than sacrificing useful rolls to match a showcase.
Best Skirk Weapons for Normal Attack Builds
The order below follows the Normal Attack reference discussed in the rerun tutorial. It is not an equal-refinement damage chart: artifact distribution, refinements, and passive uptime can change the result. Use it to assess an existing weapon before treating it as a reason to spend wishes.
| Reference order | Weapon | When to choose it |
|---|---|---|
| 1 | Azurelight | Her signature option for personal damage; consider it after securing the intended teammates. |
| 2 | Haran Geppaku Futsu | A strong existing choice for sustained Normal Attacks; its attack-specific bonus does not enhance the regular Burst. |
| 3 | Mistsplitter Reforged | A strong alternative for Normal Attack and Burst-oriented play; owning it reduces the urgency of another sword. |
| 4 | Summit Shaper | A conditional existing option whose full stacking ATK benefit requires a shield. |
Do not carry Haran’s position over to a Burst-focused comparison. As regular Burst damage becomes a larger share of the rotation, its Normal Attack-specific advantage matters less. Mistsplitter is worth comparing for that playstyle rather than assuming the second entry always beats the third.
Summit Shaper also needs a separate check: none of the three default teams below provides a shield. Vodyanitsa’s interruption resistance does not count as one. Without a shield, you cannot assume the weapon’s full passive or the same ranking; do not pull it specifically to copy this list.
Three Skirk Teams to Build Around
Skirk, Escoffier, and Furina form the shared core. Escoffier combines healing, off-field damage, and up to 55% Hydro and Cryo resistance reduction in a full Hydro-Cryo party. Furina supplies off-field damage and a team damage buff supported by healing. The fourth slot changes the damage support and how you arrange the rotation.
Each of Skirk’s three teammates must hit enemies with Hydro or Cryo to contribute a Death’s Crossing stack. Simply placing compatible characters in the party is insufficient. Check that their attacks connect during setup, especially if the target moves away before a delayed hit lands.
| Team | Best reason to use it | Main execution check |
|---|---|---|
| Skirk + Escoffier + Furina + Vodyanitsa | Normal Attack support, healing, resistance reduction, and interruption resistance. | If Vodyanitsa carries Thrilling Tales, switch directly from her to Skirk. |
| Skirk + Escoffier + Furina + Mona | Omen and Thrilling Tales concentrate buffs into a damage window. | Place Mona near the end of setup and avoid wasting her buff time on extra swaps. |
| Skirk + Escoffier + Furina + Shenhe | Cryo support and the option to arrange separate Burst and Normal Attack windows. | Match Shenhe’s Tap or Hold Skill to the damage you are about to deal. |
Vodyanitsa for sustained Normal Attacks
Vodyanitsa offers a short Skill setup before Skirk takes the field. Her healing, Hydro and Cryo resistance reduction, interruption resistance, and additional damage support fit sustained attacks. She can also carry Thrilling Tales of Dragon Slayers and Tenacity of the Millelith.
A large gain over Mona in a particular Normal Attack showcase should not become a fixed percentage for every account or a Burst-focused rotation. Support equipment, buff timing, and execution affect the comparison. If Mona or Shenhe already helps you clear consistently, treat Vodyanitsa as a further investment rather than a required repair.
Mona and the support artifact setup
Mona supplies Omen and can pass Thrilling Tales directly to Skirk. For this team, the following configuration directs more of the party’s buffs toward Skirk:
- Skirk: 4-piece Finale of the Deep Galleries.
- Furina: 4-piece Tenacity of the Millelith, maintaining Skill hits for its ATK buff.
- Mona: 4-piece Noblesse Oblige and Thrilling Tales of Dragon Slayers.
- Escoffier: 4-piece Scroll of the Hero of Cinder City, triggering the relevant reaction for its 12% elemental bonus.
This trades Golden Troupe damage on Furina and potentially Escoffier for more support to Skirk. Compare full clear times before replacing good existing sets, and retain enough Energy Recharge for the required Bursts. Escoffier cannot activate Scroll’s additional Nightsoul-dependent bonus, so do not calculate her set as a full 40% elemental buff.
Shenhe and buff distribution
Shenhe’s Tap Skill supports Skill and Burst damage, while Hold Skill supports Normal and Charged Attack damage. For a sustained Skirk window, use Hold Skill; a split rotation can use Tap Skill before the nuke and Hold Skill later for the attacking phase. Her cooldowns determine whether both fit the sequence.
If Shenhe uses two ATK% two-piece sets and nobody carries Noblesse, Escoffier can take Noblesse instead. Avoid assigning sets automatically across all three teams: if Vodyanitsa carries Tenacity, a second copy on Furina does not provide another stacking ATK buff. Keep each support’s personal damage and required uptime in the comparison.
Skirk Rotation and Combos
E means Skill, Q means Burst, N2 means two Normal Attacks, N5 means the full five-attack string, C means Charged Attack, and D means dash. Dash after the intended hit connects. Collecting Rifts and preserving useful buffs take priority over finishing a memorized string when the enemy moves.
A repeatable Normal Attack rotation
For the Vodyanitsa team, start with Furina E Q → Escoffier E Q → Vodyanitsa E → Skirk Tap E. Make sure each support’s elemental attack connects. With Mona, use her E Q in the fourth-slot setup instead; with Shenhe, use Hold E and Q before Skirk’s Normal Attack window.
Thrilling Tales buffs only the next character you switch to. At R5, it grants 48% ATK for 10 seconds and can trigger once every 20 seconds. Switch directly to Skirk and attack promptly. Its duration does not cover her entire maximum stance, and swapping through the holder during the cooldown will not refresh it.
- Enter the stance and check the Rifts. If three are nearby, use the special Q early; N2 Q is a convenient opening, not a requirement.
- If only one or two exist and another should appear shortly, keep attacking before Q. Two Normal Attacks do not guarantee three Rifts: generation depends on reaction timing.
- Use full N5 strings, dashing after the fifth hit if comfortable.
- When new Rifts appear and Subtlety needs replenishing, land a Charged Attack to collect them, then resume Normal Attacks.
With sufficient Rifts at the opening, a simple practice sequence is Tap E → N2 Q → N5 D → N5 D → N2 C D → N5 D. Move the Charged Attack earlier if the resource bar runs low. Collecting fewer Rifts is preferable to losing the stance or missing an enemy’s vulnerability window while waiting for three.
Mobile-player discussions repeatedly identify full strings as easier to reproduce than aggressive cancels. Once those work, practice N2 D → N2 D → N5 D as a separate drill, then add Rift collection where needed. Compare several attempts with unchanged equipment: canceling before the second hit connects can erase the theoretical advantage.
A split rotation with Shenhe
A split rotation places a regular Burst before the sustained attacking window. For Skirk, Furina, Escoffier, and Shenhe, the following is a practice template with ready support Bursts, active Hydro-Cryo application, and an enemy you can keep hitting:
- Escoffier E → Furina E, dash, N1 → Shenhe N2, Tap E.
- Furina Q → Escoffier Q, N1 → Skirk Hold E to collect Rifts, end the movement state, then Q.
- Shenhe Q, N1, Hold E → Escoffier N3, then E when available → Skirk Tap E and Normal Attacks.
The intervening support actions give Skirk’s Skill time to recover and separate the nuke from Galleries’ six-second restriction. Check cooldowns instead of cutting directly from Skirk’s Q into Tap E. If Shenhe’s Hold Skill or Escoffier’s Skill is not ready, the sequence has not reached that handoff yet.
At C0 from zero resource, Hold Skill plus two Rifts provides 61 Subtlety, covering 11 of the 12 excess points counted toward regular Burst damage. Waiting for a third is therefore a timing decision. The two Burst forms share a cooldown, so use stance Charged Attacks for pickups while special Q is unavailable. At C2, delaying special Q also delays its 70% ATK buff.
This Shenhe team has no Thrilling Tales holder. In a Mona or Vodyanitsa variant, decide which damage window receives that weapon buff; it cannot be activated twice within 20 seconds. Keep the sustained rotation if the added setup does not improve your complete clear time.
Fix Low Damage Before Farming More Artifacts
If the first rotation works but the second stalls, check Furina and the healer before changing Skirk’s artifacts. Improve the character whose Burst is unavailable through Energy Recharge, better particle collection, or reliable Favonius triggers. Test against a target that survives multiple rotations, because frequent enemy drops can hide the problem.
If individual hits look strong but the clear remains slow, measure support actions, waiting, and chasing as well as damage. Dealing the same total damage in 24 seconds instead of 30 raises average DPS by 25%; that is a timing comparison, not a promised combo upgrade. Look for missed hits, a Thrilling Tales buff sent to the wrong character, or a pickup attempted with no Rifts nearby.
Skirk Build FAQ
Why does Skirk’s Burst sometimes have no large attack animation?
Inside Seven-Phase Flash, Q becomes the special Rift-collecting Burst. The regular damaging Burst is used outside that stance. The shorter animation is intended behavior.
Can I briefly switch out and resume her attacking stance?
No. Switching out ends the stance and clears its remaining Subtlety. An emergency swap may save the run, but you cannot return and continue the same attacking window.
Does Skirk work against bosses that cannot be Frozen?
Yes. Freeze immunity does not by itself prevent Rift generation when the relevant reaction is triggered. Enemy auras still affect reactions, and permanent Cryo Resonance should not be assumed against every boss.
Is Skirk usable without Escoffier?
Yes, but these three recommended teams rely on the damage and healing Escoffier supplies. Community reports range from comfortable clears to difficulty with demanding Stygian timers because investment and encounters differ. A successful substitute team is evidence for that setup, not proof that the damage gap disappears.
If I already use Finale of the Deep, how do I activate its full passive?
Use Skirk’s Skill first, then receive enough healing to clear the weapon’s Bond of Life. Healing before Skill cannot clear a Bond that does not yet exist. With Escoffier, activate her Burst during setup and let its later healing reach Skirk after Skill.
If using Charlotte as a substitute healer, place her Burst near the end of setup, switch directly to Skirk, and use Skill inside the remaining healing field. Her initial party heal occurs too early to clear the newly created Bond; enough follow-up healing must land before the field expires. Do not switch out of Skirk’s stance to fix the timing.
Should Skirk reach level 90 before I improve her supports?
Level her chosen weapon and important talents first, then fix support healing and Burst uptime. Level 90 is a later improvement for her ATK-based damage; an HP-scaling teammate such as Furina may gain more from those final character levels. Do not leave a necessary support unfinished merely to match a showcase.
Choose Your Next Upgrade
For an existing Skirk owner building this support core, I would usually prioritize a missing Escoffier over Azurelight or Skirk constellations. If you own neither character and can afford only one, consider what improves a team immediately. Escoffier may help an existing Cryo carry, while Skirk needs compatible teammates of her own.
Once the team works, an existing Haran or Mistsplitter makes another weapon less urgent. C0 remains a sensible stopping point. If you have deliberately chosen further investment, compare Skirk C2 with the improvements available elsewhere: Escoffier C1 adds 60% Cryo CRIT DMG for 15 seconds after her Skill or Burst in an all-Hydro-Cryo party. The next purchase depends on your current sword and roster, not a fixed spending ladder.
Before the next wish, identify what prevents your target clear. Missing Burst uptime calls for an energy or rotation fix; repeated missed hits call for a simpler combo. A clean, repeatable rotation that still falls short is a better reason to consider more damage investment. Once the team reaches your goal consistently, keep the remaining Primogems for another team.