

Mitya's biggest selling point in Genshin Impact Version 7.2 isn't just his Electro damage. His leaked kit gives Stellar-Conduct teams two very different ways to play: keep him off-field to generate Gradient Beacons and support another damage dealer, or bring him on-field to spend those Beacons through powerful Charged Attacks.



That flexibility changes how you should build him. Elemental Mastery matters in both roles, but his weapon choice, Talent priority, Energy Recharge needs, and even Skill input depend on who will actually be dealing the damage. A team built around Mitya's own Gradient Detonation attacks won't use him the same way as a Sandrone-led team.













Based on the current Version 7.2 beta information, Mitya is a 5-star Electro Catalyst character with a strong focus on Stellar-Conduct reactions. His signature Catalyst, Disenchantment in Deep Shadow artifact set, and several Cryo-Electro team combinations already point toward a clear build direction. The details below use leaked test-build values, so numerical effects and materials may still change before release.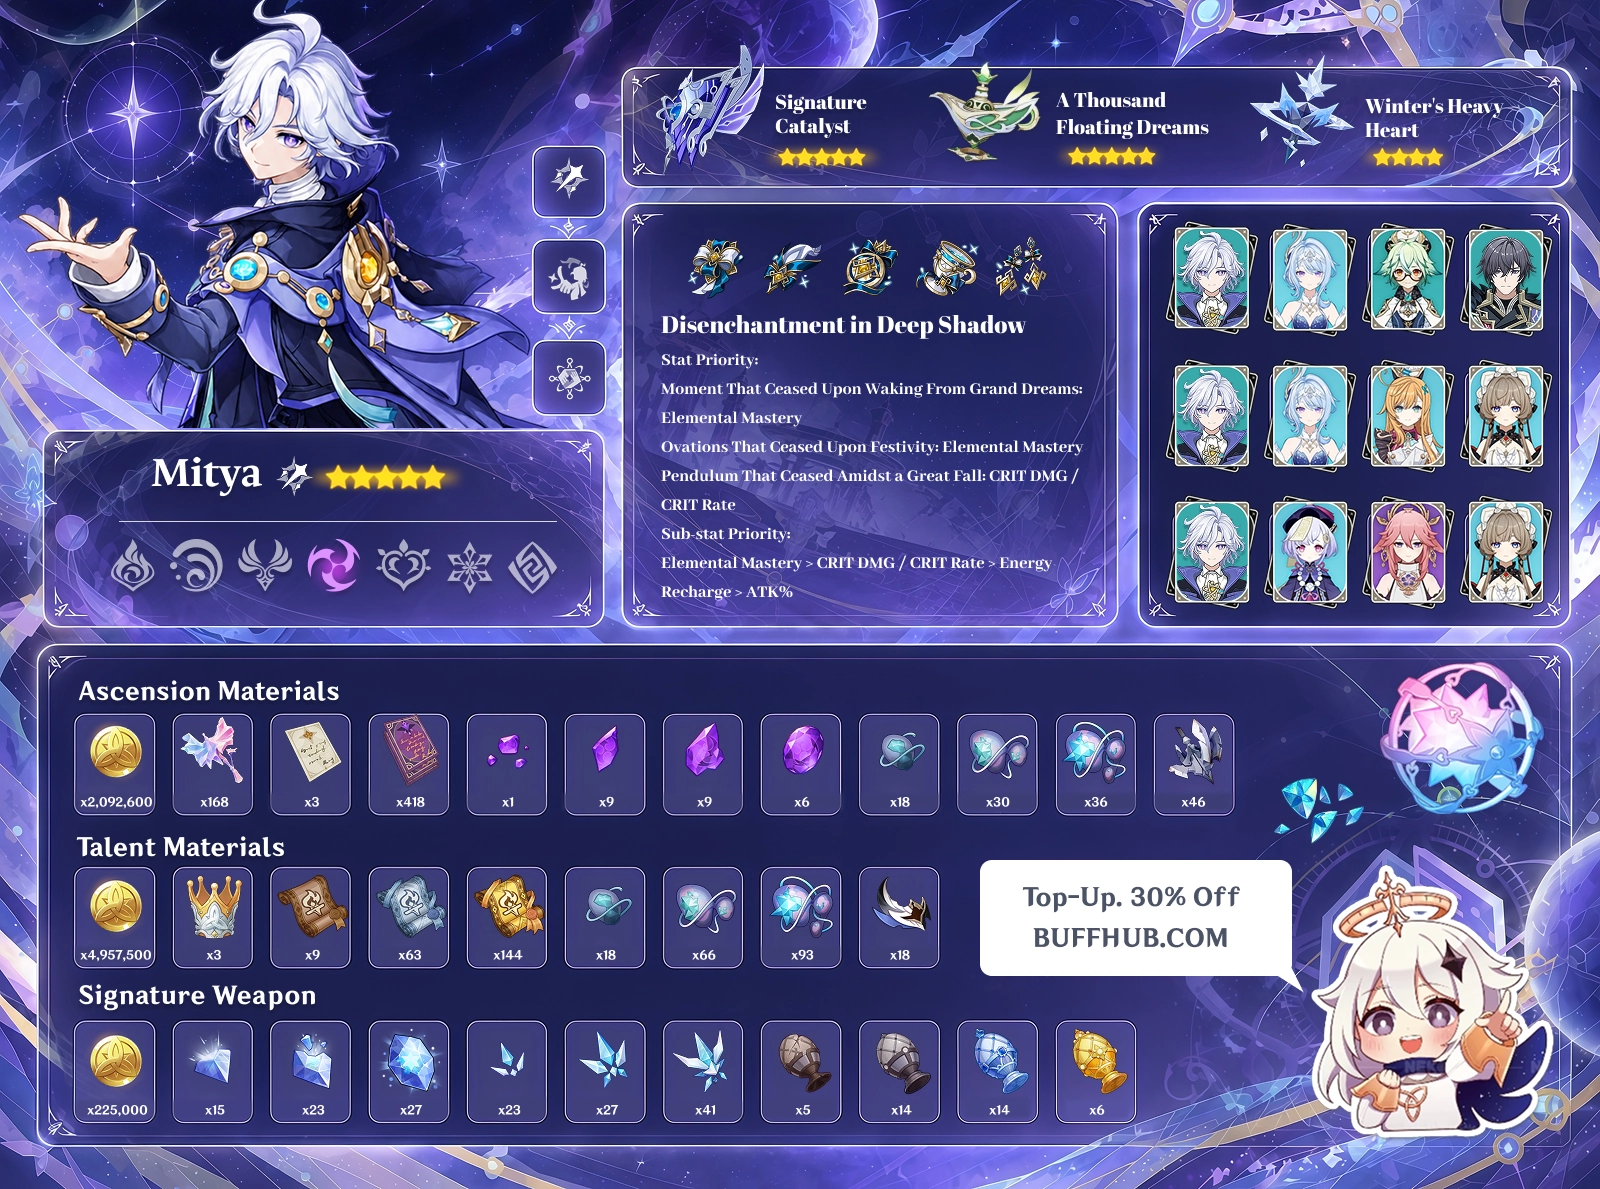
Mitya's Role: On-Field DPS or Off-Field Stellar-Conduct Support?
Mitya converts Superconduct into Stellar-Conduct through his passive, Stellar Jubilee: Top-Secret Protocol. Instead of generating Starlight Prisms, these reactions create Gradient Beacons that follow the active character and establish a Polestar Field. Mitya can normally carry up to four Beacons, and his passive extends their duration to 10 seconds.
Those Beacons are the foundation of his damage and support. His Elemental Skill, Principle: Variable Detection, creates a Detection Core that behaves differently depending on whether you tap or hold the Skill. Choosing the correct mode matters more than simply using the Skill whenever its cooldown ends.
Steady State: The Off-Field Support Setup
Tapping Mitya's Elemental Skill creates Detection Core: Steady State. The Core follows nearby enemies and periodically deals AoE Electro damage. Once Mitya reaches his maximum number of Gradient Beacons, newly generated Beacons are consumed by the Core to deal additional Stellar-Conduct reaction damage. When the Core expires or is replaced, it also consumes his remaining Beacons for a final detonation.
Steady State has another important benefit. Through Baseline Stress Test, every Gradient Beacon Mitya carries grants 30 Elemental Mastery to nearby party members. At C0, four Beacons can therefore provide 120 Elemental Mastery. This makes Mitya useful even when another character, such as Sandrone, takes most of the field time.
Overloaded: Spending Beacons Through Charged Attacks
Holding the Elemental Skill creates Detection Core: Overloaded. While this Core exists and Mitya has at least one Gradient Beacon, his usual Charged Attack becomes Gradient Detonation. This special attack costs no Stamina and consumes Beacons to deal additional AoE Electro damage counted as Stellar-Conduct reaction damage.
At Normal Attack Talent Level 10, Gradient Detonation has a 275.4% attack multiplier, while each consumed Beacon contributes damage based on 367.2% of Mitya's Elemental Mastery. His Overloaded passive also helps replenish Beacons after nearby characters trigger Stellar-Conduct, making repeated consumption possible within a short damage window.
The practical choice is straightforward: tap the Skill when Mitya is supporting another carry, and hold it when he is the character spending Beacons for damage. Switching modes is possible, but creating another Detection Core replaces the existing one, so it should be a deliberate part of the rotation rather than an accidental extra Skill cast.
Best Weapons for Mitya in Genshin Impact 7.2
Mitya's leaked signature Catalyst combines CRIT DMG with Elemental Mastery and a passive designed around elemental reactions. It's the most directly tailored weapon for his personal Stellar-Conduct damage. The alternatives are still useful, particularly if you already own an Elemental Mastery Catalyst or plan to use Mitya mainly for team support.
| Weapon | Level 90 Stats | Why Use It? |
|---|---|---|
| Unnamed 7.2 Signature Catalyst (5★) | 542 Base ATK 88.2% CRIT DMG |
Provides additional CRIT DMG, stacking Elemental Mastery, and Stellar-Conduct CRIT DMG. Designed for Mitya's personal damage. |
| A Thousand Floating Dreams (5★) | 542 Base ATK 265 Elemental Mastery |
Offers a large amount of Elemental Mastery and an additional EM buff for teammates. Particularly useful for support-oriented builds. |
| Winter's Heavy Heart (4★) | 510 Base ATK 55.1% CRIT DMG |
Provides useful CRIT DMG alongside Elemental Mastery and Stellar Glimmer bonuses in Cryo-Electro teams. |
Mitya's Signature Catalyst: CRIT DMG and Reaction Scaling
The unnamed signature Catalyst has 542 Base ATK and an 88.2% CRIT DMG secondary stat at Level 90. At Refinement 1, its passive adds another 24% CRIT DMG. Using an Elemental Skill activates Formula Association, granting 48 Elemental Mastery for 20 seconds.
During Formula Association, nearby party members triggering elemental reactions generate Formula Dissociation stacks. Each stack adds another 24 Elemental Mastery, and Stellar-Conduct triggers also allow each stack to grant 12% Stellar-Conduct CRIT DMG. With three stacks, the weapon can provide 120 Elemental Mastery in total from these effects, alongside up to 36% Stellar-Conduct CRIT DMG.
The passive fits Mitya's normal rotation. He already needs to use his Elemental Skill to deploy a Detection Core, while his Cryo-Electro teammates provide the reactions needed to build stacks. For an on-field Mitya, activating the weapon before consuming Beacons is the main advantage. The exact improvement over alternatives will still depend on artifact stats and team buffs, so the weapon's high CRIT DMG should not be mistaken for a universal damage percentage increase.
A Thousand Floating Dreams: A Flexible EM Alternative
A Thousand Floating Dreams supplies 265 Elemental Mastery at Level 90, making it attractive without requiring any reaction stacks to build its main stat. At R1, matching-element teammates grant 32 additional Elemental Mastery each, while teammates of other elements instead provide an Electro DMG Bonus. The Catalyst also grants 40 Elemental Mastery to nearby teammates other than the wielder.
Its appeal is especially clear when Mitya is used off-field. He benefits from the EM for his own reaction damage and passive scaling, while his teammates receive a separate buff. In a team where Mitya isn't the main damage dealer, that combination may be more useful than spending additional resources on a signature weapon focused heavily on his personal CRIT damage.
Winter's Heavy Heart: The Four-Star Alternative
Winter's Heavy Heart gives Mitya 55.1% CRIT DMG at Level 90. Its regular R1 passive grants 24 Elemental Mastery for each Cryo teammate and an ATK bonus for each Electro teammate. Under Radiance: Stellar Glimmer, the effect changes: each Cryo or Electro party member provides 20 Elemental Mastery and a 6% Stellar Glimmer reaction damage bonus.
All three recommended teams in this guide feature multiple Cryo and Electro characters, so the weapon has a natural place in these setups. The regular ATK bonus is less relevant to Mitya's EM-based reaction damage, but the Radiance effect works directly with the team's intended reaction. For accounts without the signature Catalyst, Winter's Heavy Heart is a reasonable option to consider before spending more pulls on another five-star weapon.
Best Artifact Set and Main Stats for Mitya
4-Piece Disenchantment in Deep Shadow
Disenchantment in Deep Shadow is the most specialized artifact set among the supplied build options. Its two-piece effect grants 18% ATK, while the four-piece bonus increases Superconduct reaction damage by 80% and Stellar-Conduct reaction damage by 40%. Attacking an enemy affected by either reaction also increases the wielder's CRIT Rate by 16% for that attack.
The two-piece ATK bonus isn't the main attraction here. Much of Mitya's relevant Stellar-Conduct damage scales directly with Elemental Mastery, so the reaction bonus and conditional CRIT Rate are the effects that matter most. The set fits an on-field Overloaded build particularly well, where Mitya actively spends Beacons through Gradient Detonation.
For Steady State support, the same set can improve his personal damage, but it doesn't directly increase the entire team's reaction damage. If you already have strong Elemental Mastery artifacts, compare their actual stats before replacing them with weaker Disenchantment pieces purely to complete the four-piece set.
Artifact Main Stats and Substats
- Sands: Elemental Mastery. Energy Recharge can be considered if Mitya needs his Burst every rotation and cannot maintain enough Energy.
- Goblet: Elemental Mastery, which benefits his EM-based damage and team-scaling passive.
- Circlet: CRIT Rate or CRIT DMG for personal damage. Elemental Mastery can also be useful in support-focused builds.
- Substats: Prioritize Elemental Mastery and a balanced CRIT ratio, with enough Energy Recharge for the rotation you intend to use.
His passive increases the team's Base Stellar-Conduct damage by 0.028% for every point of his own Elemental Mastery, up to a maximum 14% increase. That particular bonus reaches its cap at 500 Elemental Mastery. Reaching 500 EM does not mean additional EM becomes useless, since Mitya's personal reaction-related attacks can still scale with the stat.
CRIT Rate also needs careful handling. Creating Beacons grants Mitya 5% CRIT Rate per stack, up to 20%, and Disenchantment in Deep Shadow can provide another conditional 16%. Those bonuses should be considered alongside weapon stats and artifact substats rather than blindly stacking as much displayed CRIT Rate as possible. Burst-focused setups also need more Energy Recharge than support rotations that use only his tapped Skill.
Best Mitya Teams and How to Play Them
All three recommended teams use Cryo and Electro characters to generate Stellar-Conduct reactions, but they assign damage and field time differently. The first team focuses more directly on Mitya's own Gradient Detonation damage, while the other two let him support a Cryo-centered reaction damage dealer.
Team 1: Mitya + Odette + Sucrose + Valeriy
Recommended role: On-field Stellar-Conduct DPS Mitya.
This lineup gives Mitya several useful forms of support without asking him to remain on-field for an entire rotation. Odette supplies Cryo application through her Solo Dance Double and contributes Stellar-Conduct damage and reaction buffs. Sucrose adds crowd control and Elemental Mastery, while Valeriy provides a shield and an Offensive Directive effect that can strengthen eligible Electro attacks.
Sucrose's Elemental Mastery sharing is particularly relevant here. Her Skill or Burst can grant teammates EM equal to 20% of her own Elemental Mastery, and triggering an Electro Swirl grants additional Elemental Mastery to the matching Electro characters. Because Mitya spends Beacons in a relatively short window, these timed buffs can be prepared before he starts attacking.
Valeriy needs more attention than a simple Skill-and-swap support. His Elemental Skill grants 40 Impact Momentum and creates his Supercharged Shield. Once he has at least 40 Momentum, his special Charged Attack consumes the resource and provides 15 Offensive Directive stacks. These stacks are then used when the active character deals qualifying Electro damage, including Stellar-Conduct damage while the relevant Radiance state is active.
Suggested rotation:
- Start with Valeriy's Elemental Skill to apply Electro, gain Impact Momentum, and create his shield. Use his special Charged Attack to activate Offensive Directive, then his Burst if available.
- Switch to Sucrose and use her Elemental Skill to Swirl Electro and apply her Elemental Mastery buffs. Her Burst can be added when its crowd control is useful.
- Use Odette's Elemental Skill to summon her Solo Dance Double. Follow with her Burst and available special Skill attack to establish Cryo application and reaction buffs.
- Switch to Mitya and hold his Elemental Skill to create Detection Core: Overloaded. Once Gradient Beacons are available, hold Charged Attack to consume them through Gradient Detonation.
- Use Mitya's Elemental Burst to create three more Beacons, then perform another Gradient Detonation. Refresh support abilities as their effects expire.
The key is giving Mitya enough Beacons to use his special Charged Attack without wasting time on ordinary Charged Attacks. His Burst directly provides three Beacons, but using it before the first available Beacon consumption can waste part of its immediate resource value. Valeriy's Offensive Directive should also be active during Mitya's damage window, not spent unnecessarily while setting up.
Team 2: Mitya + Odette + Escoffier + Sandrone
Recommended role: Steady State support Mitya, with Sandrone handling the main damage window.
This version changes Mitya from a Beacon spender into a reaction enabler and off-field contributor. Odette provides Stellar-Conduct support and additional Cryo attacks, while Sandrone uses Fagio and her Cryo damage abilities to benefit from the Polestar Field. Mitya's tapped Skill keeps his Detection Core active while another character takes the field.
Escoffier contributes healing, off-field Cryo application, and resistance reduction. Her passive reduces Hydro and Cryo RES according to the number of Hydro or Cryo characters in the party. With Odette, Escoffier, and Sandrone occupying three of the four slots, the stated reduction is 15%, not the 55% available in a four-Hydro/Cryo lineup. That distinction matters when evaluating her contribution to this team.
Sandrone brings a more involved personal rotation. Her Charged Attack summons Fagio in Decoding mode, where it fires Cryo attacks and accumulates Decoding Power. Her Skill interacts with that resource, while her Burst can consume accumulated Refined Tactics stacks for an enhanced Convective Inhibition Ray. Rather than interrupting Fagio too early, allow its relevant resource and attack sequence to develop before using Sandrone's finishing abilities.
Suggested rotation: Open with Mitya's tapped Elemental Skill, then use Escoffier's tapped Skill for off-field Cryo application. Use her Burst when healing is needed or before the main damage window. Bring in Odette to summon her Dance Double and apply her Burst and special Skill effects. Switch to Sandrone, deploy Fagio through her Charged Attack, build Decoding Power, and use her Skill and Burst when their relevant resource conditions are met.
Mitya's Burst is optional in this support sequence. It can immediately create three Beacons and help establish his Steady State EM buff, but it also costs field time and 60 Energy. If maintaining his Burst forces you to sacrifice too much Elemental Mastery or delay Sandrone's attacks, using his tapped Skill alone is a simpler approach.
Team 3: Mitya + Qiqi + Yae Miko + Sandrone
Recommended role: Off-field Stellar-Conduct support with sustained healing and dual damage sources.
Replacing Odette and Escoffier with Qiqi and Yae Miko changes the team's balance. Qiqi handles healing and contributes Cryo application, while Yae Miko's Sesshou Sakura attacks provide off-field Electro damage. Sandrone remains the main field-time investment, supported by Mitya's Steady State Core.
Qiqi has a particularly relevant passive for this setup. While her Herald of Frost is active, Radiance: Stellar-Conduct can increase Superconduct and Stellar-Conduct reaction damage by 50%. The Herald also follows the active character, performs Cryo attacks, and can provide coordinated Cryo damage when the active character hits an enemy. Her healing makes the team less dependent on defensive play, although her Cryo application pattern differs from Odette's persistent Dance Double.
Yae Miko contributes more than her standard three Sesshou Sakura turrets. Her updated kit includes enhanced lightning after Superconduct or Stellar-Conduct reactions, and her Radiance: Stellar-Conduct effects add further reaction-related damage while she benefits from the Polestar Field. Her three Skill charges let her establish off-field Electro attacks before Sandrone begins dealing damage.
Suggested rotation: Place Yae Miko's three Sesshou Sakura, then tap Mitya's Elemental Skill to deploy his Steady State Core. Use Qiqi's Elemental Skill to establish the Herald of Frost and provide Cryo application. Sandrone can then summon Fagio through her Charged Attack and proceed through her Decoding Power sequence, Skill, and Burst. Use Qiqi's Burst when extra healing or its Stellar-Conduct damage is useful, and refresh Yae Miko's turrets as needed.
Compared with the Odette-Escoffier-Sandrone lineup, this composition trades their specific damage buffs and resistance reduction for Qiqi's sustained healing and Yae Miko's separate Electro damage. It isn't automatically an upgrade or downgrade. Its value depends on whether your account needs more protection, whether Qiqi can maintain sufficient Cryo application for your rotation, and how much damage your Yae Miko already contributes.
Mitya's Skills and Talent Priority
Choosing Talent upgrades by role can save a substantial amount of farming. Mitya's special Charged Attack belongs to his Normal Attack Talent, Chain Reaction, while his automatic Steady State damage belongs to Principle: Variable Detection. For an on-field damage build, the priority is to strengthen the attacks that consume Gradient Beacons rather than invest equally in all three Talents from the start.
Chain Reaction: Normal Attack
Mitya's Normal Attack has three Electro hits, but its most relevant feature for an Overloaded build is Gradient Detonation. With an Overloaded Detection Core active, his Charged Attack becomes a Stamina-free attack that consumes Gradient Beacons for Stellar-Conduct damage. This makes Normal Attack Talent levels important for a build centered on his personal Beacon spending.
Principle: Variable Detection: Elemental Skill
The Elemental Skill has a 15-second cooldown and creates a Detection Core lasting 20 seconds. At Talent Level 10, the initial tapped and held Skill multipliers are 163.3% and 233.3%, respectively. Steady State Core damage is 129.6%, while its Beacon consumption damage is 164.2% Elemental Mastery and its final detonation is 187.2% Elemental Mastery per Beacon in the supplied beta values.
For support Mitya, this is the Talent that directly supports his sustained off-field damage. The Core's mode also determines whether he shares Elemental Mastery through Steady State or gains the faster Beacon generation associated with Overloaded mode.
Analysis: Gradient Theory: Elemental Burst
Mitya's Burst deals AoE Electro damage and immediately generates three Gradient Beacons. At Talent Level 10, its listed multiplier is 600.5% ATK plus 1201% Elemental Mastery. The ability has a 15-second cooldown and costs 60 Energy.
For on-field Mitya, its greatest value is providing another set of Beacons after an initial Gradient Detonation. For support Mitya, it can accelerate Beacon accumulation, but isn't always necessary to maintain the Core's function. That difference affects both the Talent's upgrade priority and the amount of Energy Recharge his build needs.
Which Talents Should You Level First?
Normal Attack > Elemental Burst > Elemental Skill
Level Chain Reaction (Normal Attack) first if you're building Mitya as an on-field DPS. His special Charged Attack, Gradient Detonation, scales with this Talent and converts Gradient Beacons into Stellar-Conduct damage. Analysis: Gradient Theory (Elemental Burst) comes second, providing a powerful Electro hit and three Beacons to fuel another Charged Attack. Principle: Variable Detection (Elemental Skill) comes third, although it deserves higher priority in Steady State support builds, where the Detection Core handles more of Mitya's damage. If Mora is limited, focus on Normal Attack Level 8 first, then bring his Burst and Skill to Level 6 before investing further. This is a practical starting point rather than a tested damage breakpoint.
Mitya Constellations: Where Does Extra Investment Matter?
Mitya's leaked Constellations enhance both his Beacon economy and his team buffs. C1 and C2 are the most relevant early investment points to examine, while C4 and C6 add more reaction-focused damage. Some higher-Constellation conditions and numerical values have differed between beta reports, so they should not be treated as finalized pull recommendations.
- C1 – The Observer Seeking What Is Missing: Raises the Beacon limit from four to five, creates an extra Beacon when using the Elemental Skill, grants the active character 50% CRIT DMG while the Core exists, and allows Mitya to recover 10 Energy when a Beacon is created, once every eight seconds. It improves both modes and makes Burst-dependent rotations less demanding.
- C2 – The Matter That Slumbers Beyond Inertness: Adds Cryo and Electro RES reduction against enemies inside the Polestar Field. Steady State grants nearby teammates an additional 100 Elemental Mastery, while Overloaded grants the active character 200 Elemental Mastery. The RES reduction percentage has varied between reported beta revisions.
- C3 – The Knotted String of Invariant Topology: Increases Principle: Variable Detection by three levels, benefiting Mitya's Elemental Skill damage.
- C4 – The Isotopes Born of Decay: Allows Mitya's Detection Core to deal an additional AoE Electro hit equal to 400% of his Elemental Mastery for every five Beacons consumed. This damage counts as Stellar-Conduct reaction damage.
- C5 – The Periodic Law That Orders All: Increases Chain Reaction by three levels, directly benefiting the Normal Attack Talent used for Gradient Detonation.
- C6 – Elemental Transition at the Gate of Reason: Includes a reported 30% chance to refund a Beacon during applicable Core consumption, alongside a 20% Elevation bonus to nearby party members' Stellar-Conduct reaction damage. Beta revisions have also adjusted which Core mode receives the Beacon refund and the Steady State damage effect.
C1 addresses several practical needs at once: more Beacons, easier Energy management, and a direct CRIT DMG buff. C2 looks particularly relevant when Mitya is sharing field time with another Stellar-Conduct damage dealer, as it adds both resistance reduction and Elemental Mastery support. Higher Constellations lean further into damage, but their value is harder to judge without finalized multipliers and consistent team comparisons.
Mitya Ascension and Talent Materials
Mitya's leaked material list includes Vajrada Amethyst gemstones, the Chimeric enemy-drop series, Charity Talent books, and several Snezhnaya-related resources. The 168-unit Local Specialty is Crystalfold, and its confirmed name is used in the material list below.
| Upgrade | Material | Quantity |
|---|---|---|
| Level 1–90 | Mora | 2,092,600 |
| Hero's Wit / Wanderer's Advice | 418 / 3 | |
| Crystalfold | 168 | |
| Vajrada Amethyst Sliver / Fragment / Chunk / Gemstone | 1 / 9 / 9 / 6 | |
| Chimeric Core / Symbiotic Chimeric Nucleus / Prime Chimeric Nexus | 18 / 30 / 36 | |
| Shattered Stability Anchor | 46 | |
| All Three Talents, Level 1–10 | Mora | 4,957,500 |
| Teachings / Guide / Philosophies of Charity | 9 / 63 / 114 | |
| Chimeric Core / Symbiotic Chimeric Nucleus / Prime Chimeric Nexus | 18 / 66 / 93 | |
| Mask of the Virtuous Doctor | 18 | |
| Crown of Insight | 3 |
Taking Mitya to Level 90 and upgrading all three combat Talents to Level 10 requires 7,050,100 Mora according to these listed totals, excluding weapon upgrades. If you're planning to use him primarily as a Steady State support, you may not need to triple-Crown him. Prioritizing his Elemental Skill can reduce the immediate Talent-book and Mora investment, leaving more resources for the characters who will spend the most time attacking.
Crystalfold and Shattered Stability Anchor may limit how much of his character ascension can be prepared before Version 7.2. Materials already available to your account, such as the listed gemstones, enemy drops, and Talent books, are the more practical starting point.
Mitya Signature Weapon Ascension Materials
Players considering the signature Catalyst should also budget for its separate ascension materials. The current leaked weapon sheet lists the following resources to reach Level 90:
| Material | Quantity |
|---|---|
| Mora | 225,000 |
| Ethereal Glimmershard / Ethereal Crystal / Ethereal Crystalscale Stone | 15 / 23 / 27 |
| Snowborn Heartshard / Snowborn Mirrorheart / Snowborn Heart of Ignorance | 23 / 27 / 41 |
| The Frost Emperor's Revival / Ceremony / Lament / Farewell | 5 / 14 / 14 / 6 |
These are weapon ascension costs, not the complete cost of leveling the Catalyst with enhancement materials. More importantly, the weapon's name remains unconfirmed in the supplied beta information. Its passive looks well matched to Mitya, but players who already have A Thousand Floating Dreams or a suitable Winter's Heavy Heart should compare their intended team role before treating the signature weapon as a required purchase.
Is Mitya Worth Pulling in Version 7.2?
Based on his current leaked kit, Mitya looks like a promising pull for players who enjoy Stellar-Conduct teams. His ability to contribute as either a damage dealer or a support gives him some welcome flexibility, especially if you already have characters who can take advantage of his reaction buffs. For accounts that aren't invested in Cryo-Electro teams, though, he's more of a character to watch than an immediate must-pull. His final value will depend on how well those numbers hold up at release.
There's still plenty to look forward to as Version 7.2 testing continues. More Mitya leaks could give us a clearer picture of his damage potential, signature weapon, and best team combinations. For now, he's an interesting addition to the Stellar-Conduct roster, and one worth keeping an eye on as new details emerge.
Mitya FAQ
Can Mitya Work Without Odette or Yae Miko?
Yes, although the team may play differently from the example lineups. Mitya needs reliable Cryo and Electro application to keep Stellar-Conduct active, but Odette and Yae Miko are not the only characters who can provide those elements. Options such as Qiqi for healing or another off-field Electro character can fill specific gaps. Expect different reaction uptime and damage, and don't assume a lower-investment replacement will match a fully built premium team.
Can Mitya Replace Yae Miko in Wriothesley or Lohen Teams?
Possibly, but this is a change in team function rather than a guaranteed damage upgrade. Off-field Mitya offers his Steady State Core, Beacon-based Elemental Mastery support, and Stellar-Conduct conversion. Yae Miko contributes her own off-field Electro attacks. Wriothesley and Lohen teams may value those contributions differently depending on field time, Cryo application, and other buffs. Without calculations at equal investment, treat Mitya as an alternative to test, not a direct upgrade.
Can Off-Field Mitya Use Thrilling Tales of Dragon Slayers?
Yes, as a budget support option. Thrilling Tales of Dragon Slayers boosts the ATK of the character who takes the field immediately after Mitya, so switch order matters and the intended damage dealer needs to benefit from ATK. It doesn't supply Elemental Mastery to Mitya, which can reduce his own reaction damage and EM-dependent support compared with an EM weapon. Consider it for a deliberate support rotation rather than as a universal best-in-slot choice.