


Ineffa is a 5-star Electro Polearm character introduced in Genshin Impact Version 5.8, but calling her a simple off-field Electro support misses most of what makes her kit useful. Her Elemental Skill creates a shield and summons Birgitta, who stays on the field to attack enemies every 2 seconds, while Ineffa's presence converts Electro-Charged into Lunar-Charged. She can therefore cover off-field Electro application, defensive utility, reaction support, and personal damage without demanding much field time.



ATK sits at the center of her build. Her shield scales from ATK, Panoramic Permutation Protocol converts part of her ATK into Elemental Mastery for herself and the active character, and Moonsign Benediction: Assemblage Hub increases Lunar-Charged Base DMG as her ATK rises. The last passive reaches its listed maximum at 2,000 ATK, making that a useful benchmark before you start chasing smaller upgrades elsewhere.













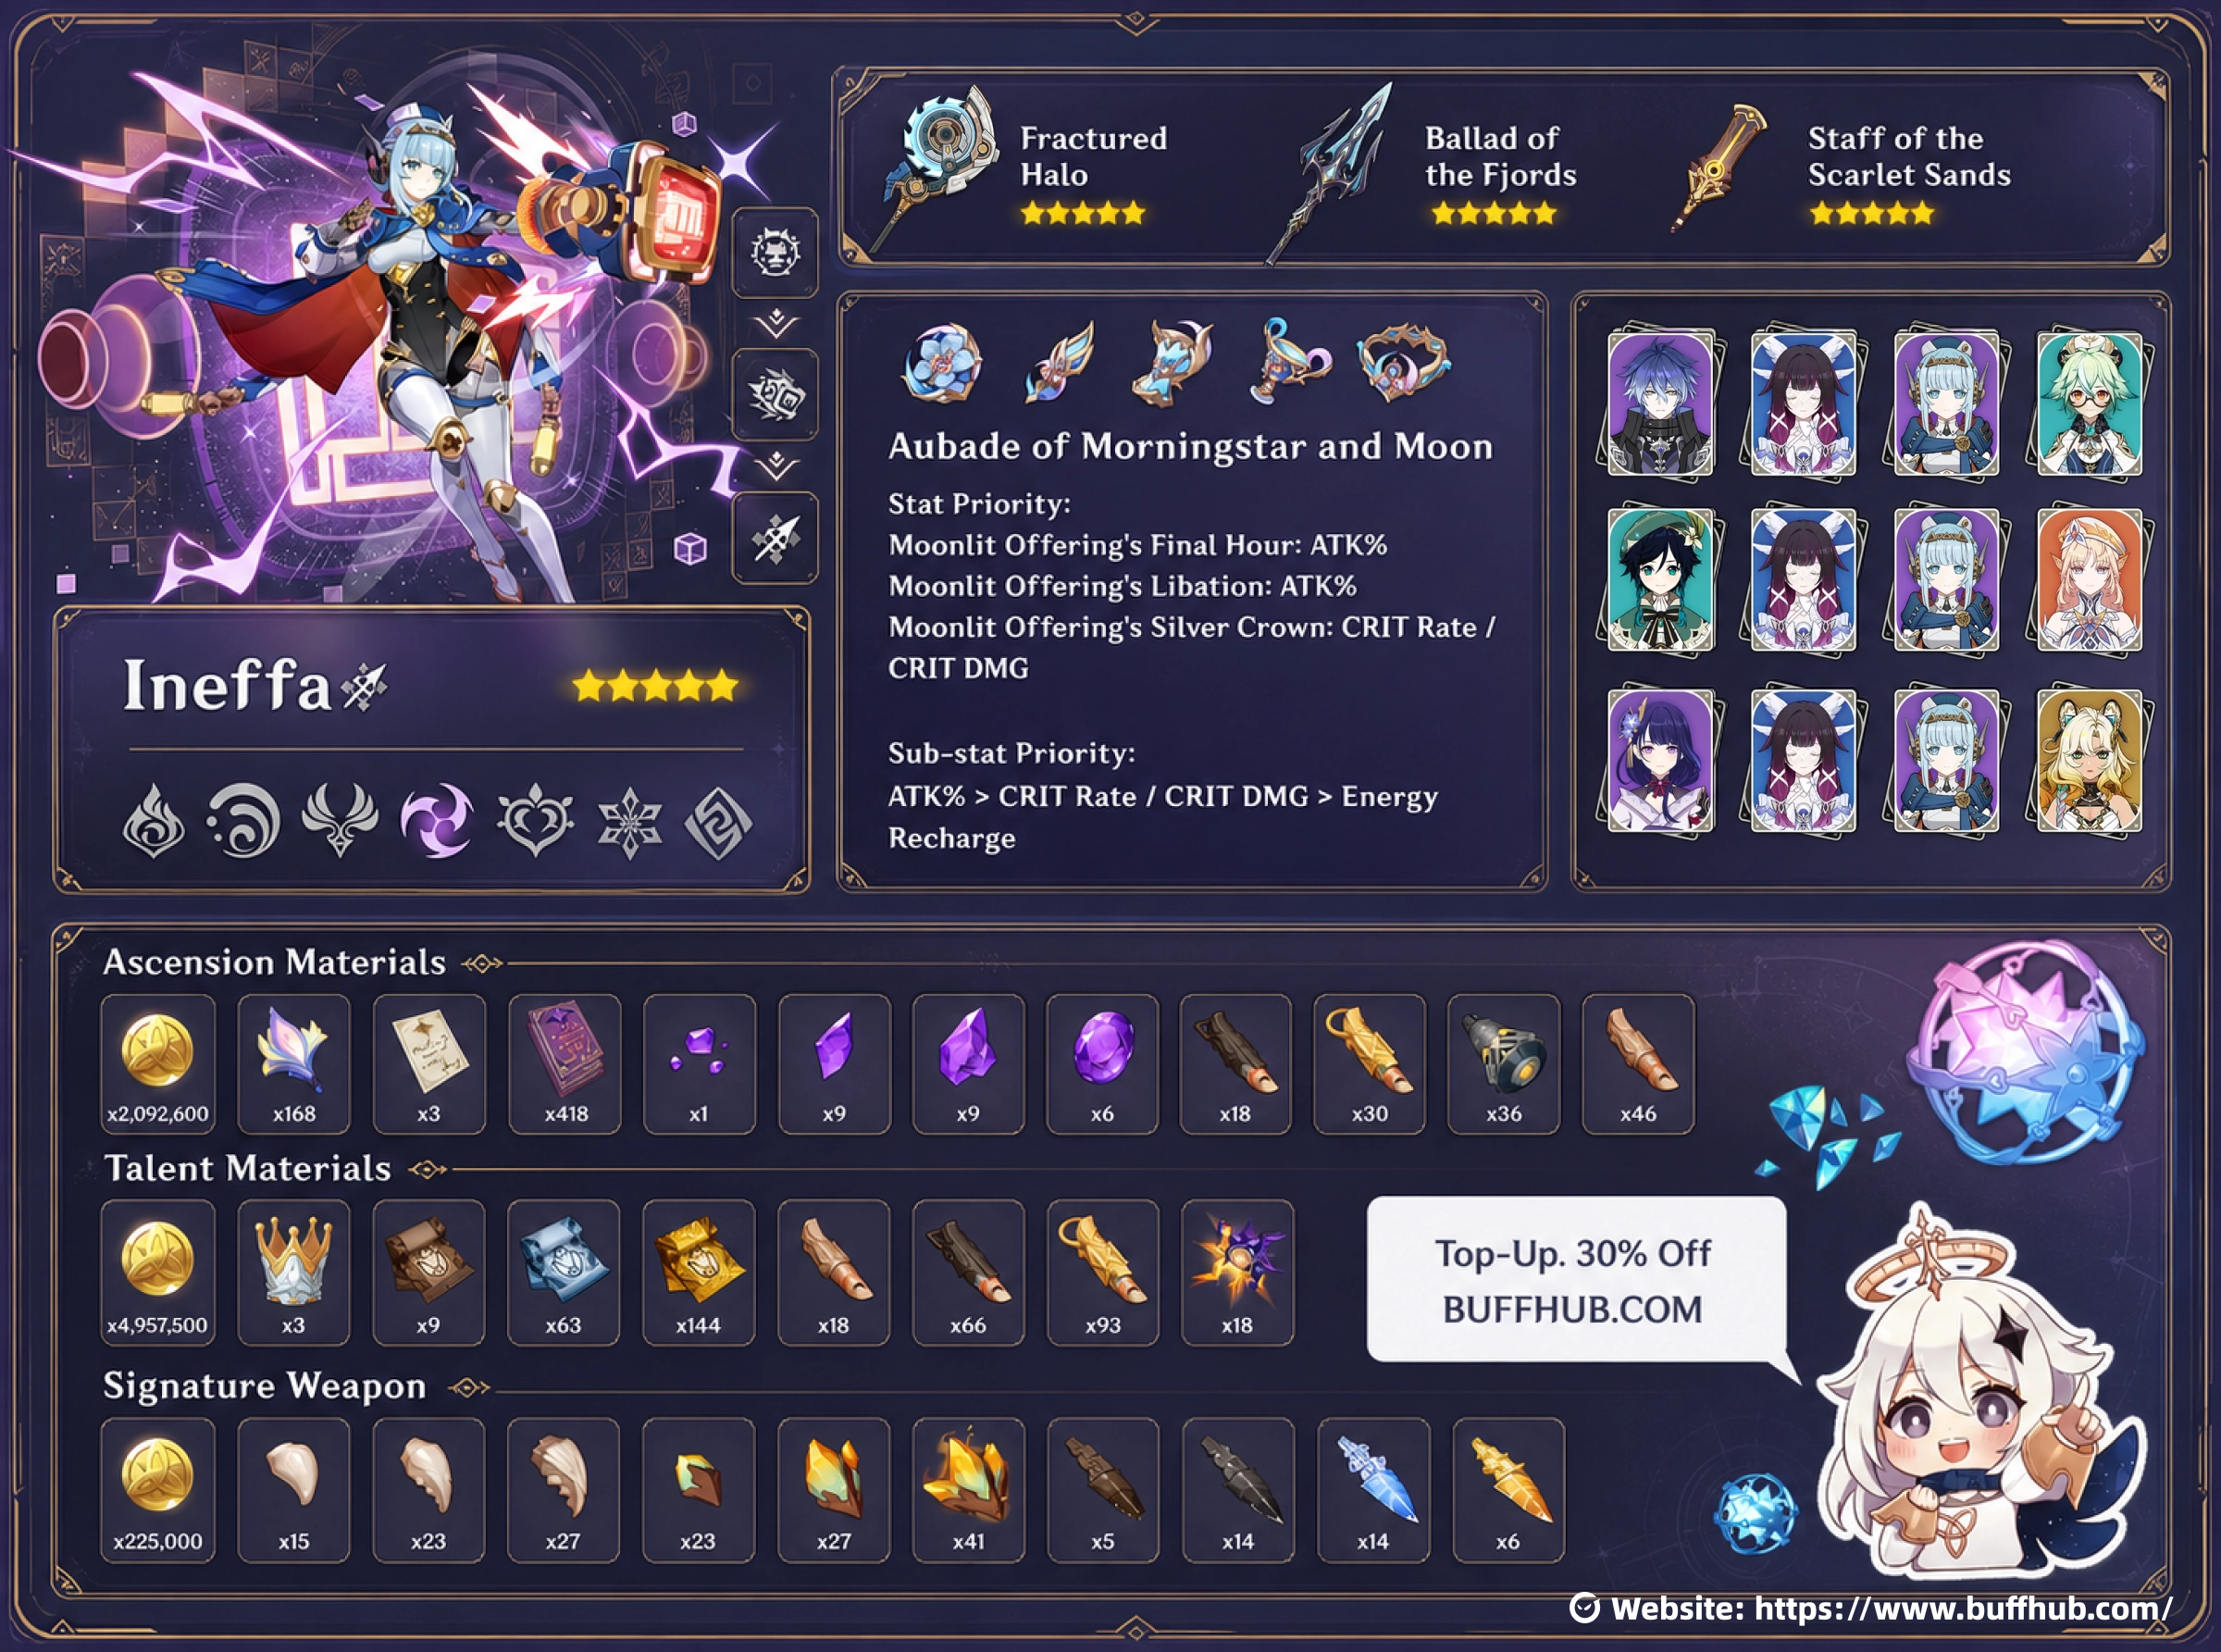
How Should You Build Ineffa?
For a general Lunar-Charged build, the cleanest setup combines plenty of ATK with a balanced CRIT ratio. At Level 90, Ineffa has 330 Base ATK and gains 19.2% CRIT Rate from Ascension, so she already starts with some help on the CRIT side. Reaching roughly 2,000 ATK is especially valuable because every 100 ATK adds 0.7% to Lunar-Charged Base DMG through Assemblage Hub, up to the 14% cap.
| Build Category | Recommendation |
|---|---|
| Role | Off-field Electro Sub-DPS / Shielder / Lunar-Charged Support |
| Best Weapon | Fractured Halo |
| 4-Star Alternative | Ballad of the Fjords |
| 5-Star Alternative | Staff of the Scarlet Sands |
| Recommended Artifact Set | 4-Piece Aubade of Morningstar and Moon |
| Sands | ATK% |
| Goblet | ATK% |
| Circlet | CRIT Rate / CRIT DMG |
| Sub-stat Priority | ATK% > CRIT Rate / CRIT DMG > Energy Recharge |
| Talent Priority | Elemental Skill > Elemental Burst > Normal Attack |
| Lv. 90 Base HP | 12,613 |
| Lv. 90 Base ATK | 330 |
| Lv. 90 Base DEF | 828 |
| Ascension Stat | 19.2% CRIT Rate |
Once you are around that ATK benchmark, CRIT becomes more attractive for improving her personal damage and Lunar-Charged output. Energy Recharge still has value because Supreme Instruction: Cyclonic Exterminator costs 60 Energy, but there is little reason to sacrifice a strong ATK and CRIT build just to stack ER. Her Burst is useful, yet much of her regular contribution continues through Birgitta and her Elemental Skill.
What Are Her Best Weapons?

Fractured Halo is the weapon built most directly around Ineffa's job in a Lunar-Charged team. At Level 90 it provides 608 Base ATK and 66.2% CRIT DMG, then gives 24% ATK for 20 seconds after using an Elemental Skill or Burst at R1. Creating a shield while that effect is active grants Electrifying Edict for 20 seconds, increasing Lunar-Charged DMG dealt by all nearby party members by 40%.
| Weapon | Lv. 90 Stats | Why It Works |
|---|---|---|
| Fractured Halo | 608 ATK, 66.2% CRIT DMG | Raises ATK and directly gives the entire nearby party 40% more Lunar-Charged DMG after its shield condition is met. |
| Ballad of the Fjords | 510 ATK, 27.6% CRIT Rate | Provides an easy CRIT stat and 120 Elemental Mastery at R1 when the party contains at least three different Elemental Types. |
| Staff of the Scarlet Sands | 542 ATK, 44.1% CRIT Rate | Offers a large CRIT Rate stat and converts Elemental Mastery into bonus ATK, with additional ATK available after Elemental Skill hits. |
The signature is especially comfortable because its requirements already match what she wants to do. Cleaning Mode: Carrier Frequency both uses an Elemental Skill and creates the Optical Flow Shield Barrier, so you do not need to invent an awkward rotation just to make the weapon relevant. Its party-wide Lunar-Charged bonus is also something the alternatives cannot reproduce.
Ballad of the Fjords is the practical lower-rarity choice from the options here. All three recommended teams below contain at least three Elemental Types, so its R1 condition for 120 Elemental Mastery is naturally satisfied. Its lower Base ATK makes reaching the ATK benchmark a little more demanding, but 27.6% CRIT Rate can make artifact balancing much easier.
Staff of the Scarlet Sands takes a different route. The 44.1% CRIT Rate is excellent for stabilizing her ratio, while the passive converts 52% of Elemental Mastery into bonus ATK at R1 and can add further ATK through Elemental Skill hits. If you already have it leveled, it gives her several useful stats at once, although Fractured Halo remains the more specialized weapon for supporting Lunar-Charged teams.
Why Does Aubade of Morningstar and Moon Fit Her?
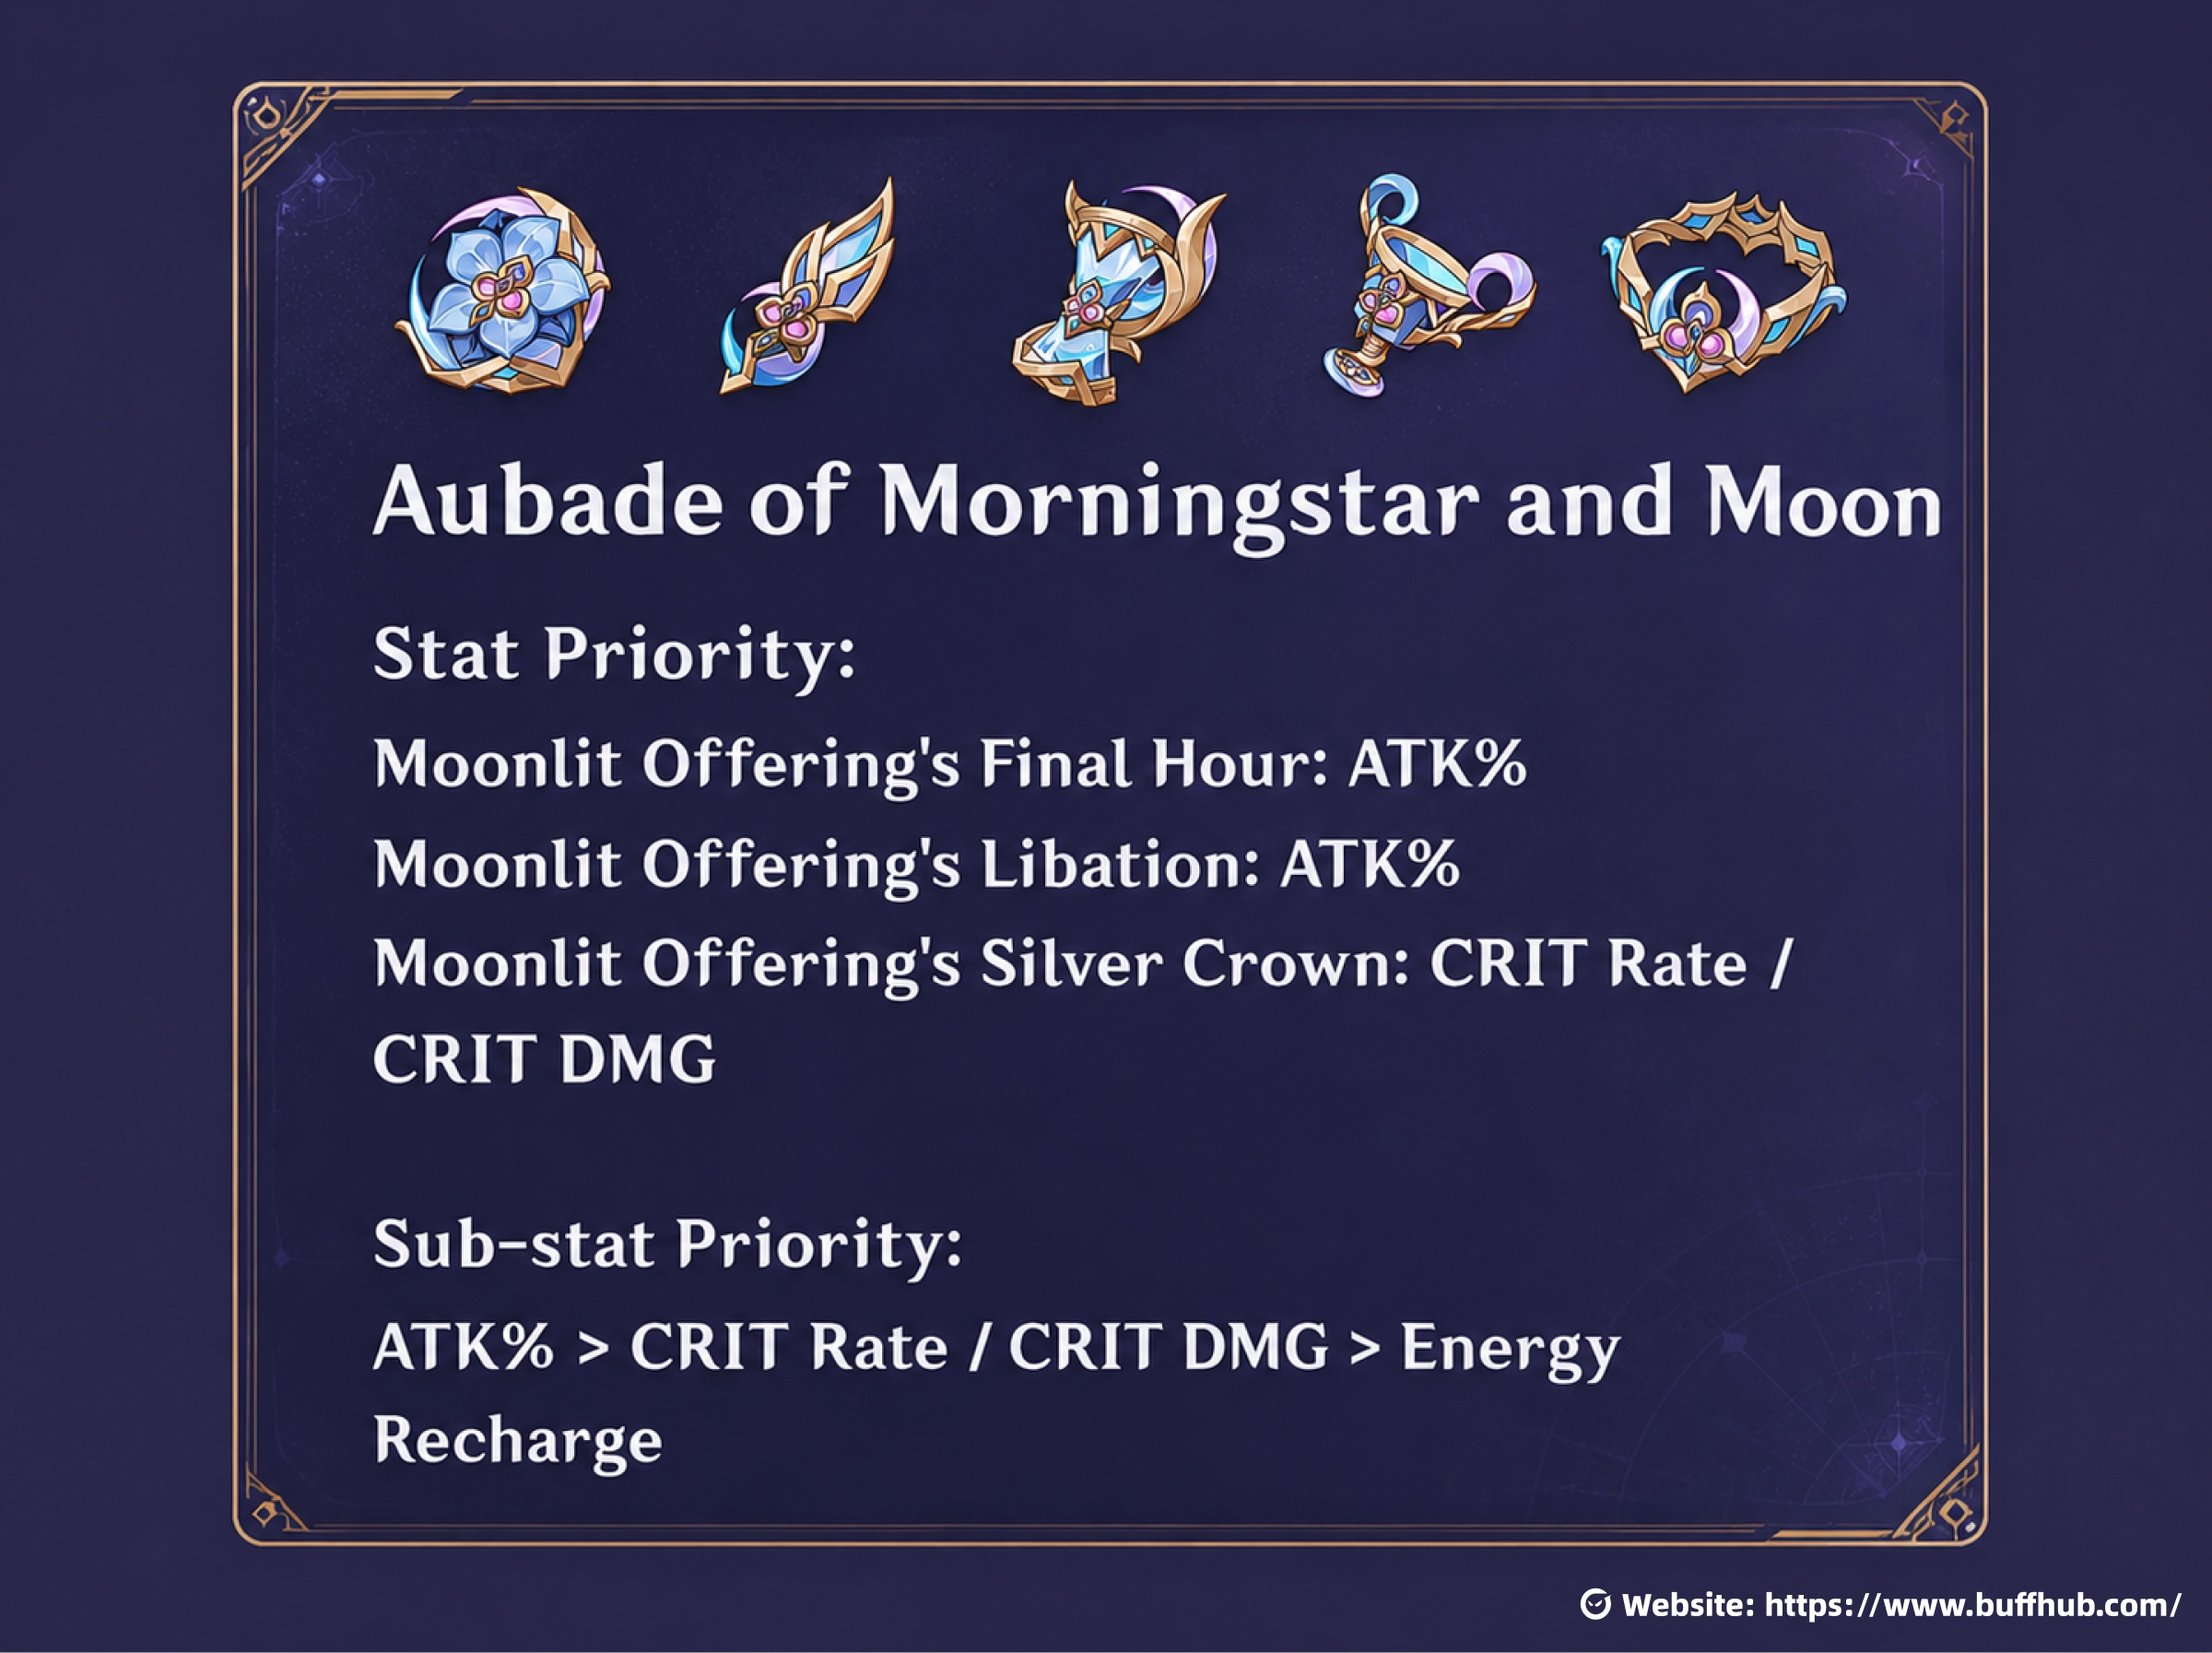
Aubade of Morningstar and Moon suits Ineffa because most of her work happens after she has left the field. The 2-piece set gives 80 Elemental Mastery, while the 4-piece bonus increases Lunar Reaction DMG by 20% when the wearer is off-field. If the party reaches at least Moonsign: Ascendant Gleam, that Lunar Reaction bonus gains another 40%, and the effect only disappears after the wearer has remained active for 3 seconds.
That condition matches Birgitta particularly well. Ineffa can set up her shield and summon, use her Burst when needed, then hand the field to another character while Birgitta continues attacking from off-field. You are not being asked to keep her on-screen to maintain the artifact bonus, which is exactly what you want from a character whose support and damage can continue after swapping out.
- Moonlit Offering's Final Hour: ATK%
- Moonlit Offering's Libation: ATK%
- Moonlit Offering's Silver Crown: CRIT Rate or CRIT DMG
- Sub-stats: ATK% > CRIT Rate / CRIT DMG > Energy Recharge
Double ATK% main stats may look unusual beside a reaction-focused set, but they line up with several parts of her kit at the same time. At 2,000 ATK, Assemblage Hub reaches its 14% Lunar-Charged Base DMG cap, while Panoramic Permutation Protocol gives Ineffa and the active character 120 Elemental Mastery after her Burst. More ATK also strengthens the Optical Flow Shield Barrier, so those rolls are doing more than simply padding her personal damage.
Which Talents Should You Level First?
Cleaning Mode: Carrier Frequency deserves the first investment because it handles the parts of Ineffa's kit you use most consistently. The Skill deals Electro damage, creates her ATK-scaling shield, and summons Birgitta for 20 seconds. At Talent Level 10, the shield absorbs damage equal to 398.1% of her ATK plus 3,051, while each Birgitta Discharge has a 172.8% multiplier.
Supreme Instruction: Cyclonic Exterminator comes next. Its Level 10 multiplier reaches 1,218.2%, and using it re-summons Birgitta at the target location while resetting her duration. More importantly for team support, casting the Burst activates Parameter Permutation for 20 seconds, giving both Ineffa and the active character Elemental Mastery equal to 6% of her ATK.
- 1st: Cleaning Mode: Carrier Frequency — Elemental Skill
- 2nd: Supreme Instruction: Cyclonic Exterminator — Elemental Burst
- 3rd: Cyclonic Duster — Normal Attack
Cyclonic Duster can stay at a low level on a normal support or Sub-DPS build because there is little reason to keep Ineffa on-field performing regular spear strings. Her Skill and Burst already let her establish the shield, Birgitta, Lunar-Charged support, and EM buff before swapping away. If materials are limited, pushing those two talents first gives much more practical value than spreading resources evenly across all three.
How Do Birgitta and Lunar-Charged Work Together?
Birgitta is what lets Ineffa keep contributing without occupying the field. After being summoned by either Skill or Burst, the assistant moves toward nearby enemies and performs a Discharge every 2 seconds, dealing AoE Electro DMG. Only one Birgitta summoned by Ineffa can exist at a time, and using the Burst while she is already present moves her to the target and resets her duration.
The Lunar-Charged interaction goes a step further. With Ineffa in the party, Electro-Charged reactions are converted into Lunar-Charged, and Assemblage Hub increases their Base DMG according to her ATK. If a Lunar-Charged thundercloud is nearby when Birgitta performs a Discharge, Overclocking Circuit adds another AoE Electro attack equal to 65% of Ineffa's ATK, and that extra hit counts as Lunar-Charged DMG.
In practice, her field time should stay short. Get the Optical Flow Shield Barrier and Birgitta running, use the Burst before your main damage window when you want Parameter Permutation active, then swap to the character who actually wants the field. Recasting the Burst later also refreshes Birgitta's duration, so there is no need to bring Ineffa out just to perform normal attacks.
- Use Cleaning Mode: Carrier Frequency to create the shield and summon Birgitta.
- Use Supreme Instruction: Cyclonic Exterminator when you want its damage, EM buff, and Birgitta duration refresh.
- Set up the rest of your Hydro, Anemo, Geo, or other team support.
- Switch to your main on-field character and let Birgitta continue applying Electro from off-field.
- Refresh Ineffa's Skill and Burst as their effects expire instead of keeping her on-field longer than necessary.
What Are Her Best Teams?
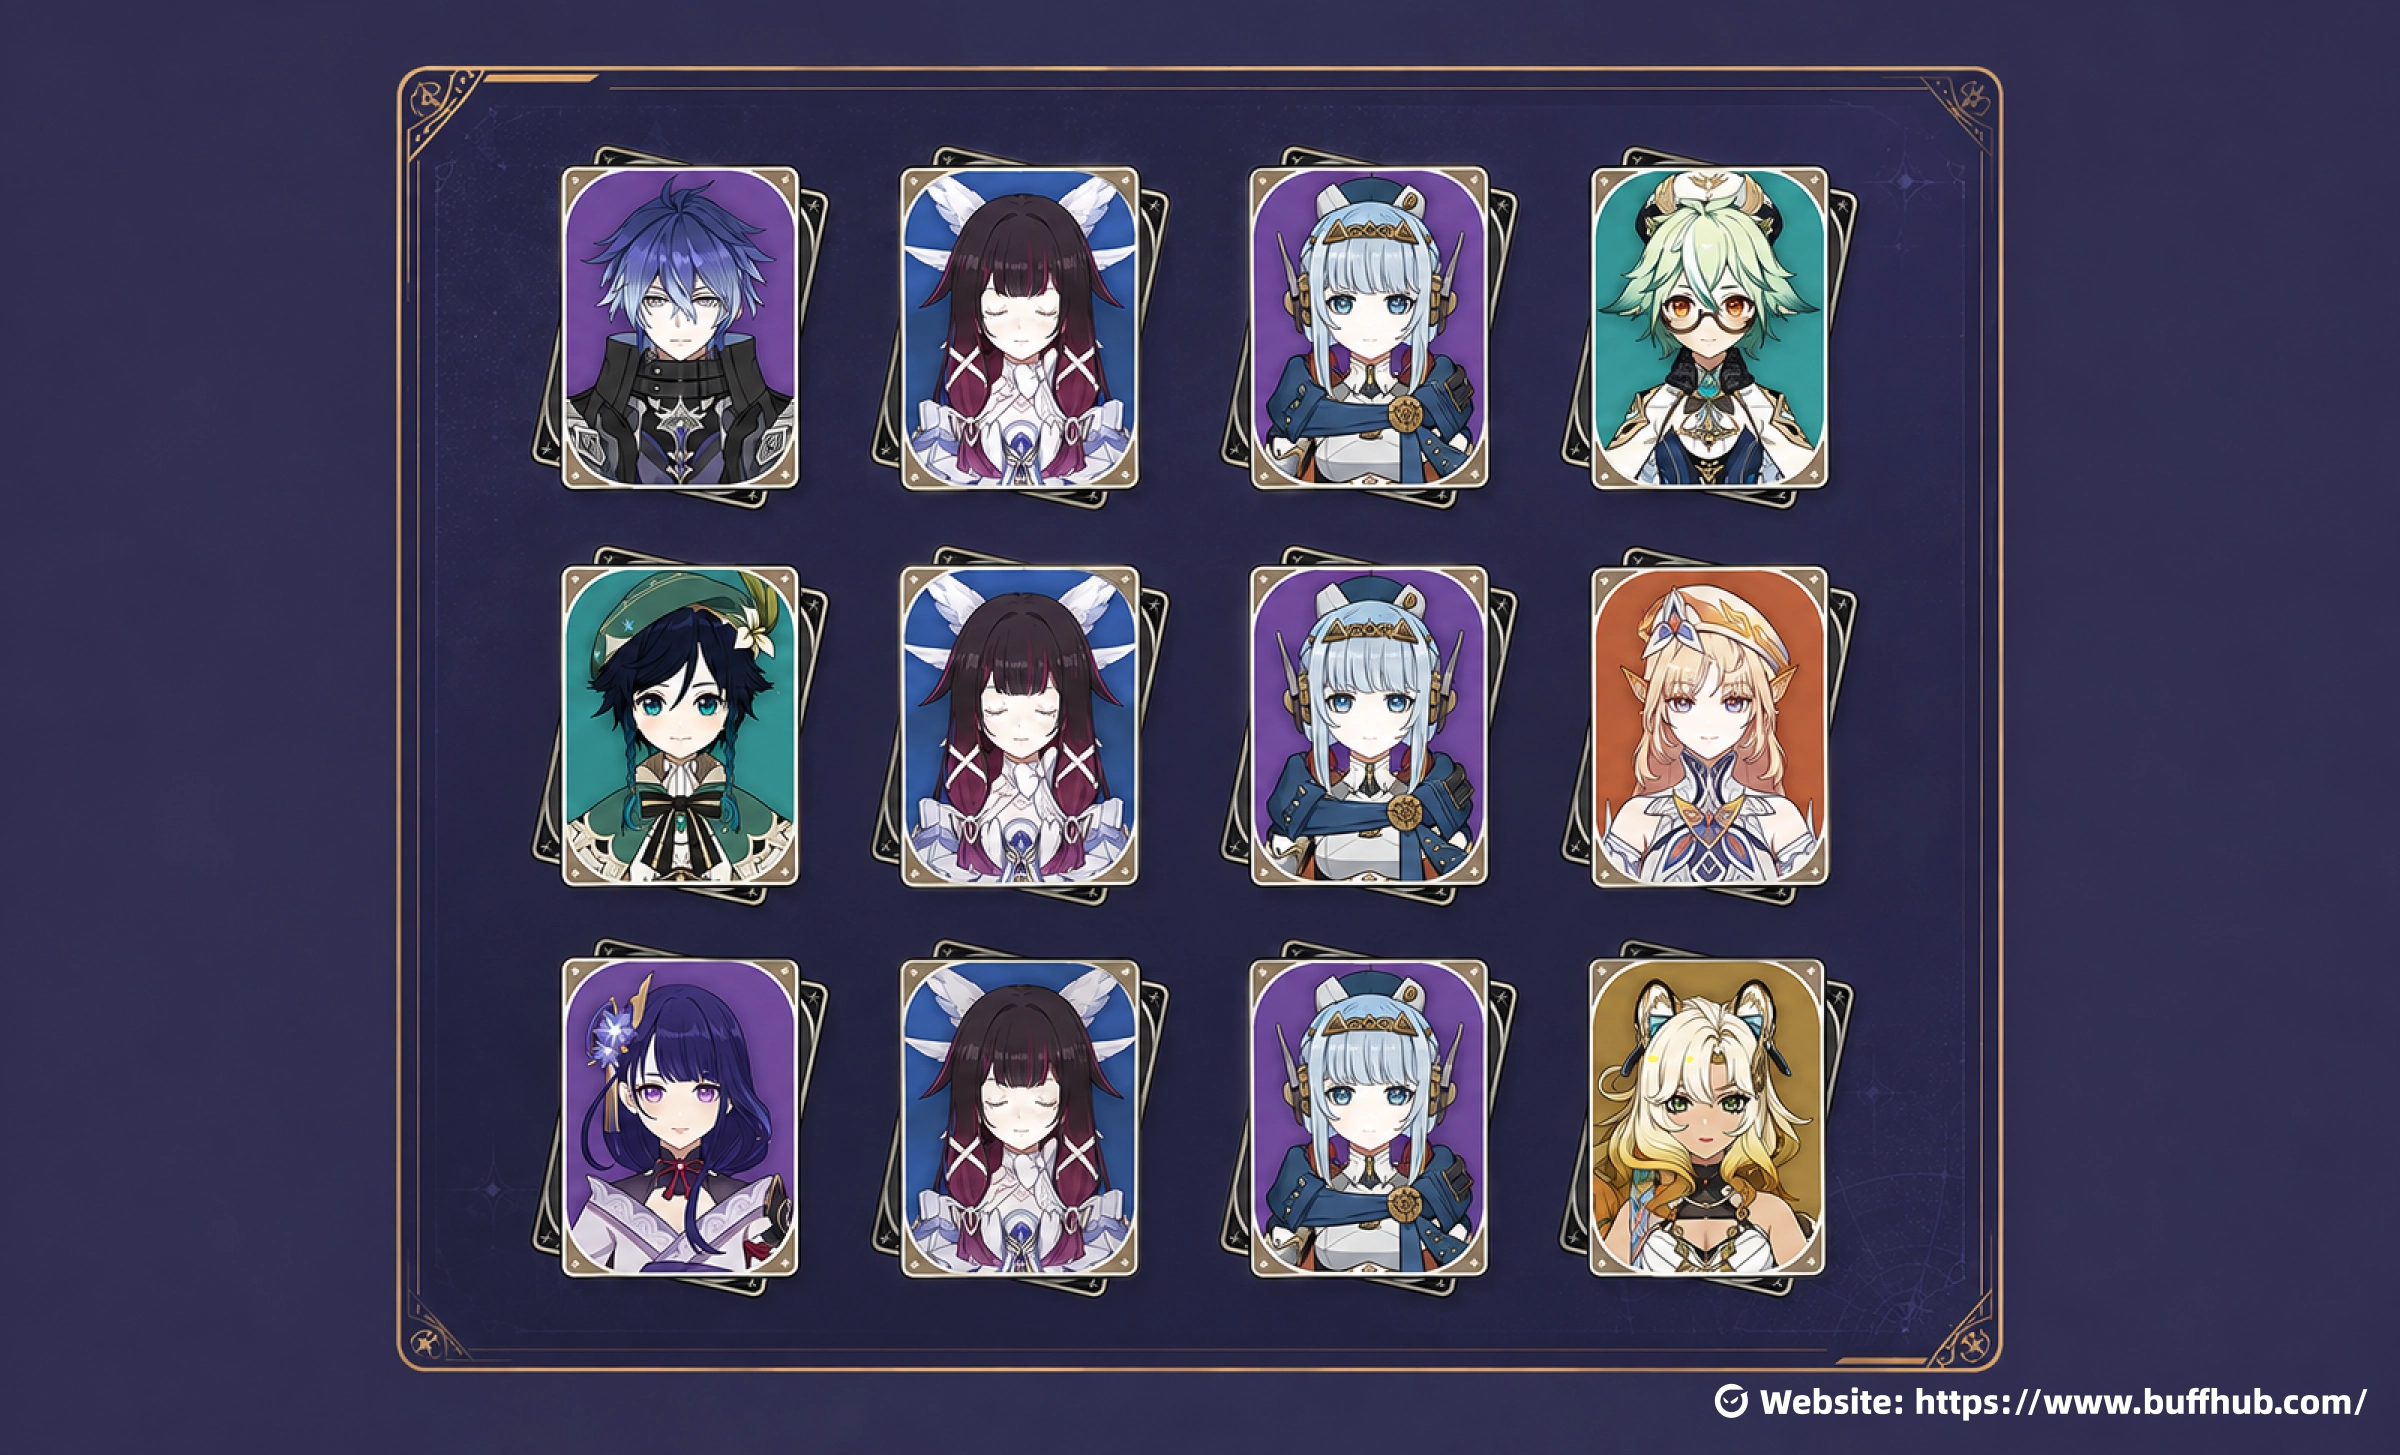
Every recommended lineup here is built around keeping Hydro and Electro available so Ineffa can support Lunar-Charged while another character takes most of the field time. Columbina appears in all three because Gravity Ripple follows the active character while applying Hydro, and her Lunar Domain raises Lunar Reaction DMG. Her own Moonsign Benediction also increases the party's Moonsign by one level, which works naturally with Ineffa's matching Moonsign increase.
- Team 1 — Flins + Columbina + Ineffa + Sucrose: The most direct Lunar-Charged setup of the three. Flins is built around Lunar-Charged damage and raises the party's Moonsign by another level, while Columbina supplies Hydro and Lunar Reaction support. Ineffa keeps Birgitta and her shield active from off-field, and Sucrose can group enemies while sharing Elemental Mastery through Catalyst Conversion and Mollis Favonius.
- Team 2 — Venti + Columbina + Ineffa + Nicole: A more utility-heavy setup. Venti's Wind's Grand Ode groups enemies and can absorb Hydro or Electro, while Nicole supplies an ATK buff, a shield, and Arcane Projection coordinated attacks through her Skill and Burst. Ineffa remains the off-field Electro source and Lunar-Charged enabler while Columbina keeps Hydro and Lunar Domain available.
- Team 3 — Raiden Shogun + Columbina + Ineffa + Xilonen: Raiden takes the active damage slot while her Eye of Stormy Judgment adds coordinated Electro attacks and her Burst restores Energy to nearby party members. Xilonen can activate Source Samples for the team's Electro and Hydro characters, reducing the corresponding Elemental RES, and her Burst heals the active character when at least two Source Samples have changed Element. Ineffa and Columbina maintain the Lunar-Charged side of the team while Raiden handles the main field window.
The first team has the clearest focus because Flins himself is designed to deal Lunar-Charged damage, so the support from both Ineffa and Columbina feeds directly into his kit. The Venti setup trades that dedicated Lunar-Charged carry for grouping and Nicole's ATK-based support, while the Raiden version brings stronger Energy utility and a familiar on-field Electro damage pattern. None of the three require Ineffa to stay active for long, which is exactly where her kit is most comfortable.
Which Constellations Matter Most?
Ineffa is functional at C0 because her shield, Birgitta, Lunar-Charged conversion, Moonsign increase, and EM buff are all part of her base kit. Her constellations mostly push those same jobs harder rather than fixing a missing mechanic. The early upgrades are particularly easy to understand because C1 strengthens Lunar-Charged directly and C2 adds another damage instance while expanding her shielding support.
- C1 — Rectifying Processor: Activating the Optical Flow Shield Barrier gives the party Carrier Flow Composite for 20 seconds. Lunar-Charged DMG increases by 2.5% for every 100 ATK Ineffa has, up to 50%, so the effect reaches its listed cap at 2,000 ATK.
- C2 — Support Cleaning Module: Her Burst applies Punishment Edict, which later deals AoE Electro DMG equal to 300% of her ATK and counts as Lunar-Charged DMG. Casting the Burst also gives nearby party members Optical Flow Shield Barriers.
- C4 — The Edictless Path: Lunar-Charged reactions triggered by the party restore 5 Energy, with a 4-second cooldown between triggers.
- C6 — A Dawning Morn for You: While Carrier Flow Composite is active, thundercloud lightning can trigger an additional attack equal to 135% of Ineffa's ATK. It counts as Lunar-Charged DMG and can occur once every 3.5 seconds.
C3 and C5 are simpler talent-level upgrades to her Skill and Burst, respectively. If you are looking for an early stopping point, C1 is the most direct upgrade to the reaction-focused role she already performs, while C2 adds both damage and extra defensive utility. The later constellations keep improving the same Lunar-Charged engine, but they ask for much heavier investment than her base kit needs to function.
What Materials Do You Need for Ineffa and Fractured Halo?

Character Ascension, talents, and the signature weapon all use different farming groups, so planning them together saves a lot of backtracking. The talent total below assumes all three combat talents go from Level 1 to Level 10, even though a normal build does not need that level of investment in Cyclonic Duster. If resources are limited, finish her level and Elemental Skill first, then work on the Burst before spending Crowns on the Normal Attack.
| Upgrade | Materials Required |
|---|---|
| Ineffa Lv. 1-90 | 2,092,600 Mora; 168 Glowing Hornshroom; 3 Wanderer's Advice; 418 Hero's Wit; 1 Vajrada Amethyst Sliver; 9 Vajrada Amethyst Fragment; 9 Vajrada Amethyst Chunk; 6 Vajrada Amethyst Gemstone; 18 Sentry's Wooden Whistle; 30 Warrior's Metal Whistle; 36 Saurian-Crowned Warrior's Golden Whistle; 46 Secret Source Airflow Accumulator |
| All Three Talents Lv. 1-10 | 4,957,500 Mora; 3 Crown of Insight; 9 Teachings of Conflict; 63 Guide to Conflict; 114 Philosophies of Conflict; 18 Sentry's Wooden Whistle; 66 Warrior's Metal Whistle; 93 Saurian-Crowned Warrior's Golden Whistle; 18 Eroded Sunfire |
| Fractured Halo Lv. 1-90 | 225,000 Mora; 15 Juvenile Fang; 23 Seasoned Fang; 27 Tyrant's Fang; 23 Cold-Cracked Shellshard; 27 Warm Back-Shell; 41 Blazing Prismshell; 5 Blazing Sacrificial Heart's Terror; 14 Blazing Sacrificial Heart's Hesitance; 14 Blazing Sacrificial Heart's Resolve; 6 Blazing Sacrificial Heart's Splendor |
Her character level deserves more attention than the Normal Attack talent because Lunar-Charged is one of the main reasons to build her in the first place. The expensive part comes if you decide to raise both Ineffa and Fractured Halo at the same time, since the weapon adds another full set of ascension drops and 225,000 Mora to the farming plan. If you already have Ballad of the Fjords or Staff of the Scarlet Sands ready to use, finishing the character herself before committing to another weapon grind is the more efficient route.
Ineffa Build FAQ
Why Does She Want So Much ATK?
ATK affects several parts of her kit instead of only increasing raw damage. Her shield scales from ATK, Panoramic Permutation Protocol converts 6% of ATK into Elemental Mastery for Ineffa and the active character, and Assemblage Hub raises Lunar-Charged Base DMG by 0.7% per 100 ATK. At 2,000 ATK, the latter reaches its 14% maximum and her Burst-based EM buff provides 120 Elemental Mastery.
Does She Need to Stay On-Field?
No. Birgitta continues operating after Ineffa leaves the field, and Aubade of Morningstar and Moon specifically rewards off-field Lunar Reaction damage. Her normal pattern is to set up the shield and Birgitta, use the Burst when needed for its damage and EM buff, then switch to the team's main on-field character.
Is Fractured Halo Required?
No. Fractured Halo gives the cleanest package because it combines CRIT DMG, ATK, and a 40% party-wide Lunar-Charged DMG bonus at R1, but the other listed Polearms are still usable. Ballad of the Fjords supplies CRIT Rate and 120 Elemental Mastery in teams with at least three Elemental Types, while Staff of the Scarlet Sands turns Elemental Mastery into more ATK and gives a much larger CRIT Rate stat.
Which Team Should You Start With?
Flins + Columbina + Ineffa + Sucrose is the most directly focused Lunar-Charged team of the three recommendations. Flins and Ineffa both raise the party's Moonsign, Columbina provides Hydro and Lunar Reaction support, and Sucrose adds grouping and Elemental Mastery sharing. The Raiden and Venti variants are better considered alternative structures when you want their specific Energy, grouping, healing, or support tools instead.