

Iroi is a 5-star Anima Survival / Healing character who brings healing, Bonus ATK support, Anima damage, and a rare revive-style safety tool into one kit. She is not a basic healer who only tops up HP bars. Her value comes from how she keeps the team alive while also creating better damage windows through Imagination, Regression, healing-based buffs, and team utility.



For players looking for the best Iroi build, the goal is simple: make her healing stable, keep her support effects active, and give her enough ATK to scale both her sustain and team buffs. She works best in teams that want a safer rotation, especially Anima-heavy squads or carry teams that can get punished during long burst windows.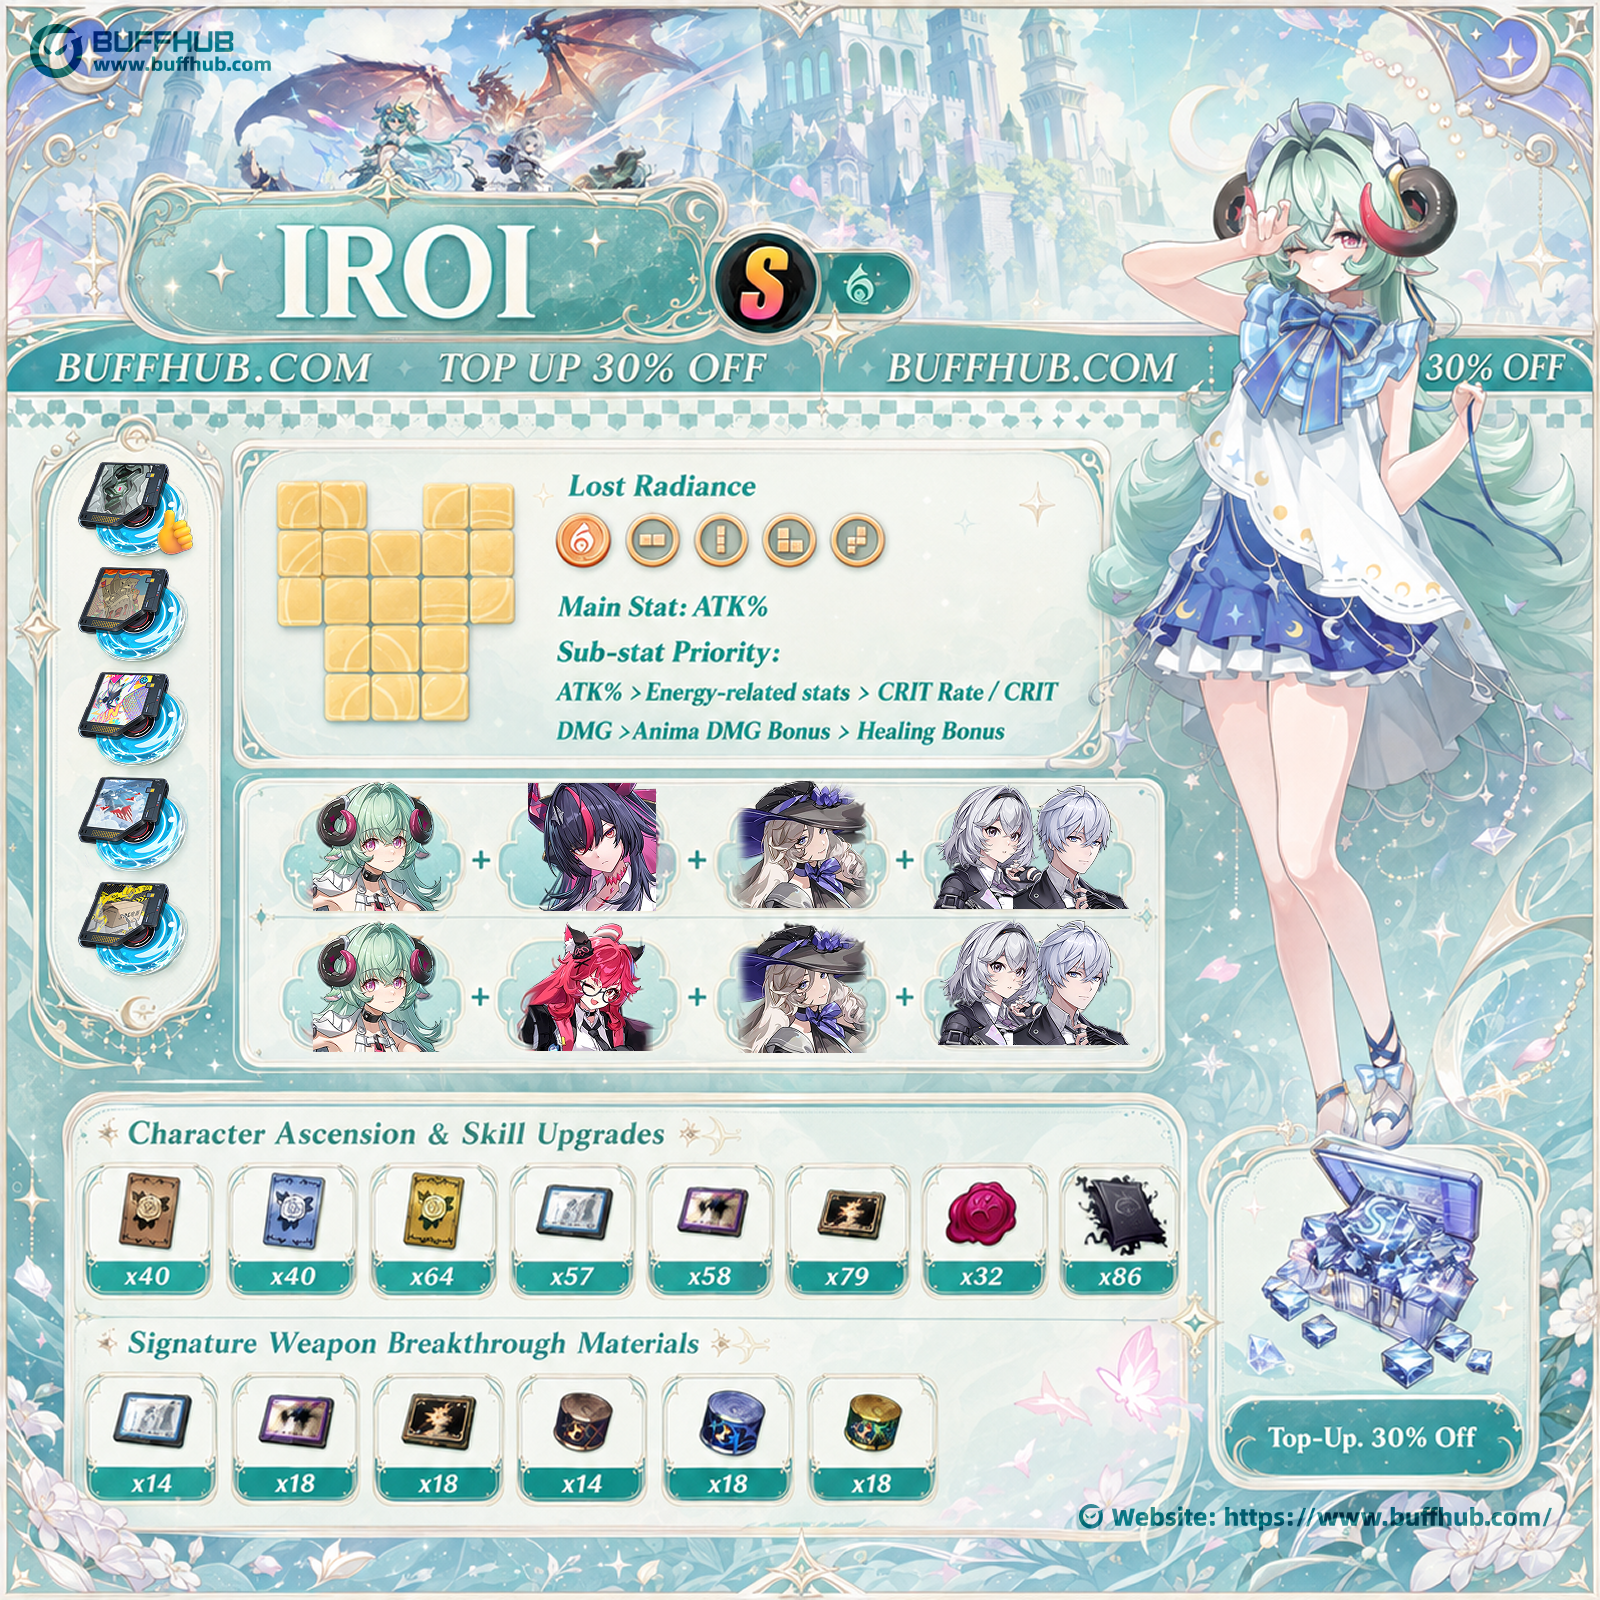








Who is Iroi and What is Their Playstyle?
Iroi is an Anima support healer who focuses on keeping the whole squad alive while adding useful offensive support. She deals Anima DMG, heals allies, grants an Bonus ATK based on her ATK, and can trigger a team-wide DEF Ignore when she provides healing. This gives her a much higher ceiling than a normal defensive support.
Her playstyle revolves around building Imagination through attacks and skills, then using that resource to unlock stronger effects during combat. When played well, she helps the team survive enemy pressure while still contributing to the team's damage plan. She is especially useful in harder fights where a squishy carry may need protection during a burst window.
The other major part of her kit is Regression. This mechanic gives the team a backup layer when allies fall in combat. Instead of simply losing a character, the fallen ally can enter Regression and later be temporarily brought back during her stronger Ultimate field. In real gameplay, this makes her feel like a safety net for risky teams.
At Lv.80, her base stats are shown below.
| Stat | Value |
|---|---|
| Base HP | 17,210 |
| Base ATK | 596 |
| Base DEF | 909 |
| CRIT Rate | 5% |
| CRIT DMG | 50% |
The most important stat here is Base ATK. Her healing and Bonus ATK support both scale with ATK, so building ATK improves more than one part of her kit. This is why her best builds usually lean toward ATK first, then add energy, CRIT, or healing stats based on what the team needs.
How Do Iroi's Skills Work?
Iroi's skill kit looks complex at first, but the core flow is easy to understand. She builds Imagination, spends it on stronger Basic Attack branches, and uses it to power up her Ultimate. Her best gameplay pattern is not about staying on-field forever. Instead, she should enter the rotation, heal and buff the team, build enough Imagination, then use her Ultimate at the right moment.
Basic Attack: Collaboration
Collaboration is her Basic Attack. She summons lambs to perform up to five consecutive attacks, dealing Anima DMG. These attacks also help her build Imagination when they hit, which means even her normal attack chain has value when she needs to prepare her Ultimate field.
Her Basic Attack also has several branches. Daydream is triggered by holding Basic Attack and consumes Imagination to charge up, unleashing up to three stages depending on the charge level. After Daydream, she can hold Basic Attack again to trigger Lucid Dream, which spends Imagination to summon Morpheus for sustained fire. These branches are important because they give her more Anima pressure when she has field time.
She also has a plunge attack called Wakey-Wakey. It deals area Anima damage after she lands, and the damage increases based on fall height, up to 100% more damage. After a Critical Dodge, she can trigger Reflexive Response, a counterattack that deals Anima damage, reduces Break, and builds more Imagination.
| Basic Attack Detail | Lv.10 Value |
|---|---|
| Fifth Basic Attack hit | 38.8% x3 |
| Daydream branch 1 | 209.1% x3 |
| Daydream branch 2 | 125.5% |
| Daydream branch 3 | 188.3% |
| Critical Riposte | 267.9% |
Redirect Skill: Future Self Continuity
Future Self Continuity is the center of her support kit. When tapped, it activates Self-Identity Extension, healing the whole team once and granting Bonus ATK based on her ATK. It also summons lambs to attack independently, pull in targets within range, and deal additional damage based on her Base ATK for each ally in Regression. This makes the skill both defensive and offensive at the same time.
The tap version is what players will use often during normal rotations. It keeps the team healthy, refreshes her Bonus ATK support value, and helps prepare her Ultimate. Since her healing can also trigger the Sympathetic Nerves passive, this skill can turn into a small team damage window instead of being only a recovery button.
The hold version creates dreamlike illusions while in combat, causing three allies to enter Regression and assist in battle. This state is automatically removed after leaving combat. Her kit also has a built-in safety rule: fallen allies enter Regression while she is active and in combat. When any fallen ally enters this state, she builds Imagination. In practice, this means she can help the team recover from mistakes that would normally end the run.
| Redirect Skill Effect | Lv.10 Value |
|---|---|
| Morpheus Attack Ratio | 359.8% |
| Icelos Attack Ratio | 34.2% x7 |
| Phantasos Attack Ratio | 199.9% |
| ATK Buff Ratio | 15% |
| Healing Ratio | 158.8% |
Ultimate: 3.8-Billion-Year Mirage
3.8-Billion-Year Mirage is her strongest survival tool and one of the main reasons to build around her. The Ultimate costs 100 Energy and changes depending on how much Imagination she has when it is cast.
If Imagination has not reached the required threshold, she opens the Dream of the Horned Gate. This version focuses on continuously healing all allies. It is still useful as a defensive tool, but it does not unlock the full value of her kit.
If Imagination has reached the threshold, she opens the Dream of the Ivory Gate. This version provides continuous team healing while also dealing damage over time to enemies inside the dream. During this stronger field, the player can press and hold the avatar icon of one character in Regression to revive that ally and restore some HP. Only one character can be revived during each dream field.
The revive is not a full permanent reset. The dream continuously consumes Imagination, and when Imagination is depleted, the dream ends. Revived characters then return to Regression. That means the mechanic is best used as a clutch recovery tool or a way to finish a key burst window after a teammate has fallen.
During the Ultimate effect, Imagination cannot be built up. However, Daydream and Lucid Dream do not consume Imagination during this period. This creates a useful window where she can keep attacking without draining the resource faster.
| Ultimate Effect | Lv.10 Value |
|---|---|
| Post-Cast Healing Ratio | 198.5% |
| Continuous Healing Ratio | 63.5% |
| Healing Duration | 8s |
| Post-Cast DMG Ratio | 799.6% |
| DoT Ratio | 115.9% |
| Ultimate Energy Cost | 100 |
Support Skill: Bang!
Bang! lets her pick up Morpheus and attack forward, dealing one hit of Anima DMG, heal the whole team, and building Imagination. It is a simple but valuable support action because it gives both sustain and resource generation. At Lv.10, the damage ratio is 539.7%.
Important Passives
Mirror Image enhances Blossom Enhancement by generating a Vita Bud copy when the current Vita Bud disappears. This copy cannot generate another copy. This gives her extra passive value through the Vita Bud system, though the exact impact will depend on the team and encounter.
Sympathetic Nerves is more important for combat. When she heals an ally, she grants the team additional DEF Ignore for a short duration. The exact value is Currently unknown, but the effect type is already strong because DEF Ignore can improve team damage during support windows.
Best Iroi Rotation
A strong Iroi rotation should start by setting up her support value before the main damage dealer enters their burst window. In most fights, use her Redirect Skill early to heal, grant Bonus ATK, and build Imagination. If the team needs Regression setup, use the hold version before the fight becomes dangerous.
After that, use Basic Attacks or her available support actions to keep building Imagination. When Imagination is high enough, cast her Ultimate during a dangerous enemy phase or right before your team wants to push damage. If an ally is already in Regression, use the stronger dream field to temporarily revive them at the right moment.
During her Ultimate, take advantage of the fact that Daydream and Lucid Dream do not consume Imagination. This lets her keep pressure on the enemy while maintaining the dream field. Once the field ends, return to the normal support loop and refresh her Redirect Skill when needed.
What is the Best Weapon for Iroi?
The best weapon for Iroi is her 5-star Liquid weapon, Wrong Door. The official English name may need final confirmation if the game uses a different localized name, but based on the provided data, this is clearly her best-in-slot option.
Best-in-Slot: Wrong Door
| Weapon | Rarity | Lv.80 ATK | Sub-stat | Effect |
|---|---|---|---|---|
| Wrong Door | 5-star | 570 | ATK Bonus 30% | ATK +16%. When the wearer heals, their Anima DMG +30%, and other teammates gain Universal DMG +15% for 20s. Re-triggering refreshes the duration. |
Wrong Door fits her kit almost perfectly. It gives high base ATK, an ATK Bonus sub-stat, more personal Anima damage after healing, and a teamwide Universal DMG buff. Since she heals often, she can refresh the weapon effect naturally during the normal rotation.
This weapon also supports both sides of her role. The ATK helps her healing and Bonus ATK support, while the Anima damage bonus improves her own damage from Basic Attack branches, Redirect Skill, Support Skill, and Ultimate. The Universal DMG buff makes it even better in teams where Nanally, Jiuyuan, Shinku, or Zero are doing the main damage.
Best Budget and F2P Options
Clear Skies is the cleanest lower-rarity option from the provided weapons. It has ATK Bonus 25% and increases Anima DMG from the wearer's Redirect Skill and Ultimate by 20%. Since those are important parts of her kit, this weapon works well if you do not have her signature.
Mind Royale is another useful option if the main problem is Ultimate uptime. It grants 10 Ultimate Energy when the wearer casts a Redirect Skill, up to once every 20 seconds. Her Ultimate costs 100 Energy, so this effect can make her rotation smoother in longer fights.
Call of the Twisted City can work for a pure healing build because it gives Healing Bonus 12% after casting Redirect Skill. However, its HP Bonus sub-stat is less ideal because her key support scaling comes from ATK. Use it only if your team mainly needs more comfort.
Real Music is a 3-star starter option with ATK Bonus 20% and Redirect Skill DMG +12%. It is usable early, but it should be replaced once you get a stronger 4-star or 5-star Liquid weapon.
Some weapons should be treated with caution. Youthful Fantasy focuses on Chaos DMG, which does not match her Anima kit. Fluff of Fleetness can work for an on-field damage experiment, but its stacking effect wants the wearer to stay active, which is not ideal for a support build. Shiny Days is more Break-focused and does not support her healing and ATK-scaling identity as cleanly.
Which Gear and Stats Maximize Iroi's Damage?
The best gear set from the provided data is Fireflies and the Forest. It supports her Anima damage while also giving strong CRIT DMG scaling when the team keeps applying Anima hits.
Best Set: Fireflies and the Forest
| Set | Effect |
|---|---|
| 2-piece | Anima DMG +10% |
| 4-piece | When a nearby enemy takes Anima DMG from the team, the wearer gains CRIT DMG +8%, up to 7 stacks. Each stack lasts 10s. The effect remains active off-field. |
At full stacks, Fireflies and the Forest gives up to 56% CRIT DMG. This is a strong bonus for her because she can deal Anima damage through several parts of her kit. It also works well when paired with Anima teammates such as Nanally and Jiuyuan, since they can help keep the set active.
For stats, ATK% should be the main priority because it improves her healing and Bonus ATK support while also raising her own damage. After ATK, energy-related stats are useful if available, especially because her Ultimate costs 100 Energy. If the team already survives well, CRIT Rate and CRIT DMG become better for improving her personal damage.
Anima DMG Bonus is also valuable for a more offensive setup. Healing Bonus should be considered when the team needs more comfort, but it is not always the best choice if you are trying to balance healing and damage support. HP and DEF are only comfort stats and should not be prioritized over ATK unless survival is a real issue.
Recommended Stat Priority
| Priority | Stat | Reason |
|---|---|---|
| 1 | ATK% | Improves healing, Bonus ATK scaling, and personal damage. |
| 2 | Energy-related stats | Helps with her 100-cost Ultimate if the stat is available. |
| 3 | CRIT Rate / CRIT DMG | Improves personal Anima damage when survival is already stable. |
| 4 | Anima DMG Bonus | Boosts her Anima attacks if the gear slot allows it. |
| 5 | Healing Bonus | Useful for a pure safety build, but not always needed. |
The provided console data also lists Type III Specialization, which increases ATK Bonus by 10% for each Type III Module equipped. Since her kit scales so well with ATK, Type III Modules are a strong fit if your setup can use them.
What Are the Best Team Comps for Iroi?
Iroi fits teams that want strong sustain, clean buff uptime, and a backup plan when a carry gets punished. She is not locked to one exact lineup, but the provided data points to two strong team ideas: an Anima-heavy Nanally team and a more aggressive Shinku carry team.
Team 1: Nanally + Jiuyuan + Zero + Iroi
| Character | Role | Team Value |
|---|---|---|
| Nanally | Main DPS | Anima pressure and follow-up attack damage. |
| Jiuyuan | Burst DPS / Control | Anima burst damage and Lethal Rose Pact utility. |
| Zero | Burst / Instant Cycle | Cosmos burst damage and cycle support. |
| Iroi | Support / Healer | Healing, Bonus ATK support, DEF Ignore, and revive utility. |
This is the most natural team from the provided data. Nanally brings steady Anima pressure and follow-up attacks, while Jiuyuan adds burst damage through Lethal Rose Pact. Zero gives the team extra burst and cycle value, which helps the rotation feel faster and cleaner.
Iroi ties the team together by keeping everyone alive and giving the squad better support windows. Her healing can trigger DEF Ignore, her Redirect Skill gives Bonus ATK, and her Ultimate gives the team a way to recover if a fight goes wrong. Since Nanally and Jiuyuan can help apply Anima damage, the team also has good synergy with Fireflies and the Forest.
In this comp, the usual flow is to let Nanally and Jiuyuan create pressure, rotate through Zero for burst value, then use Iroi to refresh healing, Bonus ATK support, and Imagination setup. Her Ultimate should be saved for dangerous boss patterns, failed dodges, or key damage windows where a temporary revive can keep the run alive.
Team 2: Shinku + Jiuyuan + Zero + Iroi
| Character | Role | Team Value |
|---|---|---|
| Shinku | Main DPS | High-pressure carry with strong active-field damage. |
| Jiuyuan | Burst DPS / Control | Burst damage and pact utility. |
| Zero | Burst / Instant Cycle | Cosmos burst damage and cycle support. |
| Iroi | Support / Healer | Sustain, Bonus ATK support, DEF Ignore, and revive safety. |
This version is better for players who want a more aggressive carry setup. Shinku wants to stay active during her powered-up state, where she gains stronger damage, better movement, and more interruption resistance. That kind of carry window can be powerful, but it also creates risk if the player mistimes a dodge or gets hit during an enemy burst.
Iroi helps solve that problem. She gives Shinku more room to play aggressively by adding healing, Bonus ATK support, DEF Ignore, and Regression backup. Jiuyuan and Zero add more burst pressure, while the healer keeps the team stable enough to finish the rotation.
This team is a good choice if your main DPS can clear fast but sometimes feels too fragile. Instead of replacing damage with a purely defensive unit, this support gives both safety and offensive value.
What Materials Are Needed to Upgrade Iroi?
To fully raise Iroi, players need her character ascension materials, skill materials, and signature weapon materials if they also plan to build Wrong Door. The provided data includes the full material list for Lv.1 to Lv.80 and the listed skill upgrades.
Iroi Ascension Materials: Lv.1 to Lv.80
| Material | Amount |
|---|---|
| Beetle Coin | 525,000 |
| Fading Silhouette | 17 |
| Blurred Silhouette | 18 |
| Chaos Silhouette | 15 |
| A Page from Delusion's Shore | 86 |
Iroi Skill Materials
The source lists these materials for the shown skill upgrades: 1 to 10 / 1 to 10 / 1 to 10 / 1 to 10 / 1 to 5 / 1 to 2.
| Material | Amount |
|---|---|
| Dreamless Seed | 96 |
| Fons | 38,400 |
| Beetle Coin | 2,258,000 |
| Fading Silhouette | 40 |
| Blurred Silhouette | 40 |
| Chaos Silhouette | 64 |
| FNG | 40 |
| CO | 42 |
| White Rose | 65 |
| Good Boy Stamp | 35 |
Signature Weapon Ascension Materials
These are the listed materials for upgrading the signature weapon to Lv.80.
| Material | Amount |
|---|---|
| Beetle Coin | 420,000 |
| Fading Silhouette | 14 |
| Blurred Silhouette | 18 |
| Chaos Silhouette | 18 |
| Iron Appleseed | 14 |
| Silver Appleseed | 18 |
| Golden Appleseed | 18 |
Which Constellations (Awakenings) Are Worth Getting?
Iroi's Awakenings mainly improve her Imagination economy, Regression value, healing comfort, and team support. Her base kit already works as a healer-buffer, so players do not need high Awakenings just to make her playable. However, several upgrades can make her rotation smoother or give her stronger support value.
| Awakening | Effect | Value / Verdict |
|---|---|---|
| Iterated Prisoner's Dilemma | Increases Imagination gain efficiency. While Iroi is off-field, Imagination slowly regenerates. | High value. More Imagination means smoother Ultimate access and better dream-field uptime. |
| Strategy: Tit for Tat | When any ally casts a skill, she randomly summons Morpheus, Icelos, or Phantasos to assist with one attack that deals damage. Cooldown applies. | Good value. Adds extra damage and makes her more active in team rotations. |
| Trait: Cooperative | Increases healing received by allies with low HP. | Comfort pick. Useful in hard content, but not required if your team already survives well. |
| Trait: Retaliatory | Increases ATK Ratio for allies in the Regression state. | Potentially strong. Best for Regression-focused play. Exact ATK Ratio values are Currently unknown. |
| Trait: Transparent | Sympathetic Nerves gains an additional effect, increasing allies' ATK based on Iroi's Base ATK for a period of time, up to XX ATK. | Likely major support breakpoint. The current data lists the cap as XX ATK, so the final value may need to be updated. |
| Trait: Forgiving | Grants HP, Cycle Energy, and Ultimate Energy to characters revived after she casts 3.8-Billion-Year Mirage. | Excellent utility. Strong for clutch recovery and smoother post-revive rotations. Exact values are Currently unknown. |
| Primate Among All Things | Resonance Lv.3. Increases the skill level of Collaboration, Future Self Continuity, and 3.8-Billion-Year Mirage by 1. | Solid upgrade. Improves healing, damage, and Ultimate value. |
| Self-Proclaimed Crown of Creation | Resonance Lv.6. Increases allies' Crit DMG. Iroi deals additional damage for each ally in the Regression state. | High-investment upgrade. Strong, but not required for her main support role. Exact damage value is Currently unknown. |
For most players, the best practical stopping point is likely Trait: Transparent. Adding another Bonus ATK support layer to her healing-triggered passive should make her much stronger as a team buffer, even though the final cap is still listed as XX ATK in the current data.
Low spenders can stop earlier if they only want smoother Imagination generation or the extra assist attacks from Strategy: Tit for Tat. Her core healing, Bonus ATK support, Regression safety, and Ultimate utility are already available in her base kit.
Is Iroi Worth Pulling?
Yes, Iroi is worth pulling if your account needs a premium survival support. She offers whole-team healing, Bonus ATK support, a healing-triggered DEF Ignore, Anima damage, and a rare Regression mechanic that can temporarily bring a fallen teammate back into the fight during her stronger Ultimate field.
Her value is highest in teams that want safer rotations. If you play squishy carries, long burst windows, or hard content where one missed dodge can ruin a run, she gives your account more room to recover. She does not only keep the team alive; she also helps the team push damage through Bonus ATK, Anima pressure, and support effects tied to healing.
She is not a must-pull for every player, though. If your roster already has reliable sustain and you only need another pure hyper-carry, she may not be the best use of your pulls. Her personal damage is useful, but her biggest value is still survival, support, and comeback power.
The simple verdict is this: pull Iroi if you want a strong healer-buffer with unique safety tools. Skip her if your account already survives comfortably and only needs more raw DPS.
Frequently Asked Questions (FAQ)
What is the best Iroi build for support?
The best Iroi support build focuses on ATK Bonus, stable Ultimate uptime, and enough healing to keep the team safe. ATK is especially important because it improves both her healing and her Bonus ATK support. This makes ATK more valuable on her than it would be on a normal healer.
For weapons, Wrong Door is her best option because it gives ATK, Anima damage, and teamwide damage support after healing. For gear, Fireflies and the Forest is the best set from the provided data because it boosts Anima damage and can give a large CRIT DMG bonus when the team keeps dealing Anima damage.
Does Iroi need her signature weapon?
No, she does not need her signature weapon to function. Her base kit already gives healing, Bonus ATK support, Imagination generation, Regression safety, and Ultimate utility. That means she can still do her job with a lower-rarity weapon.
That said, Wrong Door is clearly her best weapon because it matches everything she wants to do. If you do not have it, Clear Skies is the best budget option for more Anima damage, while Mind Royale is better if her Ultimate uptime feels too slow.
How does Iroi's Regression revive mechanic work?
Regression is her special survival state. When allies enter Regression, they are not simply removed from her gameplay plan. During the stronger version of her Ultimate field, she can temporarily revive one Regression ally and restore HP.
This revive should be treated as a temporary comeback window, not a full permanent revive. When the dream field ends, the revived ally returns to Regression. The best use is to save a carry during a boss burst, finish an important rotation, or recover from a mistake that would otherwise end the fight.
Is Iroi only a healer, or can she deal damage?
She is mainly a healer and support, but she can still deal real Anima damage. Her Basic Attack branches, Redirect Skill, Support Skill, and Ultimate all deal Anima DMG. With ATK investment, Fireflies and the Forest, and enough CRIT stats, she can add meaningful pressure while supporting the team.
Even so, she should not usually be built like a pure main DPS. Her best role is survival support with damage utility. Build her to keep the team alive first, then add damage stats once the team feels stable.